Clay Lick Creek Pottery - Handmade In Southern Illinois

We were so fortunate to meet Karen Fiorino, the creative artist behind Clay Lick Creek Pottery. Her ceramics studio is nestled in a cabin-like building on her property, nestled among the tress and gorgeous surroundings of the Shawnee National Forest. She creates every single piece by hand - no molds are used here, then each piece is also hand painted. Some items are made in smaller series, and some of her creations are available year-round. She uses her natural surrounds to inspire her art, and I am very excited to share them with you today.

More About Karen

I’ve been creating functional pottery for about 20 years, starting with a few classes in ceramics on the advice of a good friend who informed me, “To take real classes in pottery and use the opportunity of subsidized courses working at the University gave me”. Thus started my journey in clay. I fell in love with the process, bought a wheel, paid off the truck and quit my job to pursue a life of art. I sell my pottery at various local and regional art fairs to sell my work, and am well received in these markets. — January 2010 marked my beginning opening my shop on Etsy and having the whole world have a peek of my work.

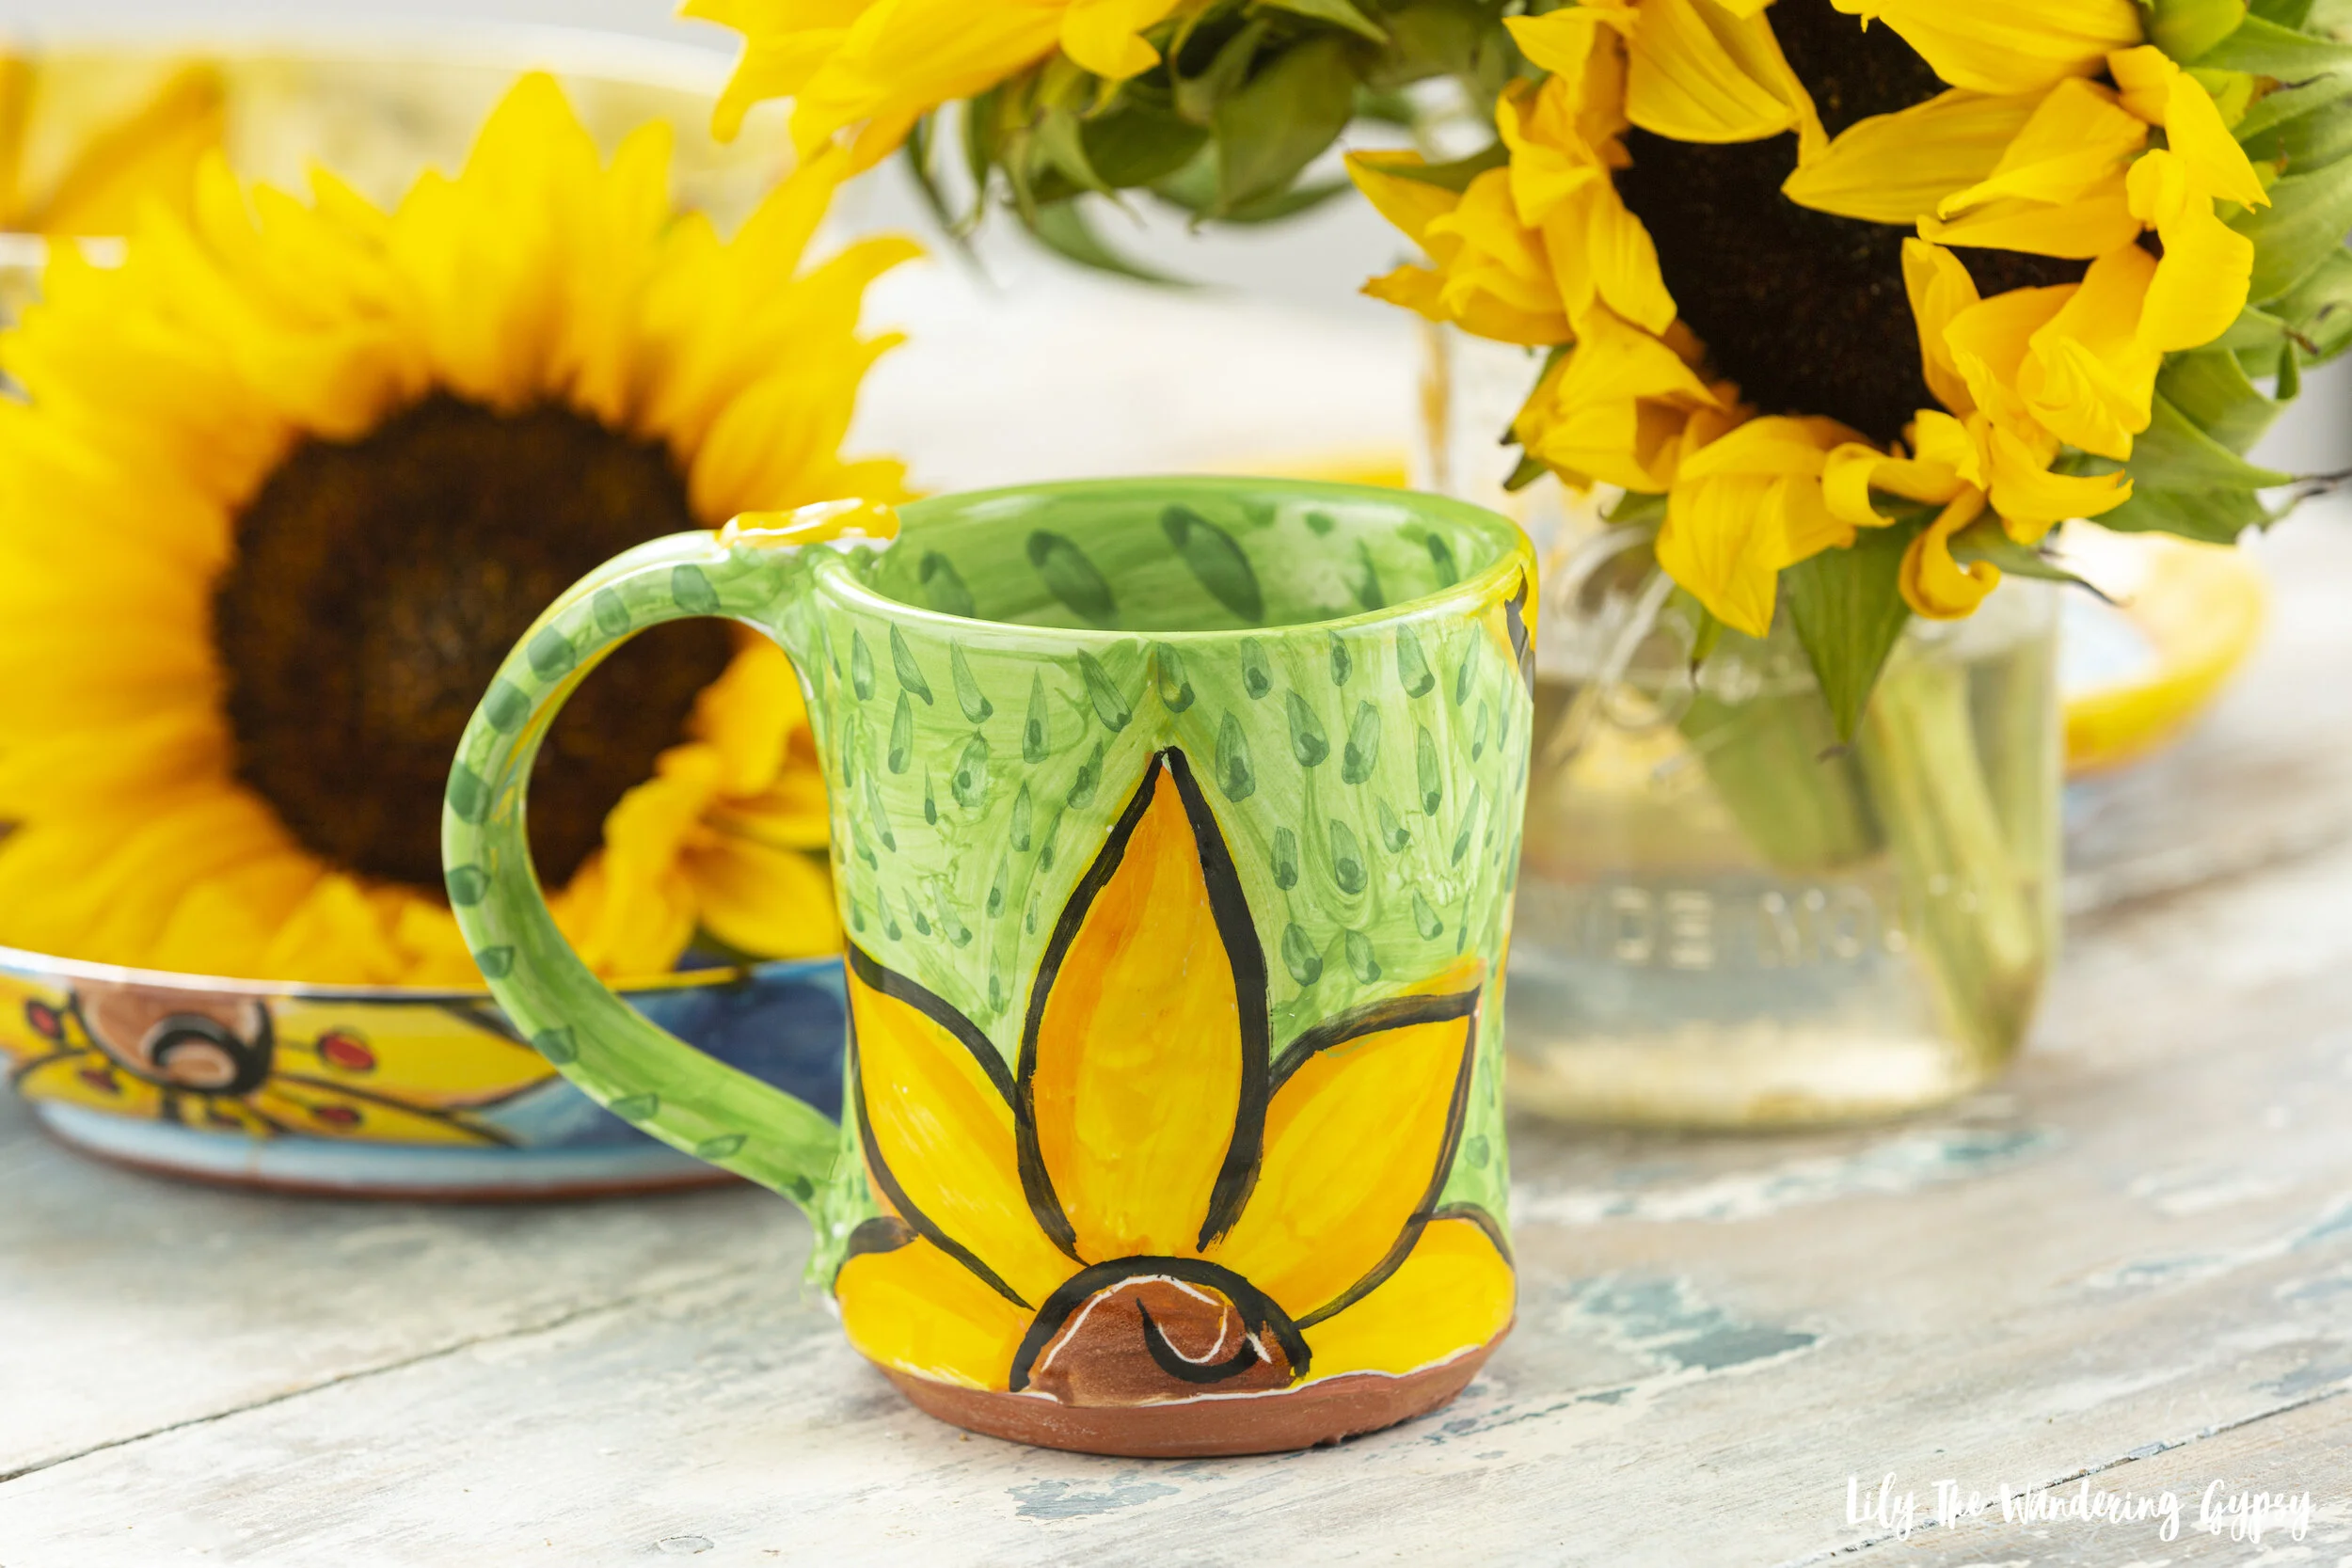
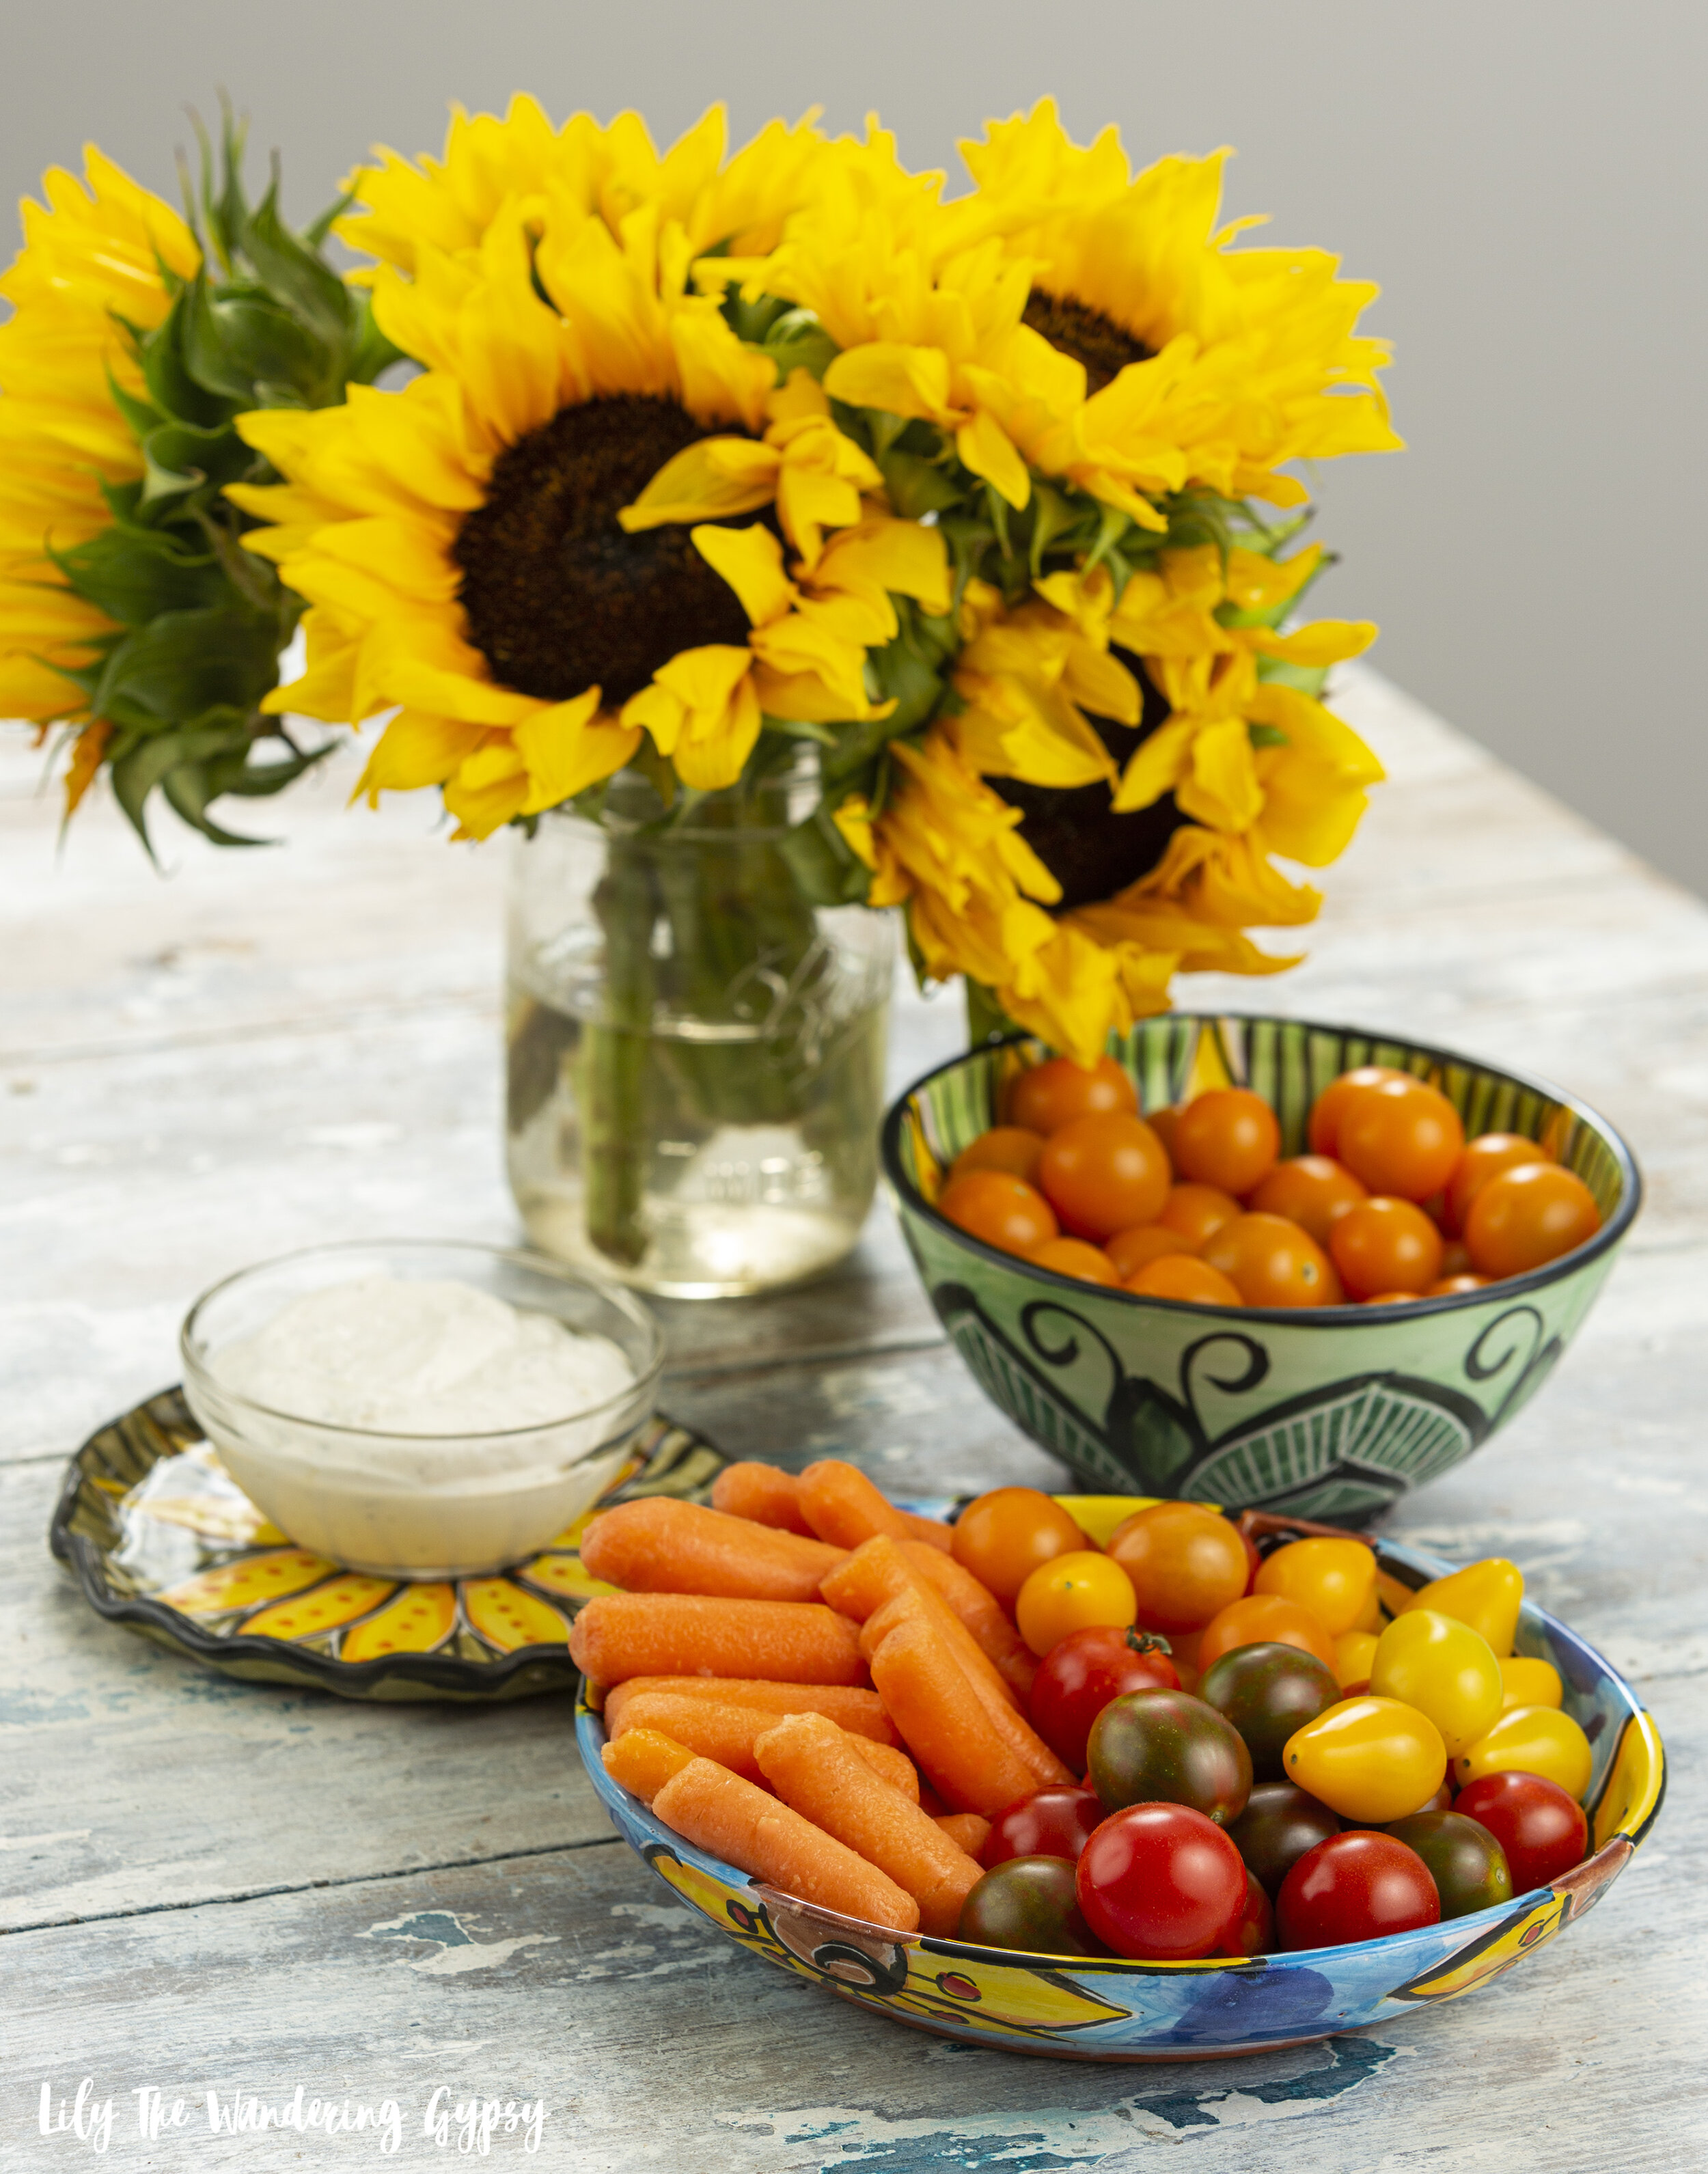
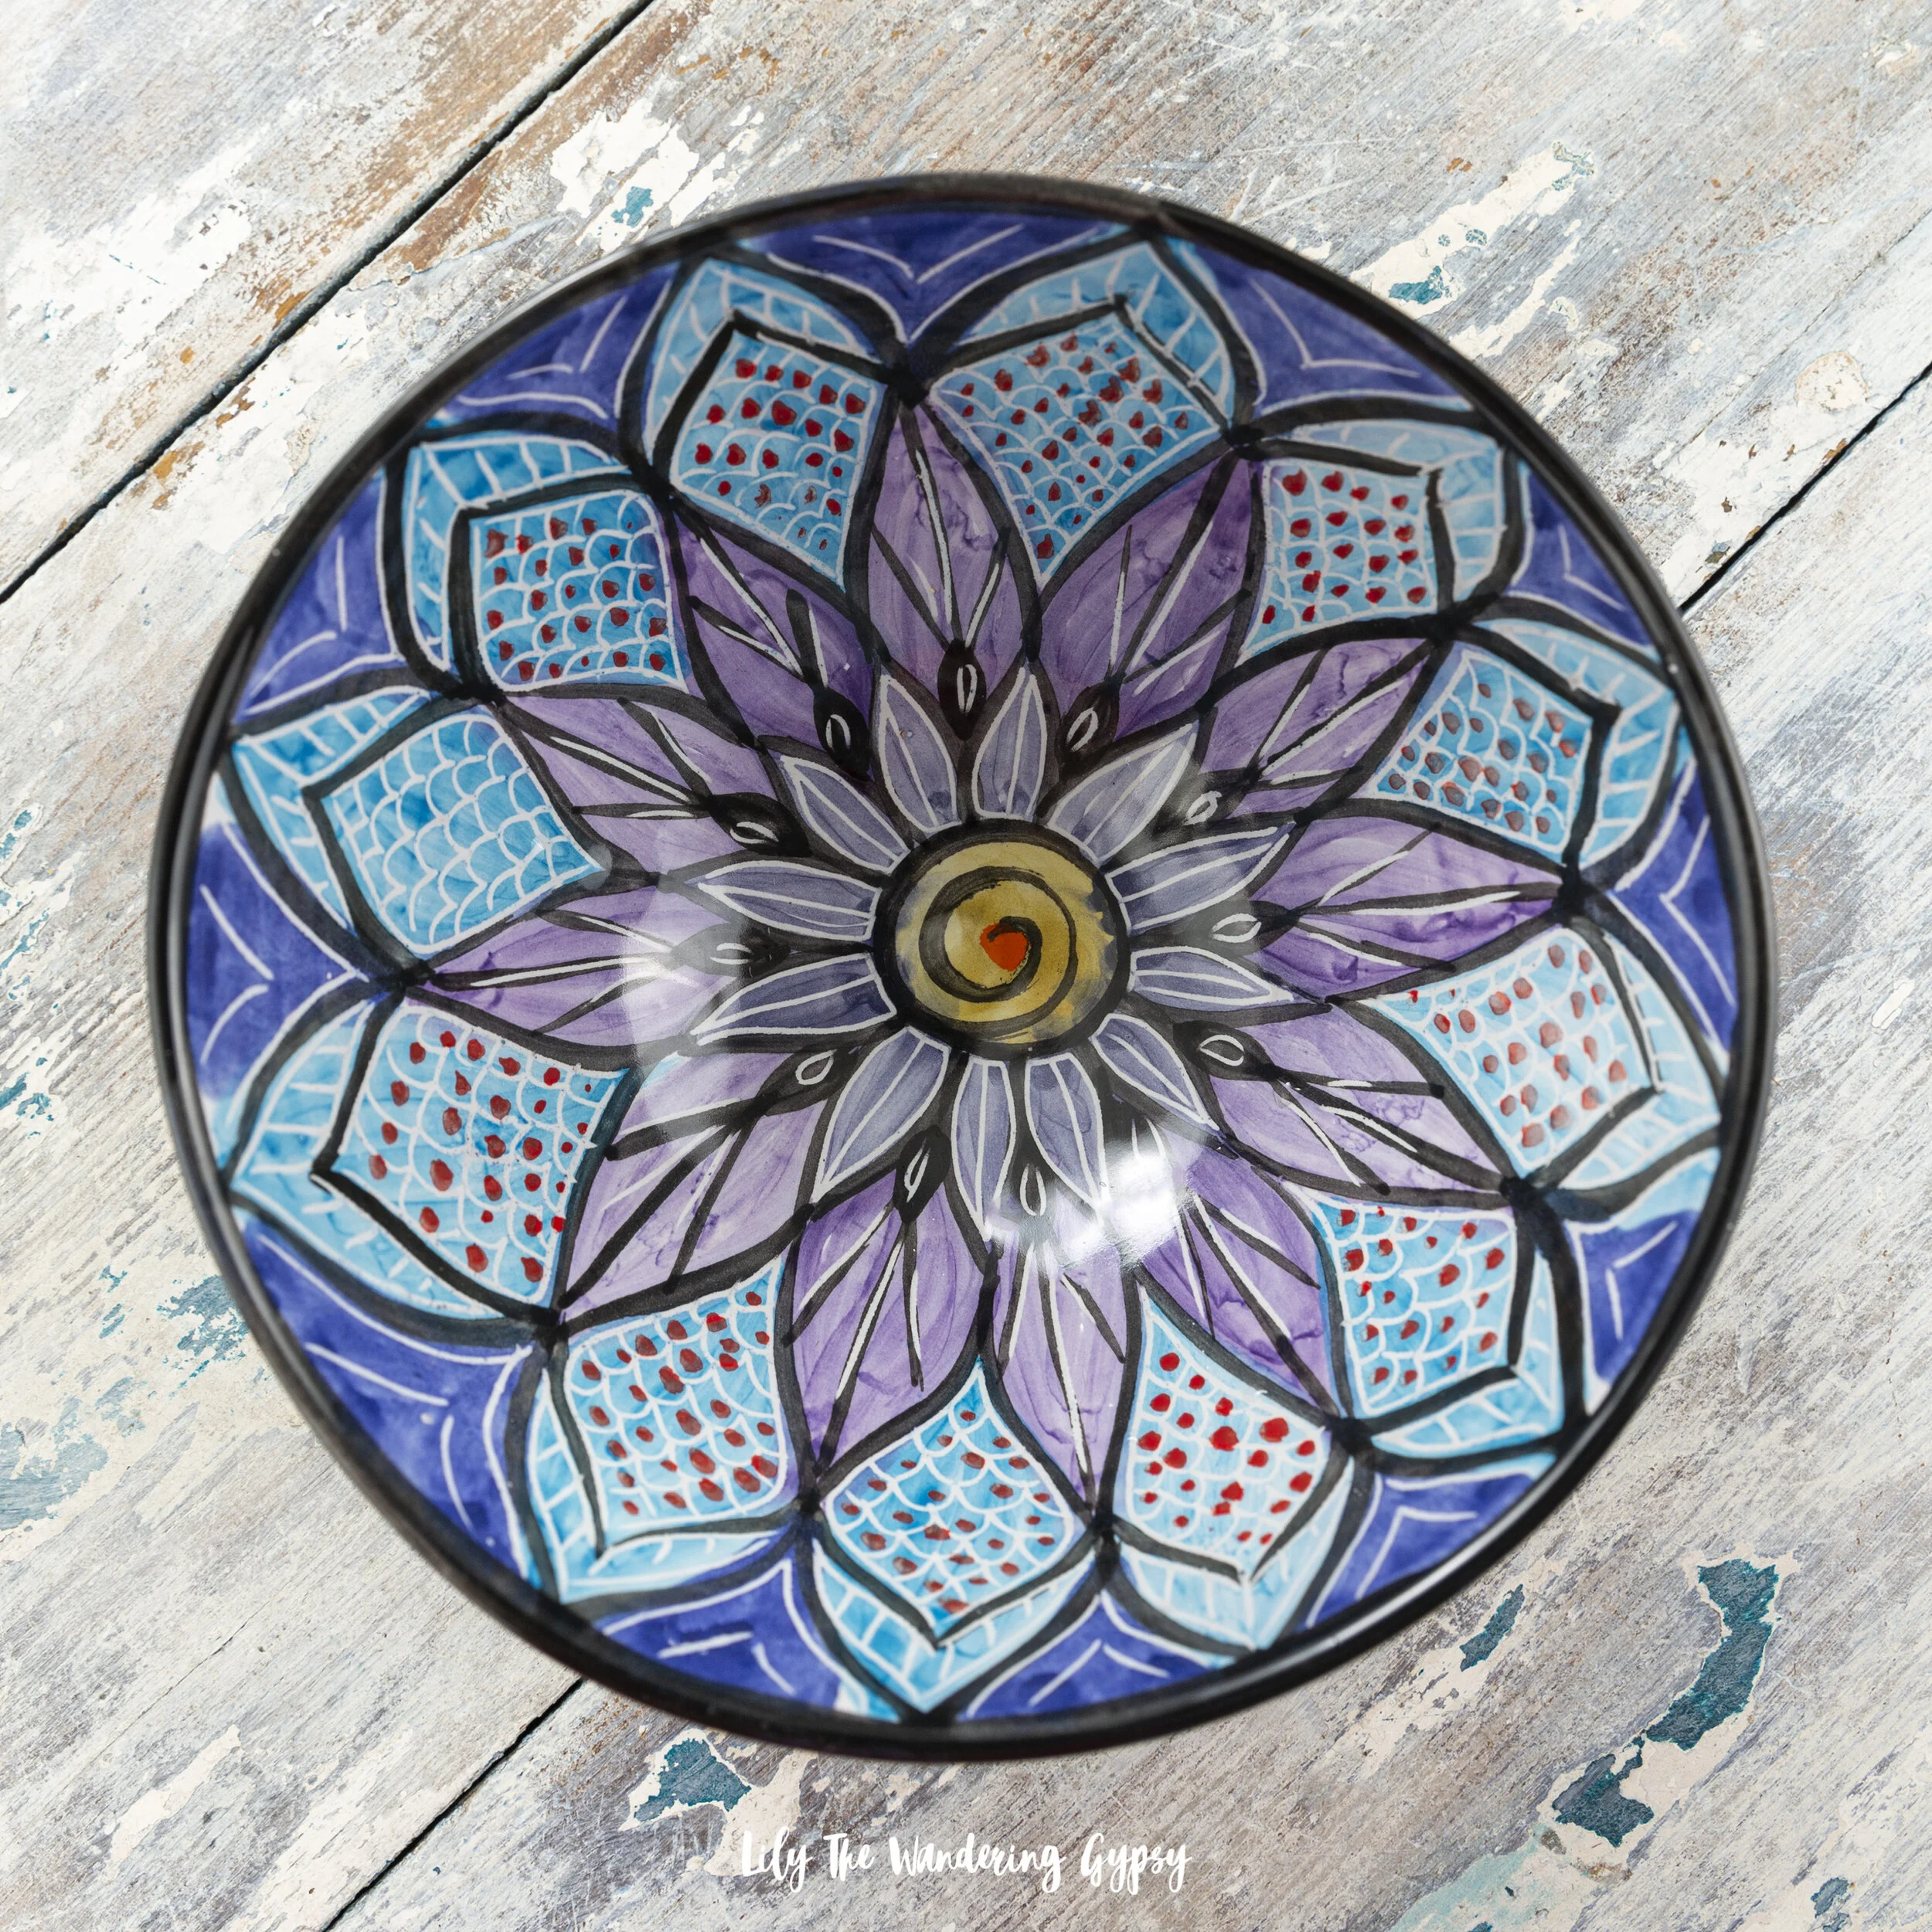
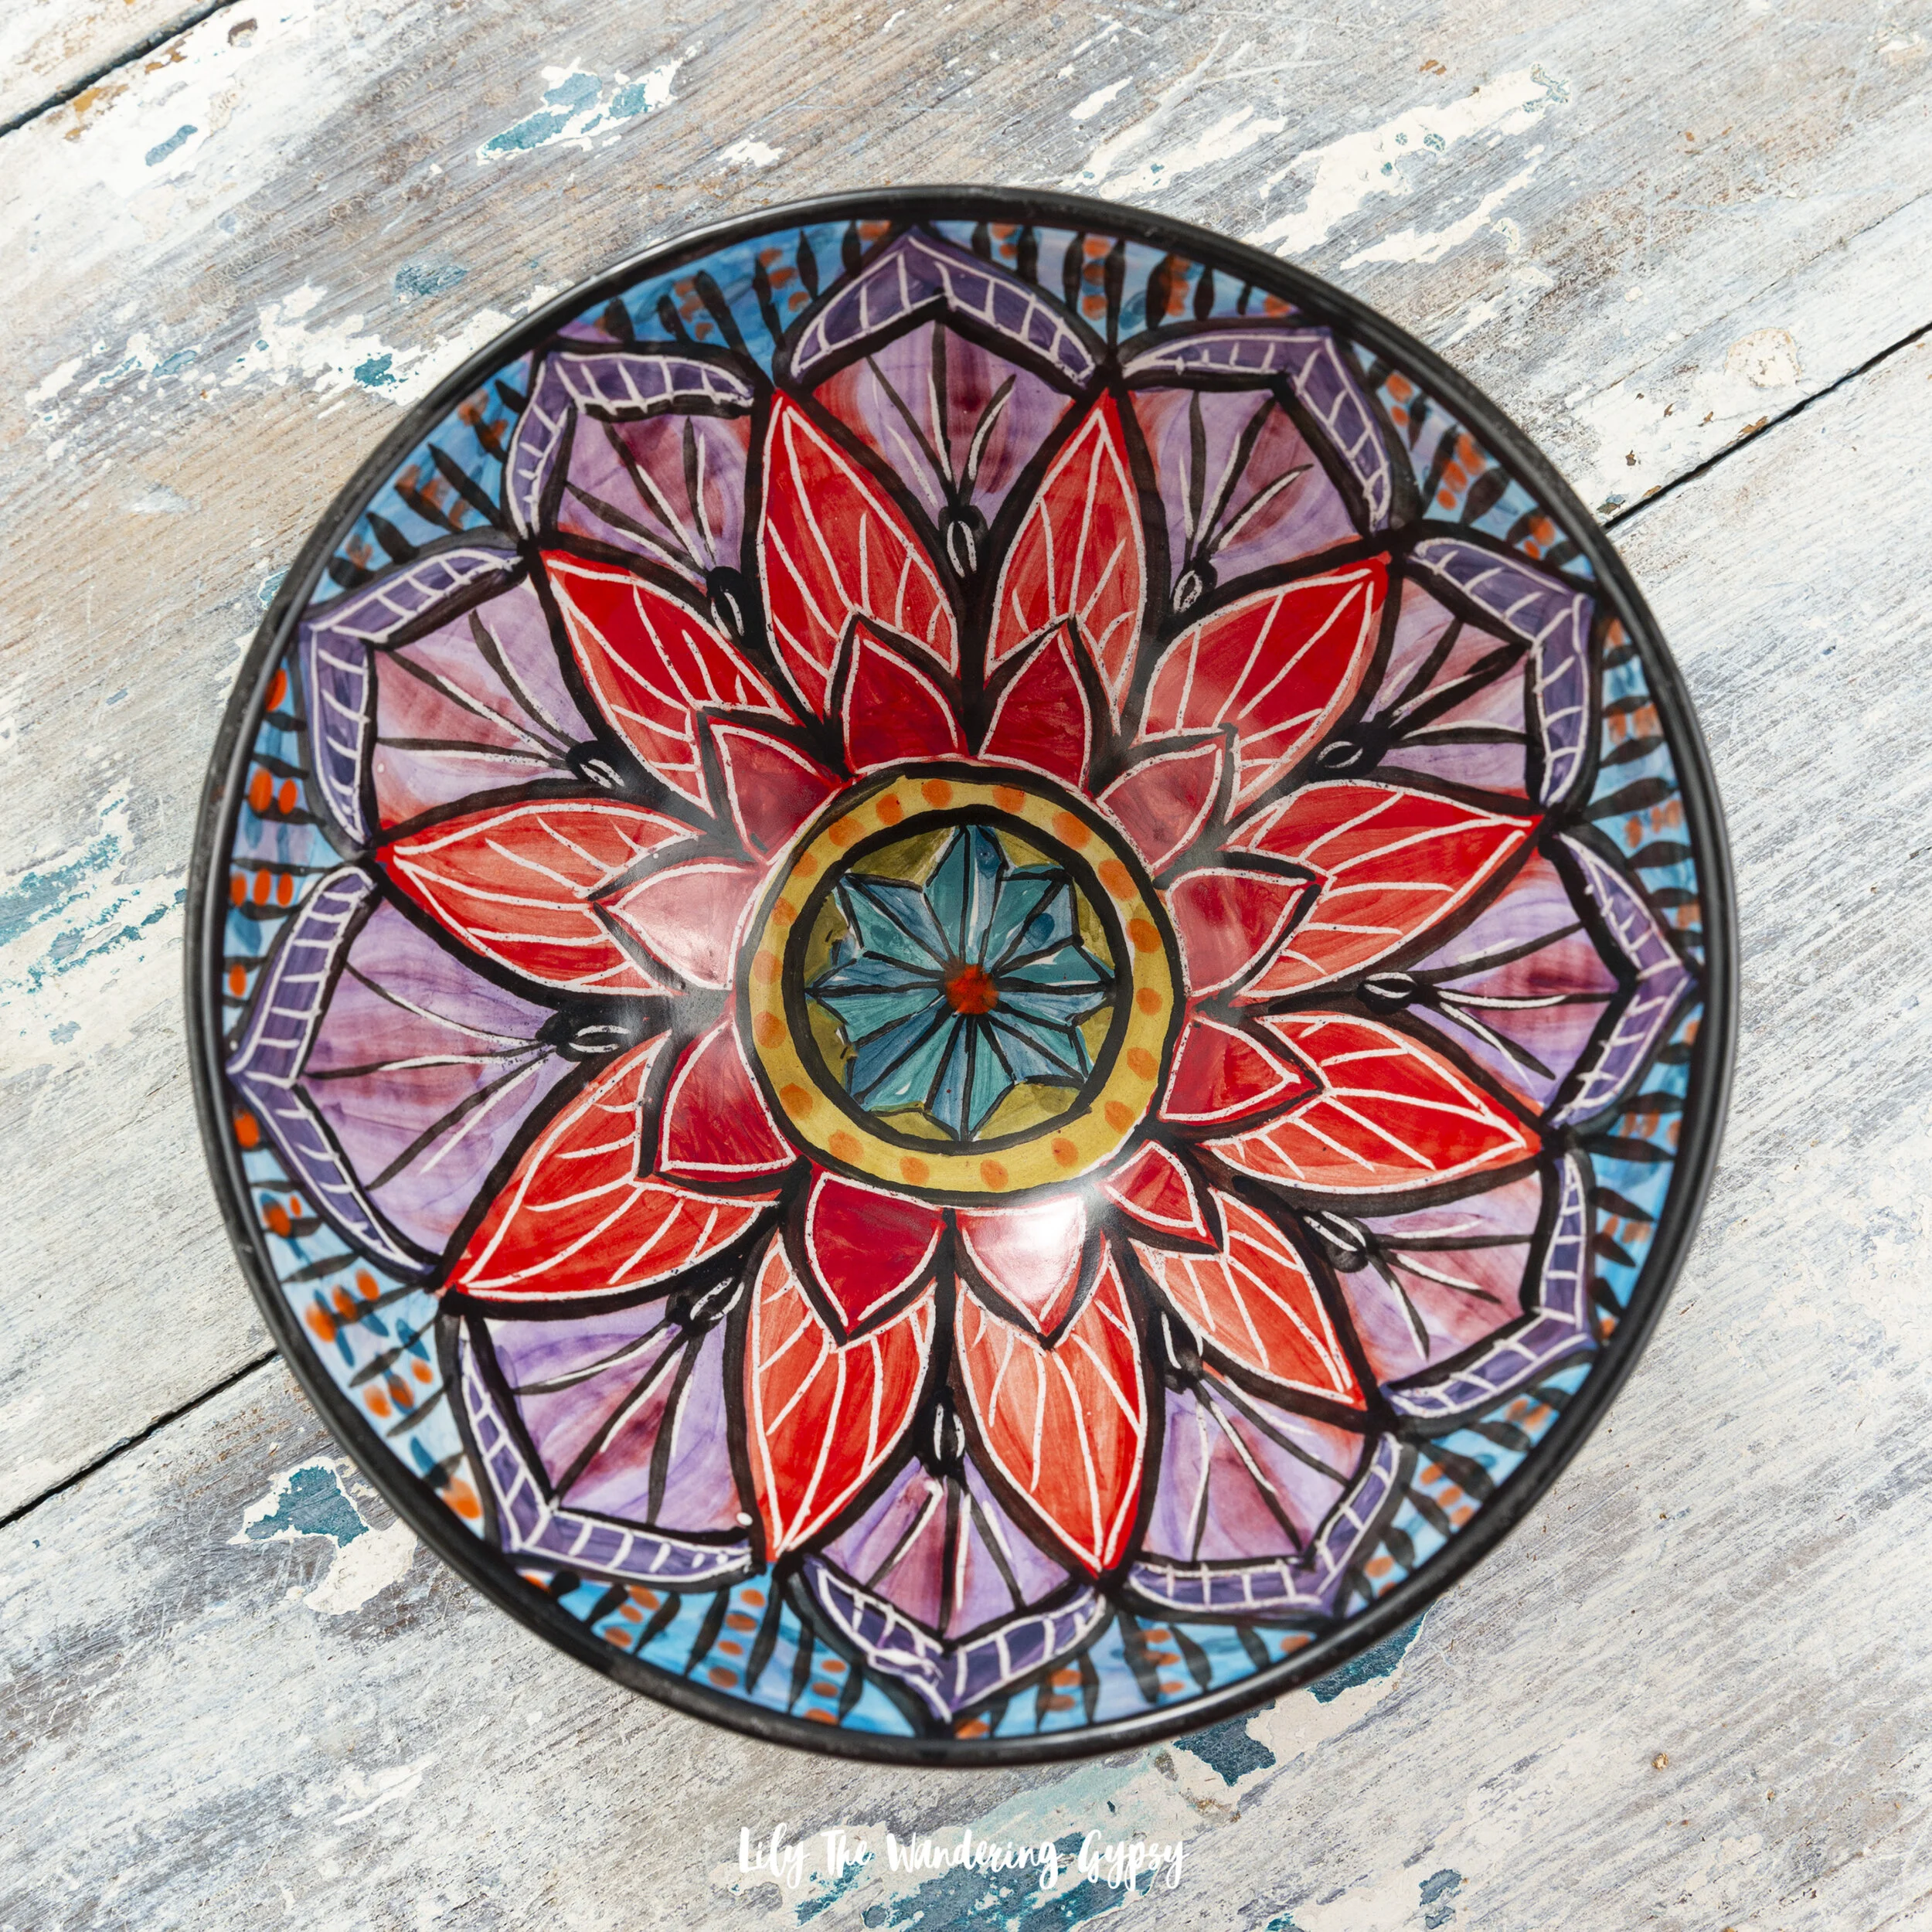
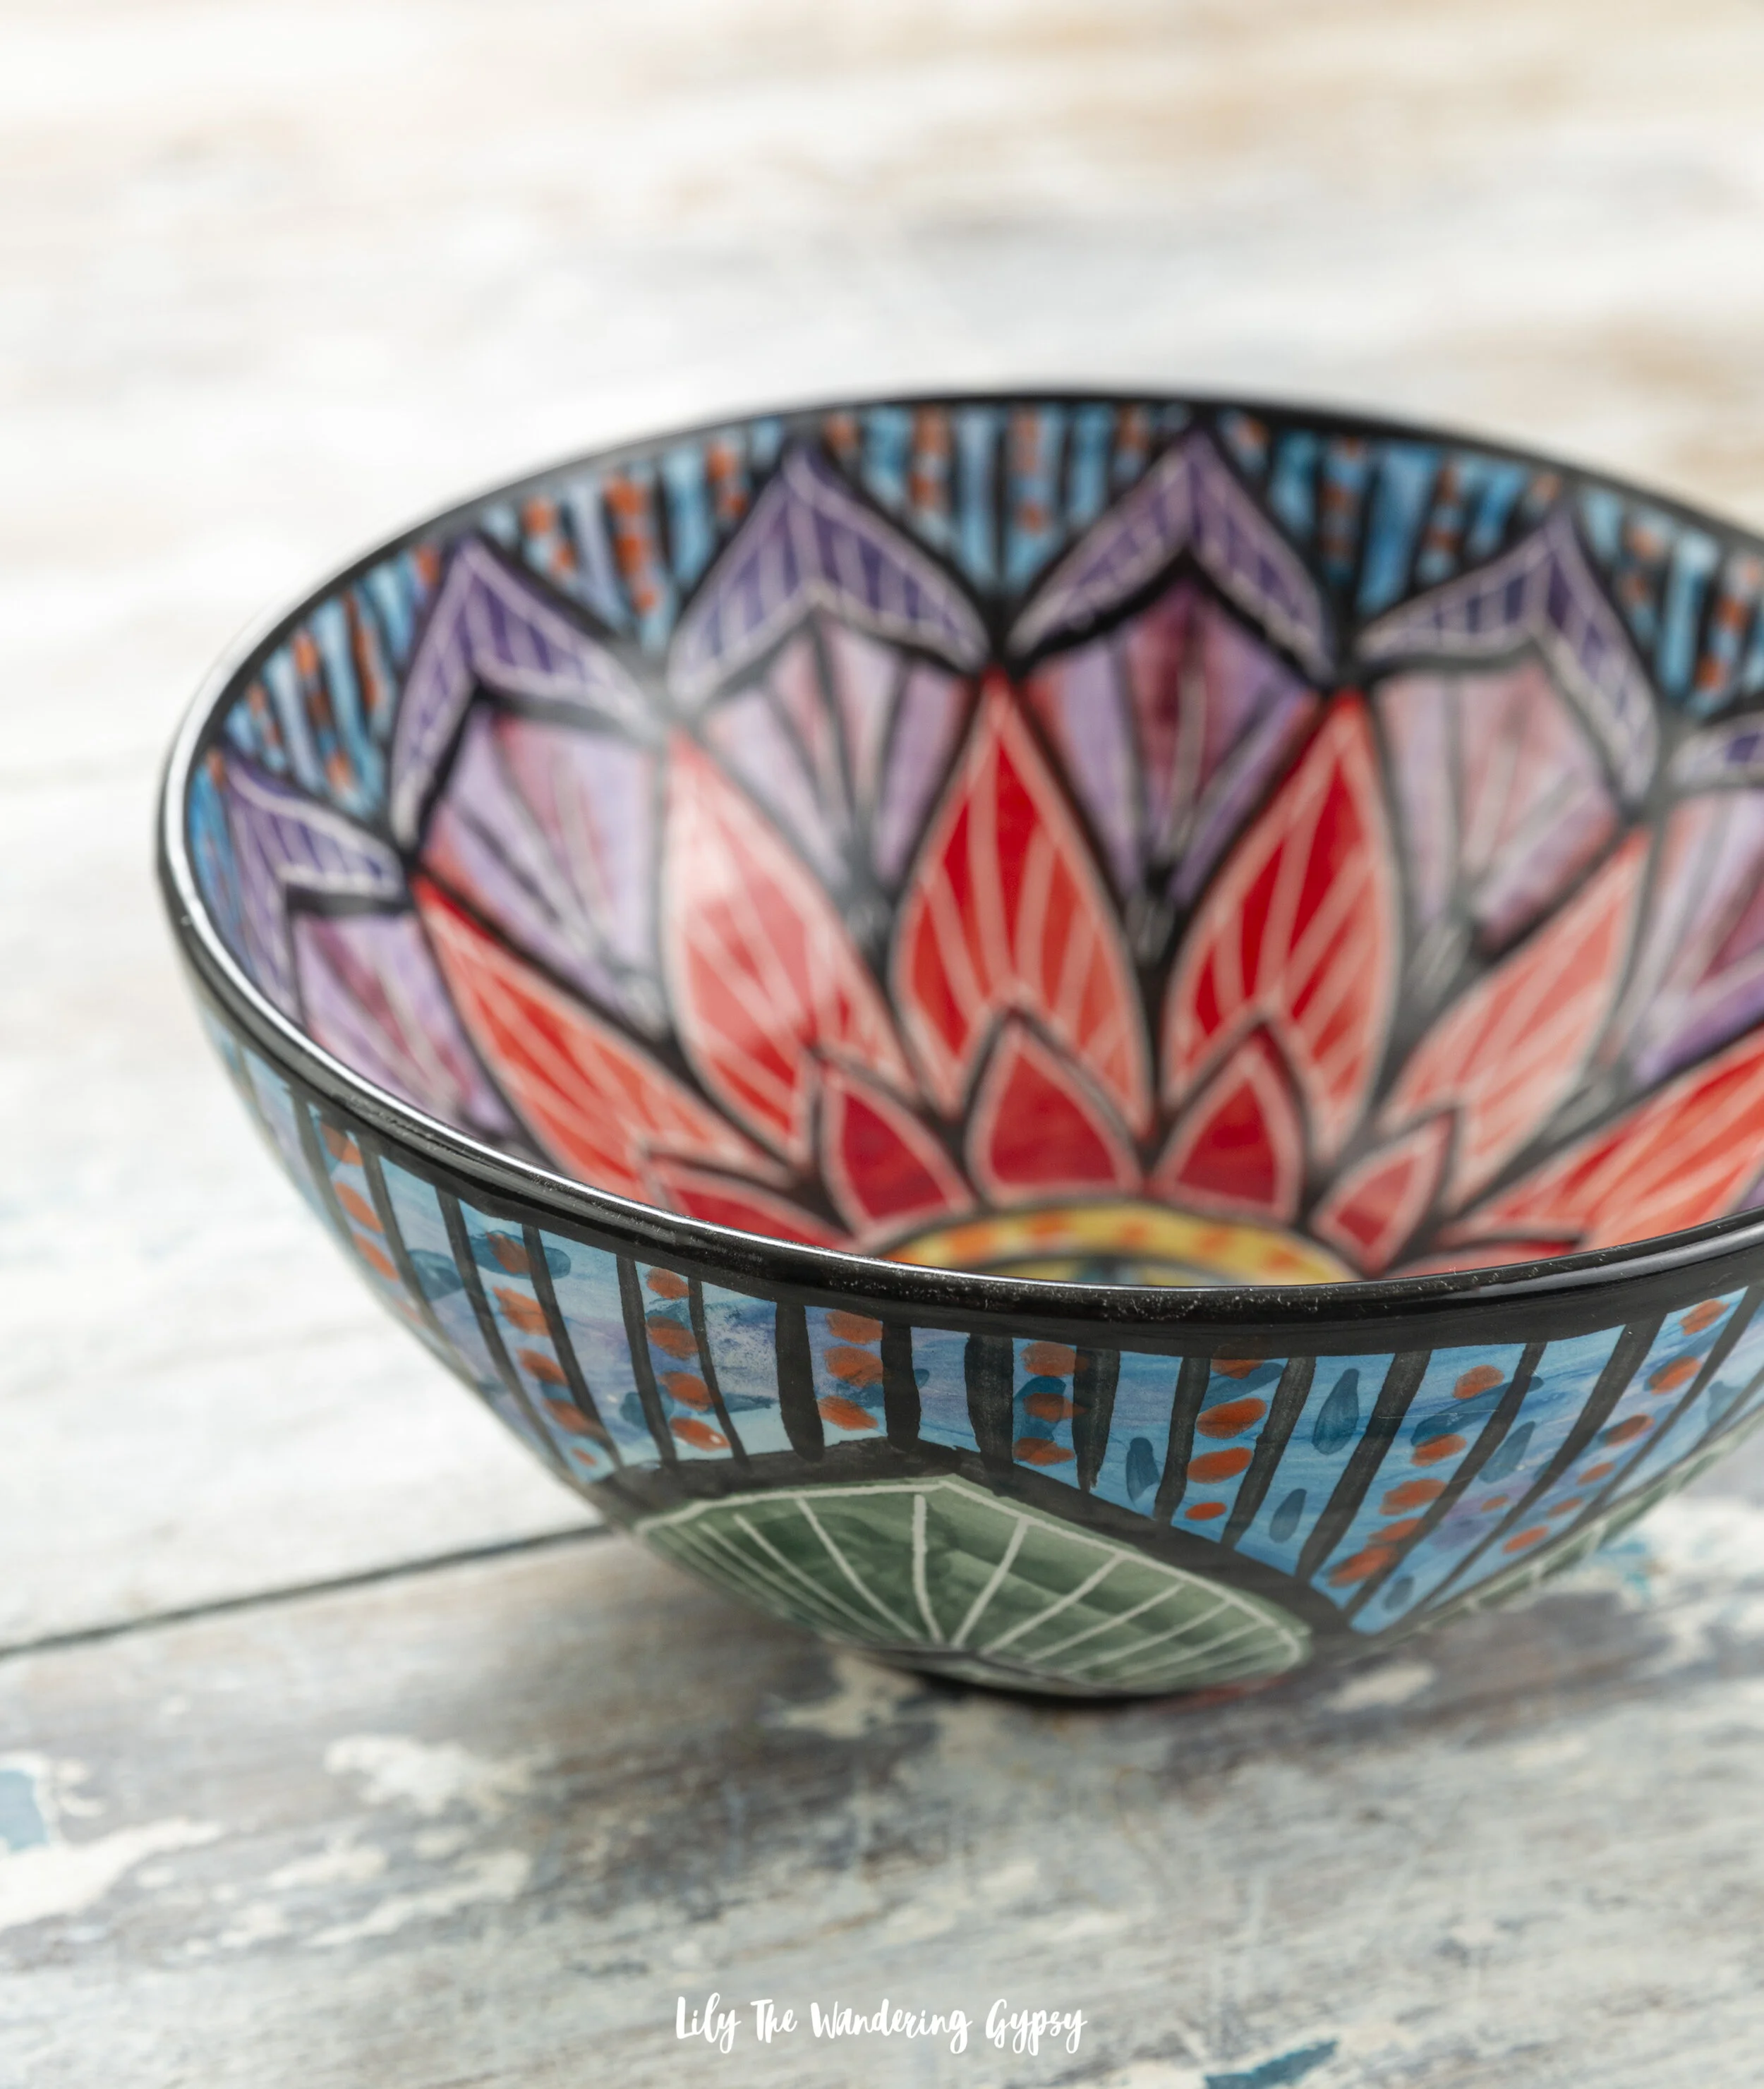
I named my clay studio, Clay Lick Creek Pottery after the name of the creek that flows across the land where I live. and specialize in functional pottery making serving bowls, mugs and other fun pieces featuring a majolica glaze decorated in brilliant colors over a red earthenware body. Each item is hand formed or hand thrown on a potter’s wheel, trimmed, and allowed to dry for approximately 1 week depending on size, density and air humidity before it is bisque fired. This stage of firing takes 16-18 hours and is then followed by a 24 hour cooling period. The white background is applied using an opaque, lead free Majolica glaze, and then hand painted using a mason stain/ frit combination. The pottery pieces are then fired again for approximately 8 hours, and after another cooling for another 24 hours, the charming wares are ready for the world and all that they may be used for. All of the pieces are food safe, and the smaller bowls and mugs may be used in the microwave for heating times of less than three minutes. To clean, they may be hand washed or placed on the top rack of a dishwasher.

“I believe people should have beautiful objects in their homes and use these beautiful objects in their everyday life. Nature inspires me, from the smallest to the largest of creatures-from the colors of geological formations to the colors of the sunrise and sunset. Ideas come to me from my zoological background (did I mention my education experience? I have a B.S. and M.A. in Zoology, specializing in Ichthyology (fish) and I draw a lot of my inspiration from this), a little dream work and images which many may not come to think. Add to that a little bit of humor and what appears is a palette of vibrant, joyful and whimsical designs that come to life on my pottery.

“Oftentimes, I have no idea what my work will look like until I am done, the designs simply develop while I am working on them. My goal for each piece is that when people come in contact with my work, they will experience joy and positive energy. One of my favorite things to hear from people who have my work, is how much they enjoy my pottery, how it makes them happy. If one of my purposes in life is to spread happiness, I believe I am succeeding one person at a time”—Karen
● ▪ ● ▪ ● ▪ ● ▪ ● ▪ ● ▪ ● ▪ ● ▪ ● ▪ ● ▪ ● ▪ ● ▪ ● ▪ ● ▪ ● ▪ ● ▪

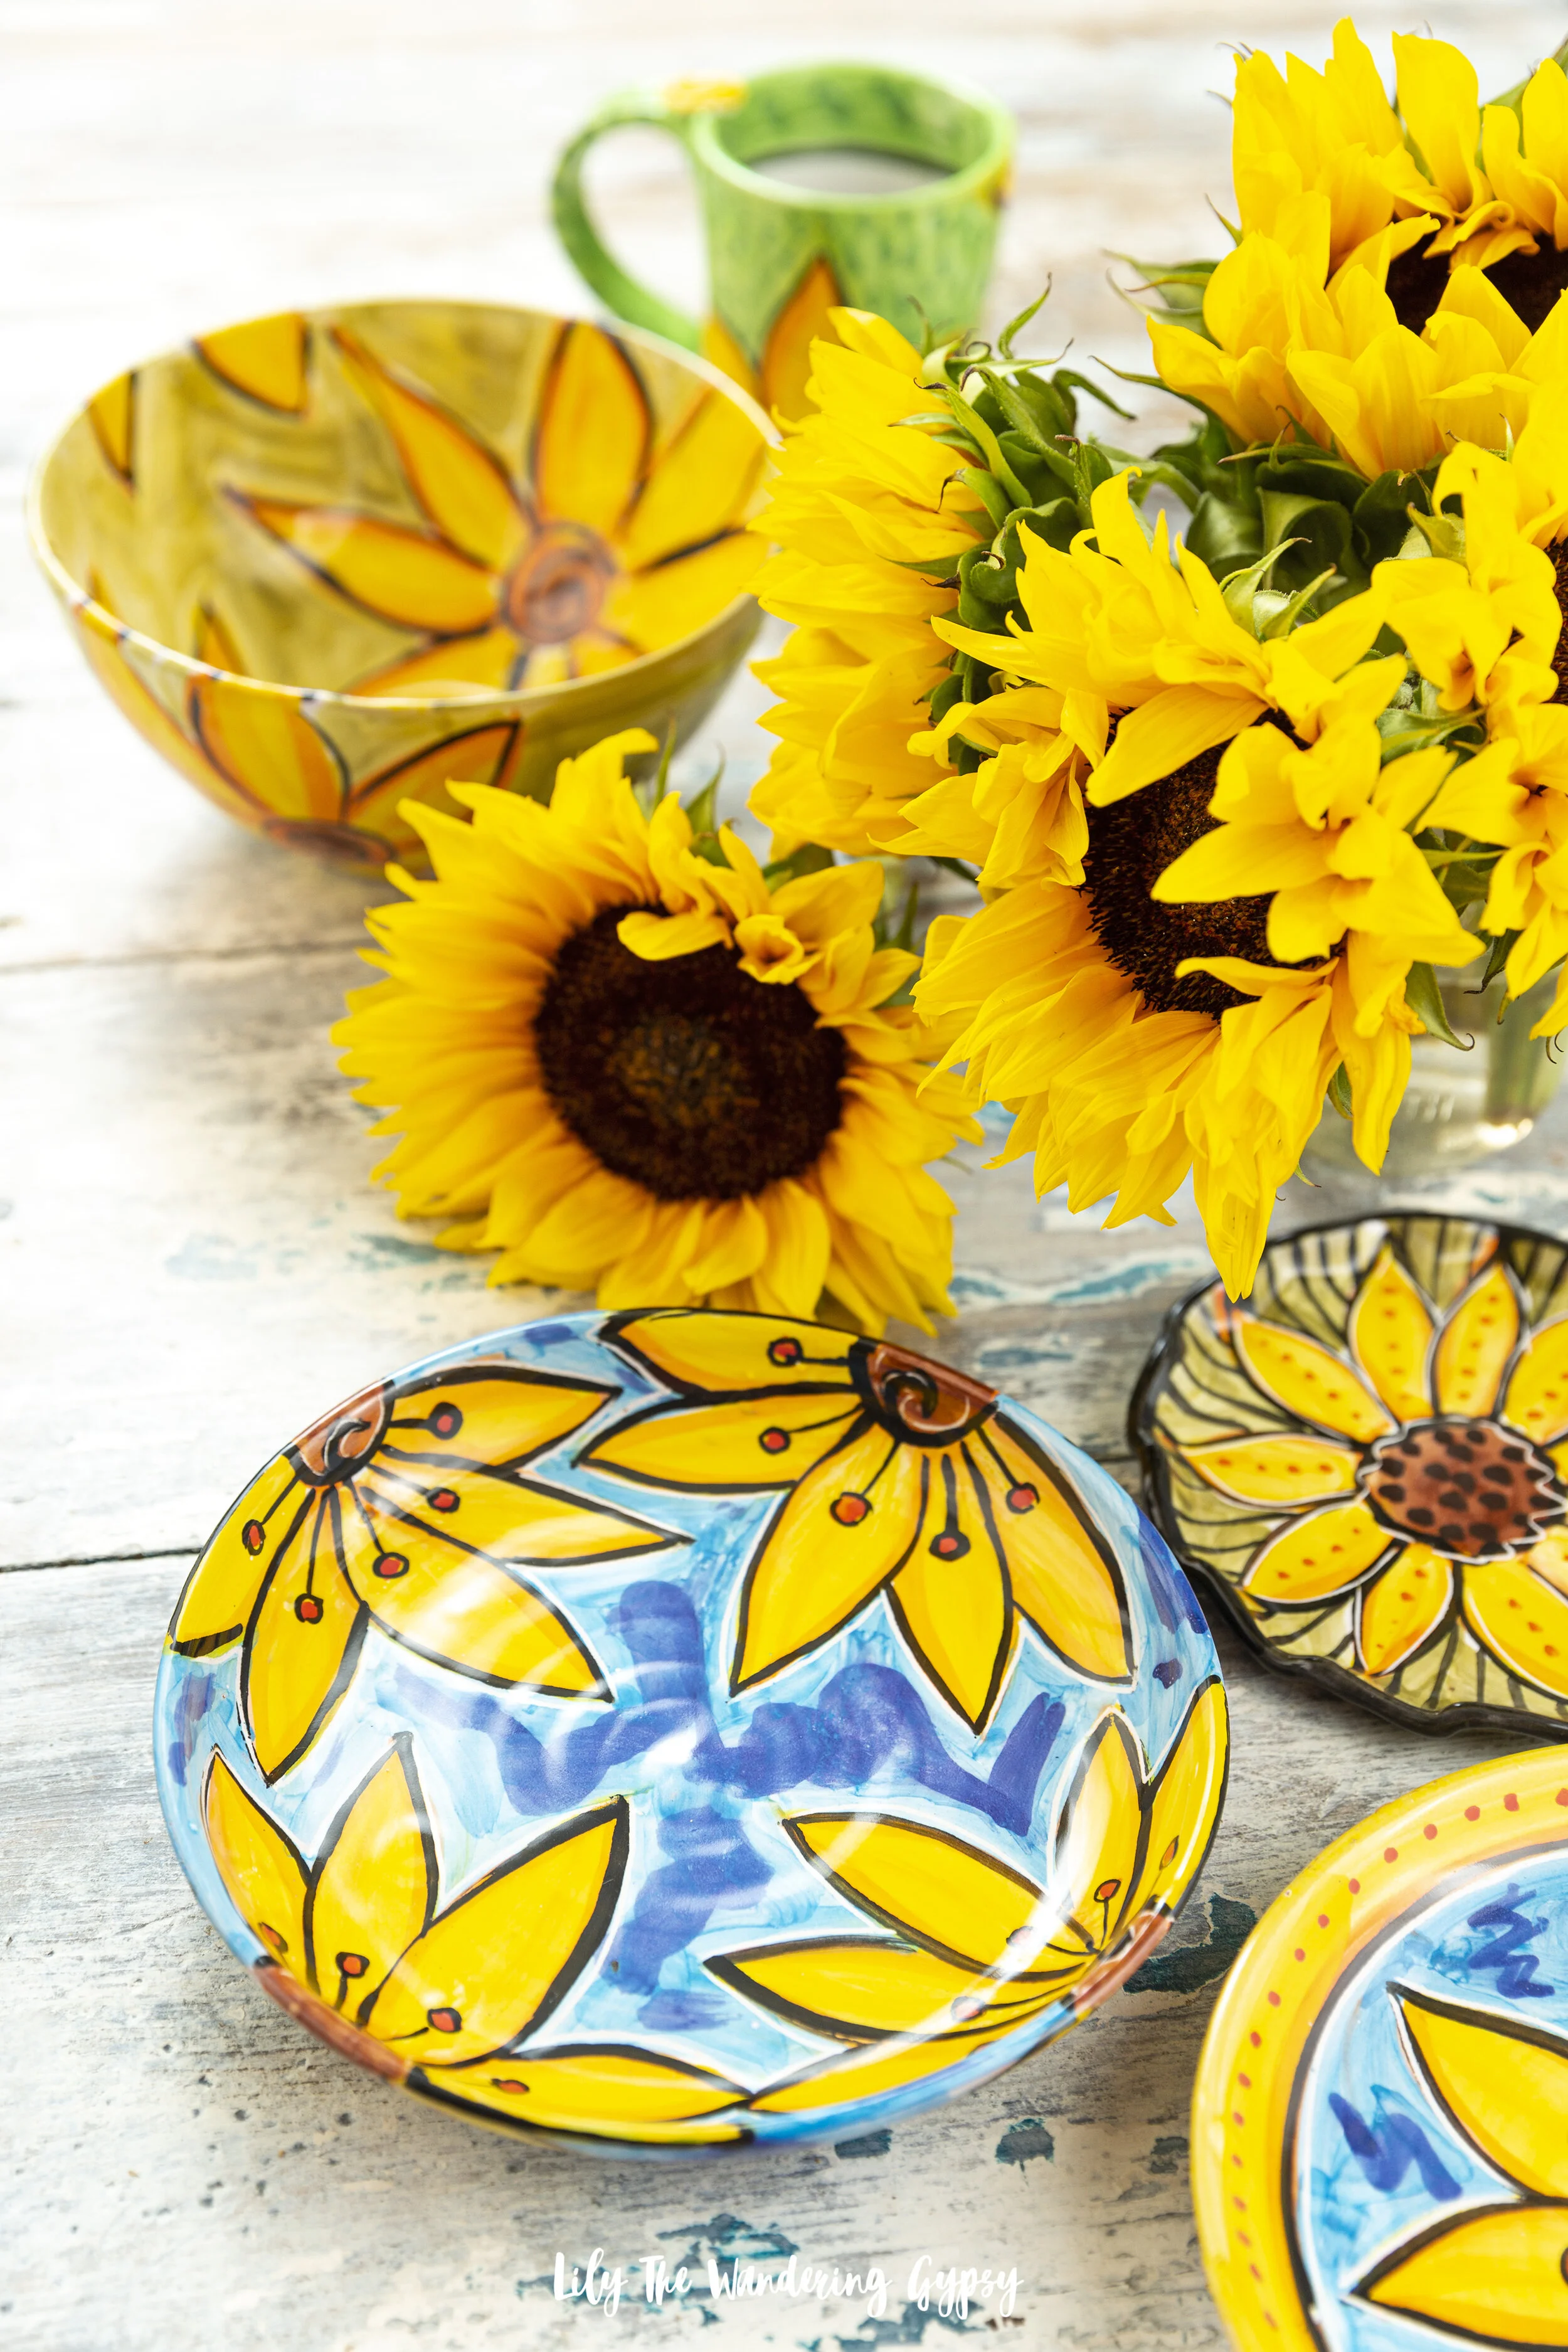
These ceramics are such show pieces! Serve your favorite veggies or appetizers in them for a beautifully colorful presentation!

Follow Clay Lick Creek Pottery on Facebook: www.facebook.com/ClayLickCreekPottery


Check out her web site at: www.claylickcreekpottery.com

Follow her on Pinterest: www.pinterest.com/claylickcreek/


She also has a listed schedule of events of art shows she’s showing her work at and various other tidbits.

If you would like a gift message enclosed with your order, just let her know. She is happy to help!

She will GLADLY ship anywhere - if it's not listed in my shipping, contact her for a quote. Plus, if you are interested in multiples, she will adjust any overcharge on the total shipping rates.

Mandala Bowls - Hand Painted Ceramics by Clay Lick Creek Pottery
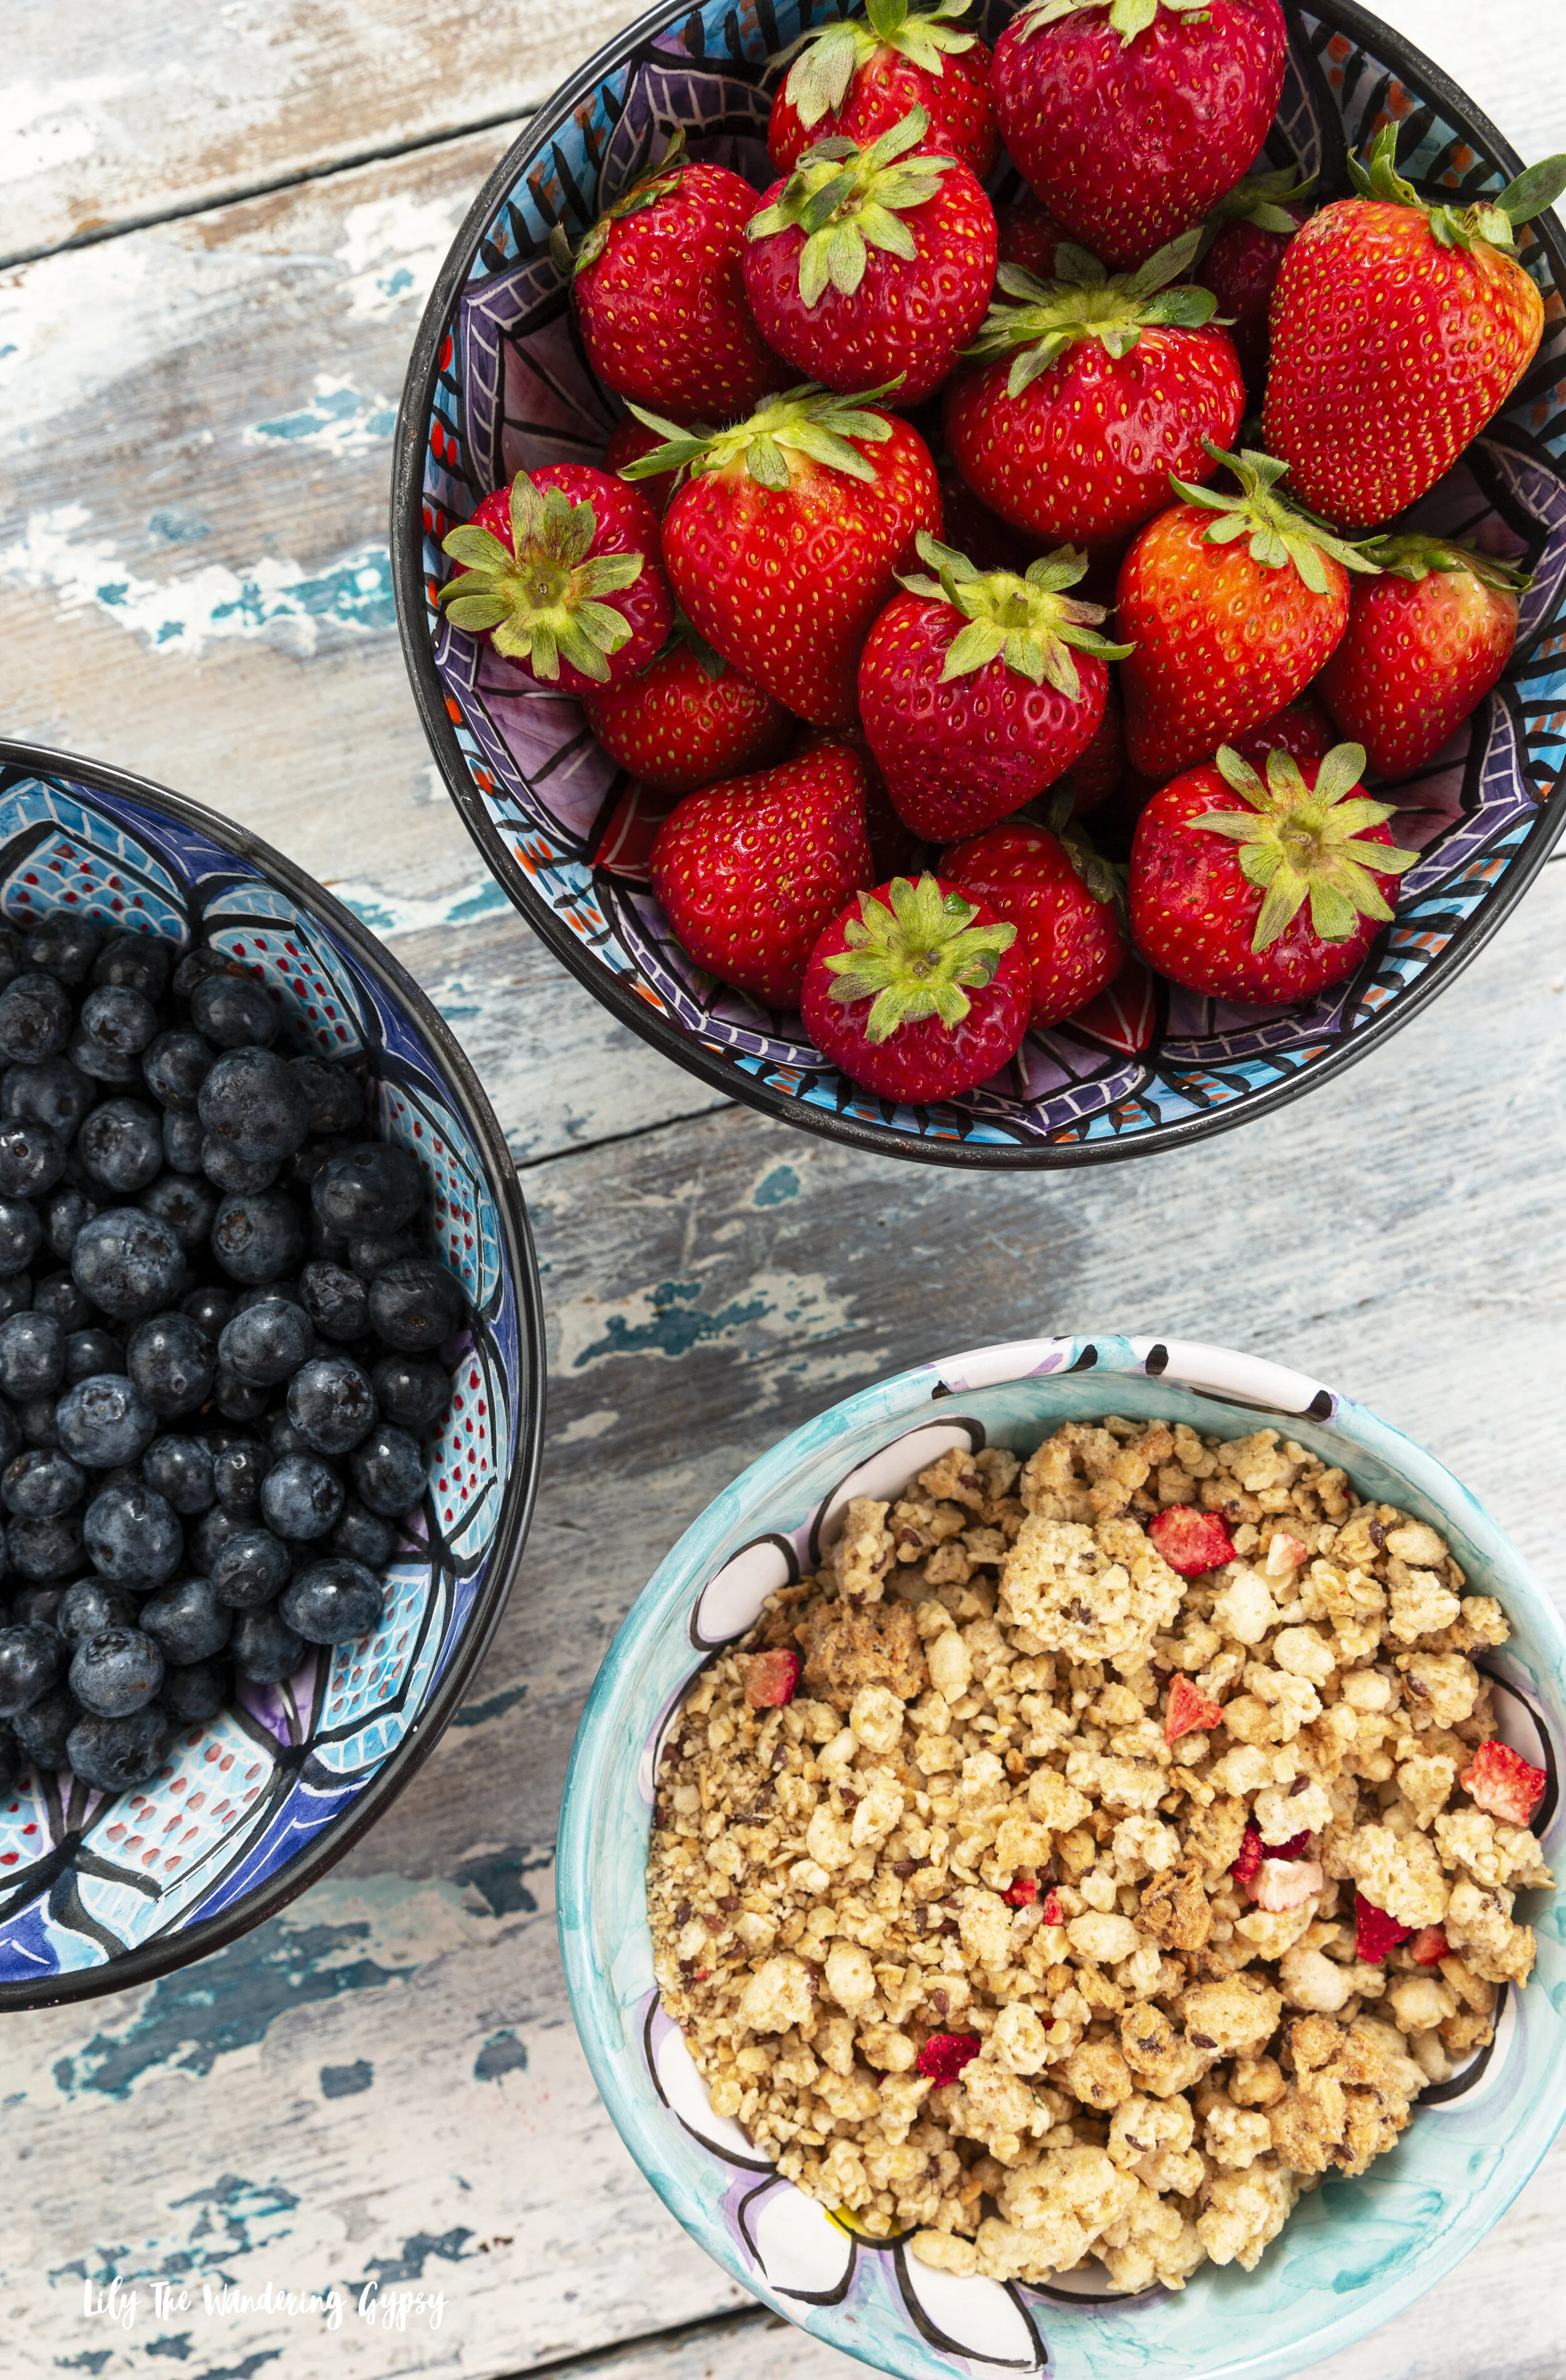
Breakfast Idea:

Serve guests vanilla yogurt and beautiful bowls of fresh fruits and granola to make their own parfaits.

Enjoy the beauty of southern Illinois with Clay Lick Creek Pottery

Elegant Halloween Party Inspirations

As the weather gets chilly and as we head into the last weekend in September, I am already in Halloween mode! I am doing some research for an upcoming project, and wanted to share my inspirations for an Upscale Halloween Party - decor and tablescapes. I have rounded up some of my FAVORITE and most inspiring Halloween Tablescapes! I generally do tons and tons of hours of research for every project, and realized that I should be sharing some of my inspirations!

First, I am featuring my favorite Halloween project of last year, this super easy to make Halloween Ghost Cake! I used a store-bought sour cream pound cake, iced it, and added Ghost Peeps! It turned out SO well and can be made in under an hour.

Below, this Halloween Mantle incorporates black and gold, and black creepy cloth to really add lots of great texture!

This Halloween Spider Cheese Ball would be amazing to serve with rustic crackers!

As always, Inspired By Charm brings the BEST Halloween decor to life!

Below, Coco Kelly put together this Sirens and Songs Halloween party that featured a bedazzled skull with nods to mermaids and those lost at sea…spooky!

Below, Williams Sanoma offers tips on styling this dark and elegant tablescape for Halloween.

Visit Tendir.com for TONS more inspirations!

Below, I am super inspired by crystals for party decor, and who knows, they might bring some good energy!

Below, in2food uses their famous mirror glaze and topped the cake with an edible gold skull, coconut pieces as geodes, and also a 3D spiderweb! How stunning!

Below, a gorgeous cake by CocoKelley, an all white Halloween Coconut Layer Cake.

And, below are a few more crystals for inspiration! Enjoy :)

Delicious No Bake Tiramisu Recipe

This Italian inspired dessert has been described as "sexual" and will make your tastebuds go crazy! Perhaps this recipe will start off your weekend just right! But in all seriousness, since this is a no-bake treat, and can be served in individual jars, it's perfect for summer parties, and everyone is going to love this recipe. 

Both rich and somehow light at the same time, the homemade whipped ricotta filling and the familiar taste of coffee really make for a decadent treat.

Easy Eggless No-Bake Tiramisu

Prep Time: 20 min + chill time

Yield: 9

INGREDIENTS

·       1 cup (250ml) whipping cream

·       1 cup (250g) mascarpone, softened

·       1/4 cup (50g) granulated sugar

·       1 tsp (5ml) vanilla extract

·       1&1/2 cups espresso or very strong coffee, cooled

·       2 tbsp (30ml) coffee liquor (I used Kahlua)

·       2 dozen lady fingers

·       2 tbsp cocoa powder

INSTRUCTIONS

1.   Beat the whipping cream until stiff peaks form. Set aside.

2.   Mix the mascarpone, sugar and vanilla until combined. Add in the whipped cream and beat again until smooth.

3. Prep small Ball jars by removing all lids, rinsing and drying thoroughly, and setting them all out onto a tray or surface.

3.   Stir the coffee and liqueur together. Lightly dip 2-3 lady fingers into the coffee mixture, then place the 2-3 lady fingers into the jars to create the bottom layer of the dessert. Make sure not to soak the lady fingers too much or there will be lots of coffee left in the bottom of the jars. Repeat in all jars.

The Kahlua is optional but adds a nice kick and authentic flavor to the flavor of this dessert!

4. Using the small ice cream scooper, scoop a generous amount of the ricotta mixture over each jar, making them look as much like a perfect scoop of ice cream as possible.

5. Sprinkle cocoa powder (or even hot cocoa mix) through a metal strainer over top of each jar. A light dusting of the cocoa powder really gives them a nicer, upscale look. Enjoy!

The other fun thing about this post is that I get to show off my new kitchen update, we painted and I installed new "tiles" from The Smart Tiles, here!

PRINT THE RECIPE...

PIN IT FOR LATER...

Revamping My Studio with California Closets X Marie Kondo

Learn more about my home studio renovation and tips on how to create a smart space of your own, inspired by California Closets and Marie Kondo! Schedule your own consultation today!

Thank you California Closets for sponsoring this post. #MarieKondoXCaClosets

I recently had a very inspiring online consultation with Jessica Ballesteros, a very talented Design Consultant for California Closets. She and California Closets recently teamed up with Marie Kondo, the author of "The Life-Changing Magic of Tidying Up" and creator of The KonMari Method. 

I sent Jessica a brief explanation of what I wanted from my space, and she gave me lots of amazing suggestions and explained what one could expect from an in--home consultation, which I will explain further into this post. After that, she inspired me to completely re paint, and then overhaul the closet in my home studio / photo studio space. I am so excited to share my experience and new space with you!

The company's professional design consultants will collaborate with you to create custom designs at a range of styles and budgets.

THE STUDIO

To explain the space a bit better, this is one of our three bedrooms, and we had nice Pergo flooring installed a few years ago, but never got around to painting it. We use the space for our photo studio and any other fun and creative projects we come across.

It's a great size space for our photo studio, and the space basically needs to be kept very neat and tidy because when one project is done, we start the next, The space has to be versatile, and changes depending upon what we are working on. These projects range from food and drink recipes to product photography and home decor projects and more!

BEFORE + AFTER

Below, you can see my studio before the transformation. While it definitely wasn't stuffed to the gills with things (yes, it was at one time), it was not very tidy or inspiring. There are things that had been in this closet for years and years, and I would just keep adding thins to it because I didn't have any place else to put them. That should have indicated to me to get rid of some things, but I never gave myself enough time to really dive into making a more inspiring space.

While I did not install actual pieces from California Closets, I did use their mission to inspire my own design.

WHAT I DID

Painting really did help so much. I chose a light grey color called Filtered Shade from Valspar in an eggshell finish.

I also added a metal shelf to the closet, which holds a lot of weight per shelf. This will be amazing to hold props, my cameras, and anything I am using for current projects. This shelf even now has a few empty spaces that can be utilized in the near future for lots of upcoming projects. 

I also hung my fabric pieces on hangers, which I use for backdrops or as tablecloths in lots of my photos. I like having a smaller selection of fabrics hung, because then it sets the color scheme for lots of my images, making my posts look more coordinated.

I made sure to keep everything in view, without crowding the shelves too much. I was able to easily store the two large camera cases in the closet and this will overall just be great because I will have everything at my fingertips during photoshoots, instead of having to run to different rooms of the house, which does waste time and energy (which never brought me joy).

IN PROCESS / BEHIND THE SCENES

THE KONMARI METHOD

After reading more into the KonMari Method, here are some key points.

Step 1: Decide what you want to get out of your space.

Ask yourself, what is your ideal lifestyle, and how can this space help you attain that? For me, I want to be a professional, very organized lifestyle blogger, and so this closet space needed to help me with that mission.

Step 2: Declutter and divide like items into groups

Take everything out of the space and organize it into piles of similar items. If there are certain items that do not actually make you feel happy, or that distract you from your initial goal(s), then it may be time to pass those items along. Then, you will be able to better organize those things that you do need.

Step 3: Decide what "sparks joy".

Marie Kondo explains what it means to spark joy. Ask yourself questions like

- Does the item contribute to making you feel good about yourself, your job, and your space? 

- Will it help you with that particular job?

If not, then time to remove that item from the space and either discard, donate, or recycle it.

Step 4: Say Thank You and Discard (or Donate)

This is probably the most important and hardest of all of the steps. It's important to first realize how much space you even have for things, because if there are things we just never have room for, it may be time to just simply purge things. It can definitely be "scary" getting rid of things that you are so sentimental or that you have had for along time, but if it's something that you never use, or keep moving back and forth without using or having space for, then it may be time to let it go. 

As suggested by Marie Kondo, say a little "thank you" to the items which have served you in the past, and send the items on their way. Discard, recycle, or donate those items which are not fulfilling your mission to "spark joy" in your life, and then give a quickly tidy up or reorganize to the space to now suite your needs better.

For me, I have gotten rid of tons of clothing, old papers, and other photography and food/drink styling related props by asking myself, would I ever really use this again, or is is outdated? Or, is this s timeless piece that I will be able to use again and again?

The Design Consultation with Jessica

As I mentioned, Jessica is a Design Specialist for California Closets, and you can read more about her in the below articles:

https://www.californiaclosets.com/expert-tips-for-displaying-and-organizing-everything-in-your-new-closet/

https://www.californiaclosets.com/blog/whats-your-organizing-style/

She gave me some expert advice, as stated below:

"If you were wanting to try the KonMari method of organizing your office closet you would first start by removing every single item, and I mean everything.  One by one you would hold each item deciding what to keep (things that Spark Joy) and what to get rid of. Then putting everything back in an organized way. Using bins or baskets is always encouraged to help compartmentalize items by category if no drawers are available. Mari Kondo loves using boxes inside boxes to help divide things into categories."

I loved her ideas, and utilized as many as I could.

What an inspiring project this has been! I know that going forward, my new space will be an amazing home studio that inspires me each and every time I see it! 

Learn more about California Closets Here! And again, check out my studio space after the revamp, below!

California Closets has an extensive range of beautiful finishes to choose from, from clean and simple white, to proprietary textures imported from Italy, all of which are environmentally sustainable and California Air Resources Board (CARB) compliant. You can really go wild and create a dream space of your own.

I was selected for this opportunity as a member of CLEVER and the content and opinions expressed here are all my own.

Gifts For The Chicago Cubs Fan

Super excited to bring you this fun Gift Guide, inspired by something so near and dear to our family, like a gift guide for the Cubs Fan. I have several people in my life whose eyes would light up at the sight of anything in Cubs blue and red! Check out the ways I decorated in Cubs colors for Christmas, and learn about items I love. 

Read More

Company's Coming! Welcoming Guests with Cute Room Decor from Big Lots (And A DIY Room Diffuser)

This shop has been compensated by Collective Bias, Inc. and its advertiser. All opinions are mine alone. #BigLotsHome #CollectiveBias

Looking to spruce up your guest room? I sure was! My guest room was so bad before this little mini makeover. The walls were light, faded, pale pink, and the only bedding I had was grey or purple - not the most flattering or welcoming color scheme, of you wan even call it that.  If you follow my blog, you will know that we welcomed a new puppy into our home recently. She is amazing, and we and love her SO much. Because of the new puppy, more friends and family visiting and staying the night (or nights). I was so excited to get the chance to spruce up our guest room, thanks to my friends at Big Lots! Our guests take time out of their busy schedules to visit, so they deserve a nice place to call their own while they are in town.

Company is coming and Big Lots has everything that you need to prepare for family and other visitors in the coming months. You can find everything there from mattresses and bed frames, to other furniture like accent tables, lamps, accent pieces, other home decor and furniture items, toiletry items, snacks, fresh foods, and more.


TOP 5 THINGS THAT WILL HELP YOU SPRUCE UP YOUR GUEST ROOM

1.) Fresh Bedding

2.) New Towels

3.) Accent Furniture

4.) Snacks and Water

5.) Scented DIY Room Diffuser (See Below)


DIY ROOM DIFFUSER

I grabbed this inexpensive glass jar at a craft store, and filled it with a mixture of witch hazel, a bit of food coloring, and any essential oil you prefer. You could flat some dried lavender or other herbs in the diffuser, too. I love the idea of using some food coloring in the liquid, because eventually, the skewer sticks would begin to get an ombre effect from soaking up the colored liquid. Place as many skewer sticks in the jar as will fit, and enjoy!

From small scale items to large scale items, Big Lots carries a wonderful assortment of high quality home decor items that are fashionable and trend right!

Big Lots has a variety of items, from home decor to food, and is a one-stop-shop that will allow you to better prepare for the busy last few months of the year.

LET'S GO SHOPPING!

I always have such a nice experience in Big Lots. The employees are beyond helpful, and I like that I can find a little bit of just about everything I need for my home. I was thrilled with the latest products from Big Lots, like these $18 Faux Fur Throw Blankets (shown below). I LOVE this blanket so much, because it's more like a comforter, and was such a good jumping off point for this guest room re-do. These blankets some in lots of varieties of textures, and are all more neutral colors, which I really like. The back of the throw blanket is a soft brown material, and I am really looking forward to cozying up on the couch with it when it gets chillier. My guests will also enjoy this beautiful blanket.

I also loved the selection of guest room furniture that I found at Big Lots. I grabbed this amazing, round, white table (which I put together myself in about 15 minutes). I didn't get an in-store photo of it, but in addition to the furry blanket, it ties the room together SO well! 

How will you prepare your guest room for friends and family who visit in the coming months? I loved sticking to a sort of white and grey color scheme while adding pops of light blues and aquas. I think that's a pretty calming atmosphere for someone who traveled far and wide to visit you!