Top 10 Halloween Cakes

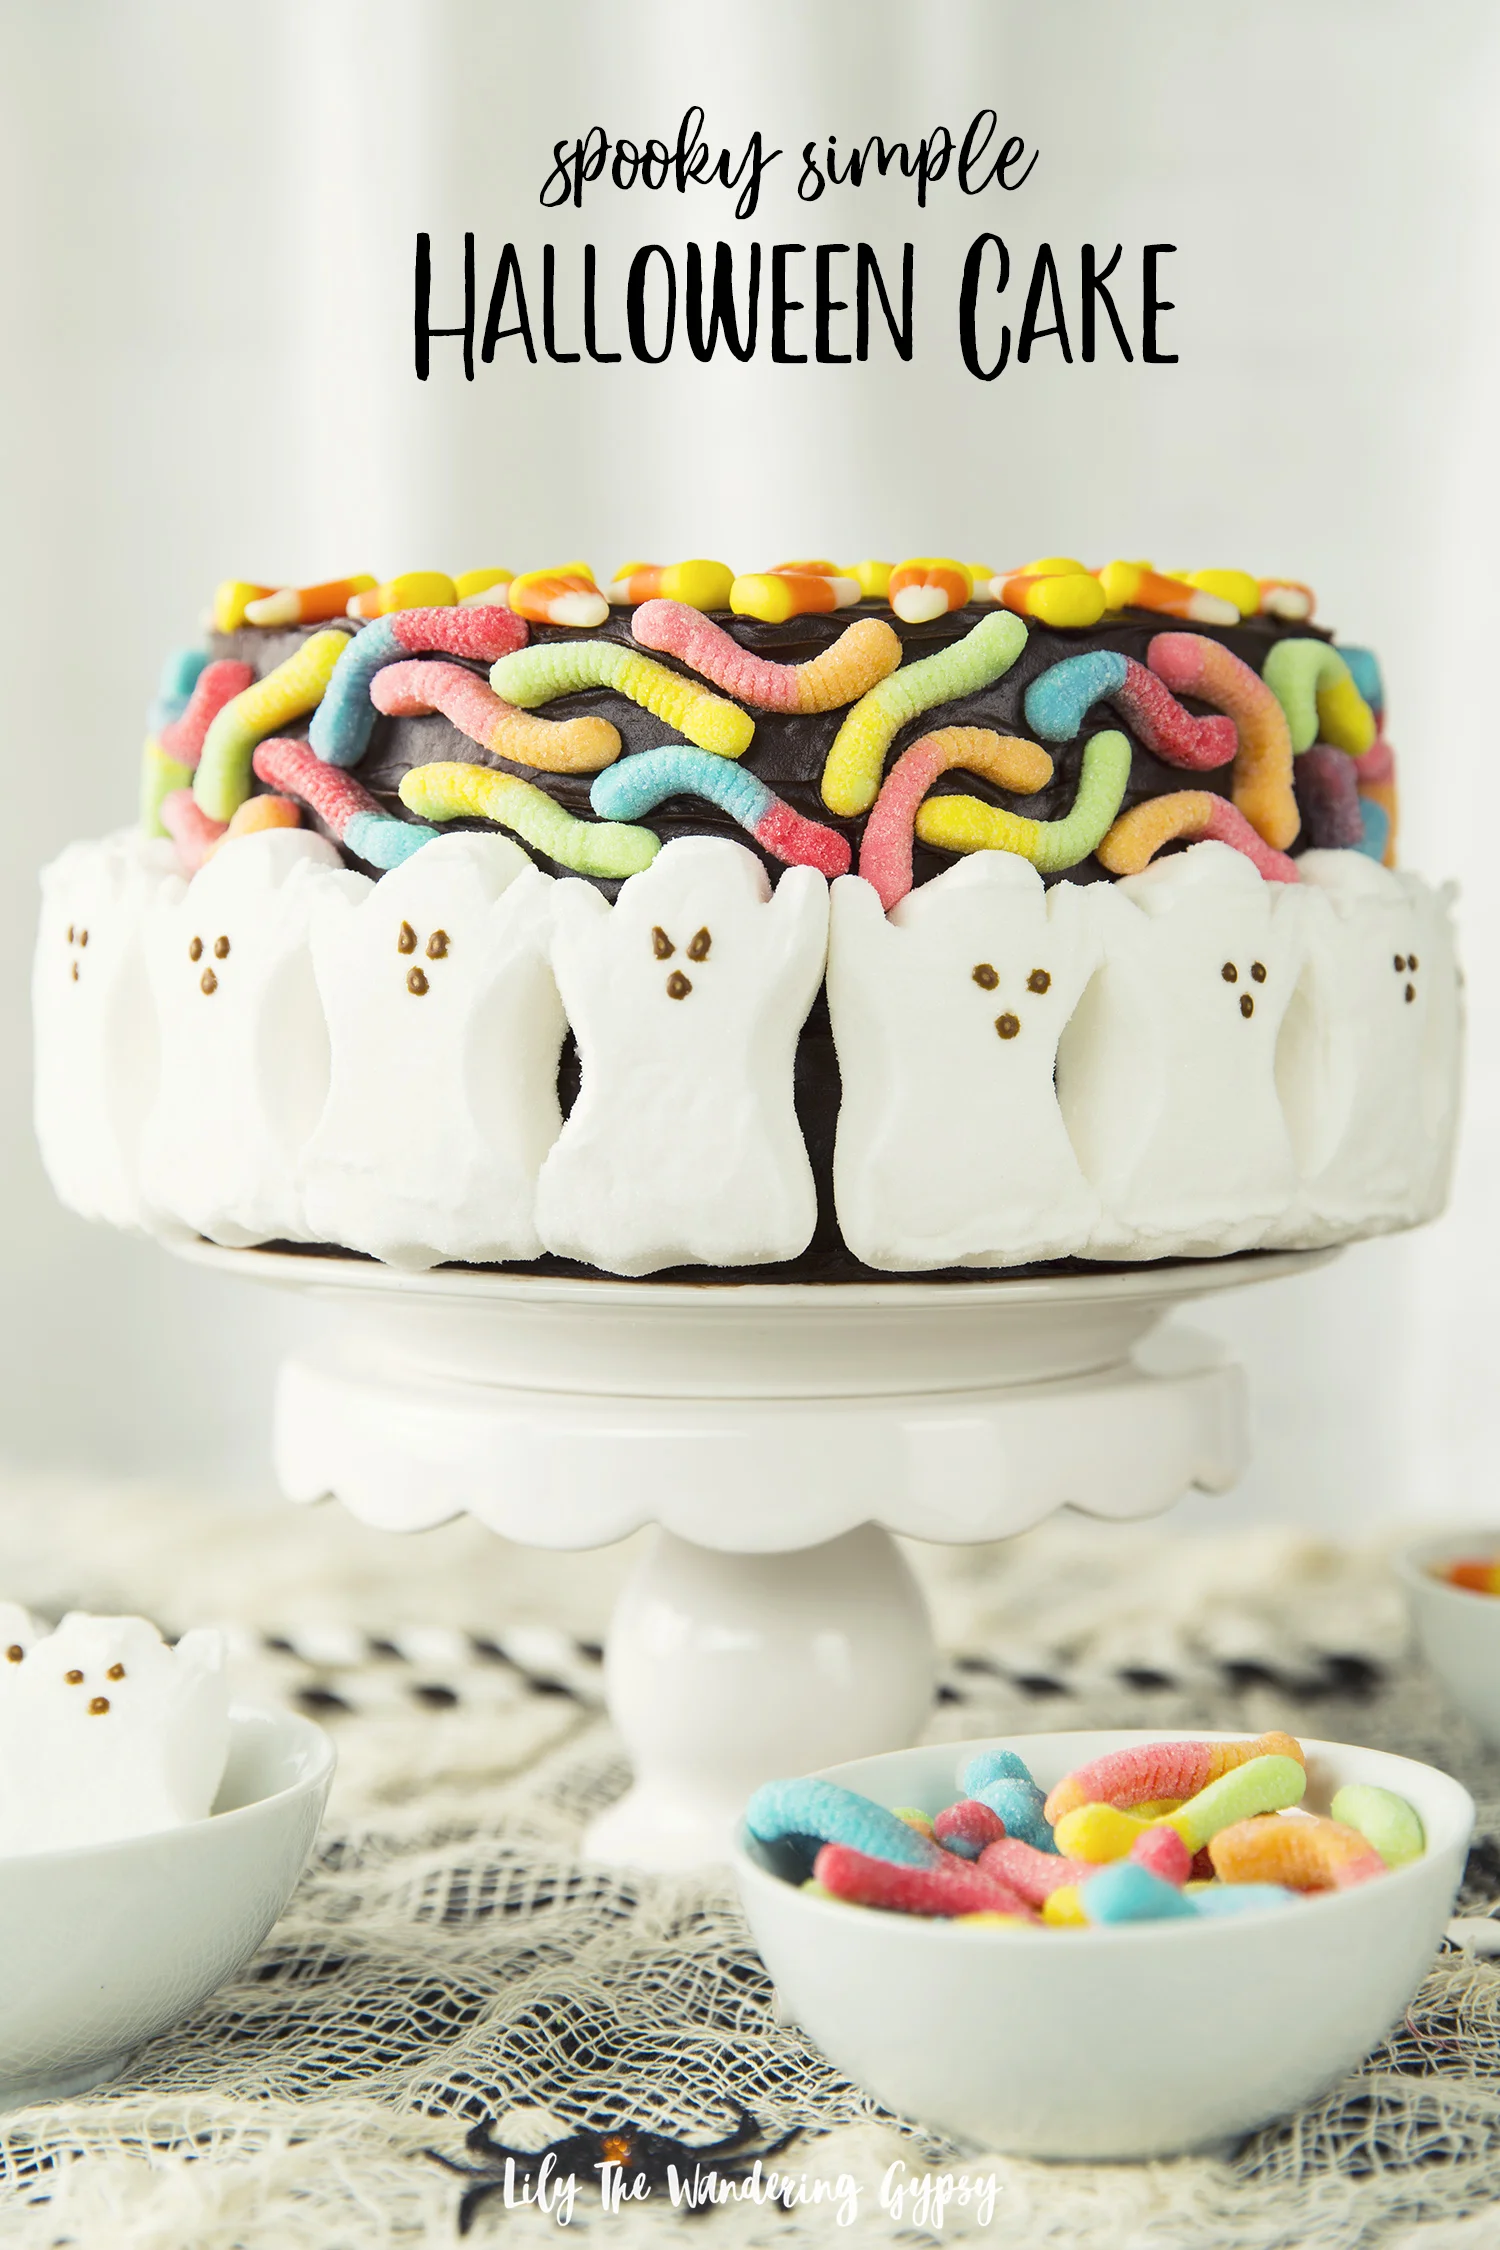
While many of us celebrated Halloween this weekend, I am still in the Halloween spirit! Here are some outstanding examples of Halloween Cakes that I found incredibly inspiring. I hope you do too!

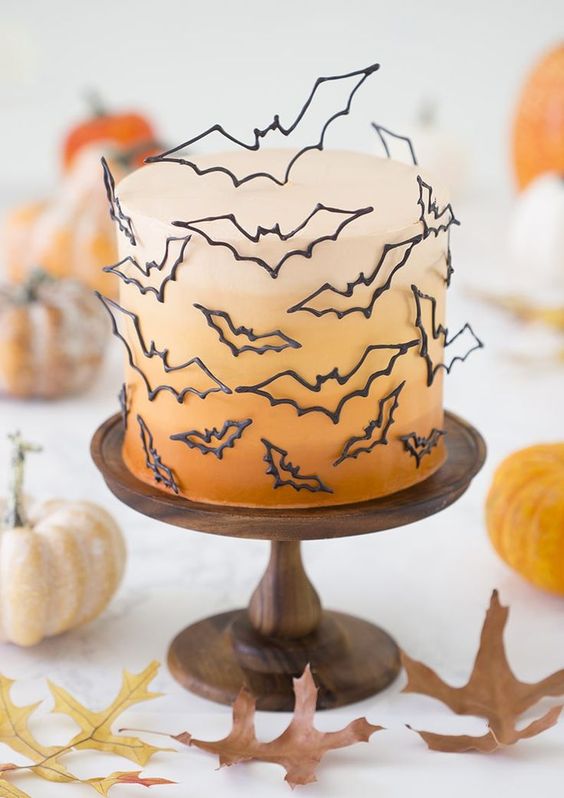
A Halloween Bat Cake that takes the cake for the most elegant and 3-Dimensional cake.

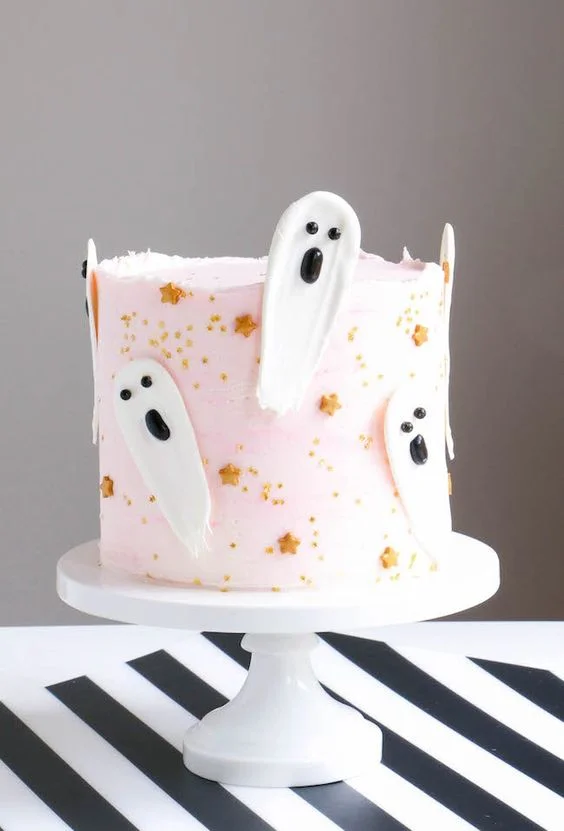
This amazing Brushstroke Halloween Ghost Cake is out of this world spooky and artistic!

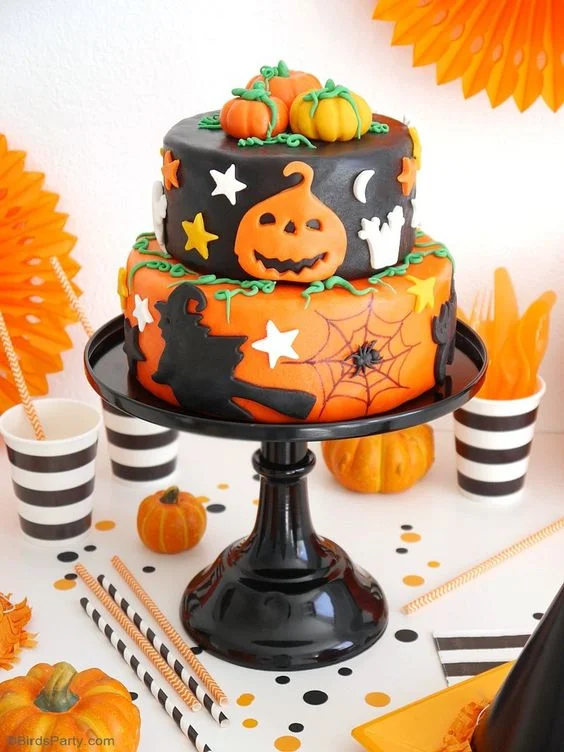
Another adorable and festive Halloween cake that is decorated just right.

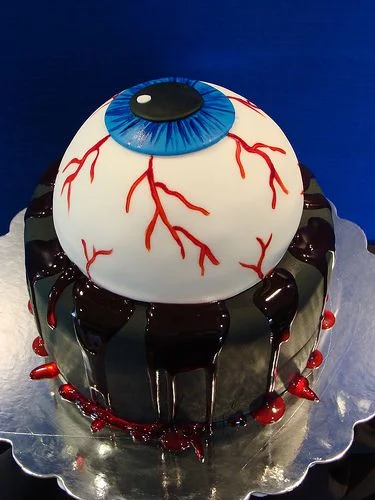
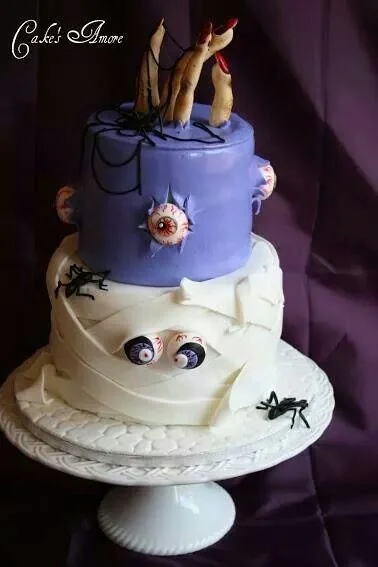
This “eye-catching” cake sure does look amazing!

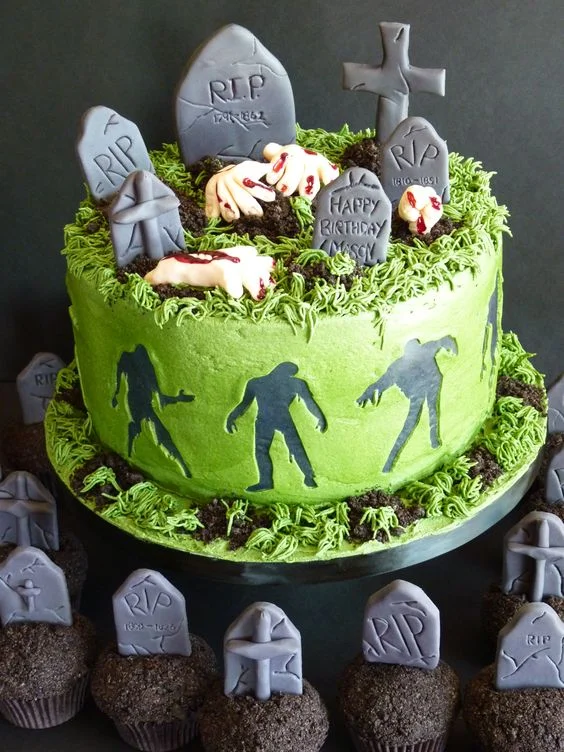
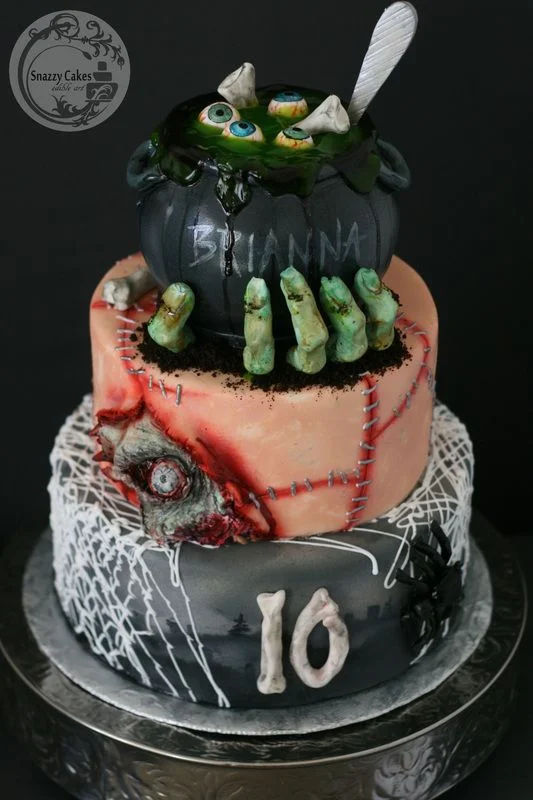
This zombie cake looks so realistic and those graveyard cupcakes pair so well with the theme!

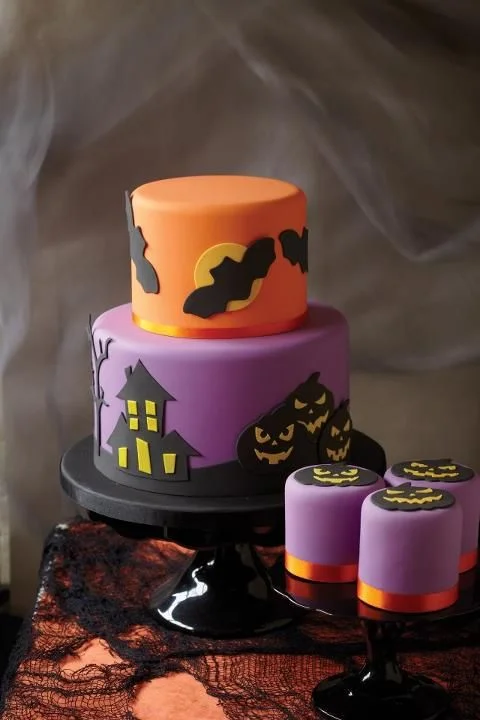
A perfectly decorated two tier cake to inspire your Halloween!

The undead would definitely feel welcome at THIS Halloween party!

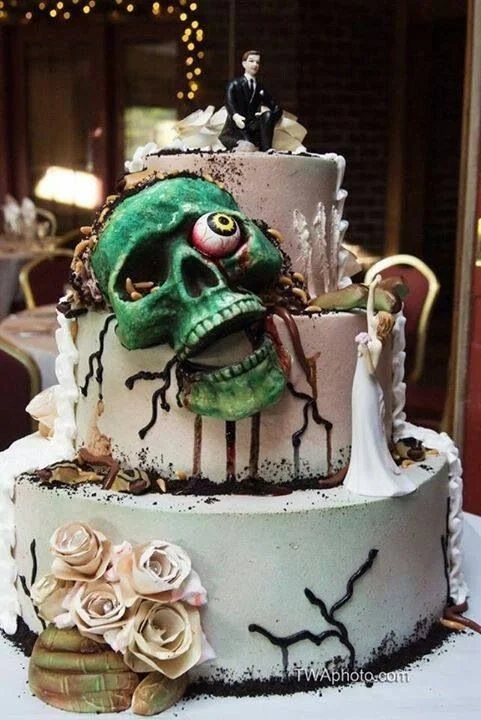
This zombie face wedding cake would definitely win an award for one of the creepiest cakes!

Love this cake, especially the eyeballs and hand sticking out from the top!

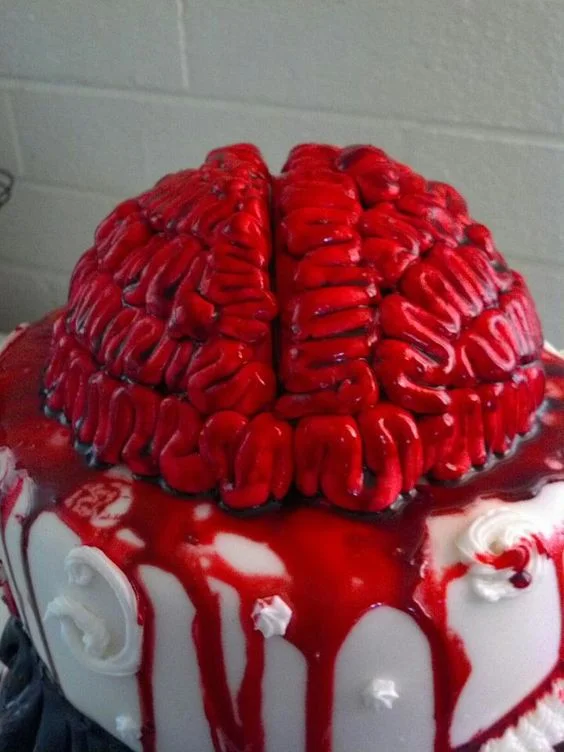
This bleeding brain Halloween cake is just too gross!

Easy Caramel Brownie Layer Cake

If you are a fan of layers upon layers of chocolate brownies, homemade whipped cream, and caramel, then this is definitely the cake for you! Although it looks so elegant, it really is pretty easy. This dessert allows us to think beyond the traditional chocolate cake, and make your next dessert rich, decadent, and delicious! When I made this dessert for a potluck, people raved about it. It was so delicious once the whipped cream layers sat with the brownie layers, because the sides stay a bit crunchy, and the inside portion of the cake moisten up and form more of a fudgy and cake-like consistency all at the same time, that’s out of this world! Hope you enjoy.

INGREDIENTS:

*Note - Amazon Affiliate Links have been provided if available

For The Whipped Cream:

For The Brownies:

  • 2 boxes of brownie mix (I used Ghirardelli caramel turtle brownie mix, and instead of mixing the caramel into the brownies to bake, I decorated the top pf the cake with it!)

  • Brownie ingredients (eggs, oil, and water)

  • 3 round baking sheets - I found mine for about $1 each at Walmart!

  • Caramel Sauce if not included in Brownie boxes you use.

INSTRUCTIONS:

1.) Preheat oven to 375 degrees. On parchment paper, trace your circular baking dish three times. Cut those three paper circles out and set aside. Spray three circular baking pans with Pam, then place the circular paper pieces into the baking pans and spray a little bit more to coat paper.

2.) Mix up 2 boxes of your favorite brownie mix and pour into three prepared circular baking pans. Bake the three circle pans for 15-20 minutes, check to see if they are done by inserting a toothpick to see if they are done.

3.) To make your homemade whipped cream, in a stand mixer, add 1 pint of heavy whipping cream + 1/3-1/2 C. sugar + 1-2tsp vanilla. I also love using vanilla bean powder to add little black flecks and more vanilla flavor to my whipped cream. Whip for 2-4 minutes on high, until stiff peaks form. Just keep mixing, it may seem like an eternity, but is so worth it! Do not over beat the cream, or it will begin to resemble butter, and not be very fluffy.

4.) Now, it’s time to “layer up”! I have shown all of my layering steps below, so you basically layer up: brownies and whipped cream until you get to the top layer. Make sure to make the top layer of whipped cream as smooth as possible. But, no need to stress about being perfect - this cake is a naked cake and is pretty rustic anyway, so the more homemade it looks, the better!

5.) To decorate the top: I used caramel sauce in a squeeze tube that worked perfectly to decorate. I basically just made a continuous line of caramel vertically across the entire cake, then crossed that again with caramel lines horizontally. I rotated the cake as I worked, which was great. Add sprinkles and enjoy!

THIS CAKE ROCKS! HOPE YOU ENJOY!

If you wind up making this recipe or any other recipes, please tag me on Instagram with @happysolez! Thanks!!

Pull Apart Cupcake Cake Recipe

This recipe is PERFECT for parties and holidays, because it's easy to eat! Everyone has their own individual cupcake to share the joy, no need to cut THIS cake. 

We were ecstatic when we learned that we had the opportunity to collaborate with Martha Stewart to promote her baking items at Macy's. It's quite the honor, and several times throughout this process I exclaimed, "I am shooting recipes for Martha Stewart"!!! 

In order to creatively incorporate her Essentials collection into pins that would encourage people to want to learn more, I thought that a sweet treat would obviously be perfect, so I found a fun recipe on marthastewart.com and creates it! Below, you will find that very recipe, and I hope you are inspired by this fun post to make your very own cupcake cake!

MARTHA STEWART RECIPE (originally found here):

Pull-Apart Vanilla-Wafer Cupcake Cake with Berries

Talk about a fun dessert! It looks like a sheet cake on top, but there are actually vanilla-coconut cupcakes underneath the fresh berries and fluffy whipped-cream frosting. It's easy to make and even easier to serve -- no slicing required.

Source: Martha Stewart Living, May 2018

INGREDIENTS

  • 45 vanilla-wafer cookies, pulsed in a food processor until finely ground (1 1/2 cups)
  • 1/2 cup unbleached all-purpose flour
  • 1 teaspoon baking powder
  • 1/4 teaspoon kosher salt
  • 1 stick unsalted butter, softened
  • 3/4 cup granulated sugar
  • 2 large eggs, room temperature
  • 3/4 cup whole milk
  • 1 cup sweetened shredded coconut
  • 1 teaspoon unflavored gelatin
  • 1 cup cold heavy cream
  • 2 tablespoons confectioners' sugar
  • 1/4 teaspoon pure vanilla extract
  • 1 1/2 cups mixed fresh berries, such as blueberries, raspberries, and blackberries

DIRECTIONS

  1. 1. Preheat oven to 350 degrees. Line a standard muffin tin with paper liners. Whisk together cookie crumbs, flour, baking powder, and salt.

  2. 2. Beat butter with granulated sugar on medium speed until pale and fluffy, about 1 minute. Beat in eggs, one at a time. Reduce speed to low and add flour mixture in 3 batches, alternating with milk, beginning and ending with flour mixture and beating until combined after each addition. Fold in coconut.

  3. 3. Divide batter among cups. Bake until cupcakes are golden brown and centers bounce back when gently pressed, 22 to 24 minutes. Let cool completely in tin on a wire rack.

  4. 4. Add 2 tablespoons water to a small saucepan. Sprinkle with gelatin; let stand until thick, about 5 minutes. Gently heat over medium until gelatin has dissolved. Remove from heat; let cool 5 minutes (but don't let it set).

  5. 5. Beat together cream, confectioners' sugar, and vanilla on medium speed until very soft peaks form, 1 to 2 minutes. Add gelatin mixture; beat on medium until stiff peaks form, about 1 minute more.

  6. 6. Remove cupcakes from tin and arrange on a platter in a three-by-four rectangle. Spoon frosting over each row of cupcakes; using an offset spatula, smooth to cover tops, forming a rectangular shape. Refrigerate at least 1 hour and up to 3 hours. Sprinkle with berries before serving.

Ombre Oreo Cake Recipe with New COOL WHIP Mix-Ins, Oreo

This post has been sponsored by COOL WHIP. All thoughts and opinions are my own.

Oreo is one of my favorite flavors of all time. I would always go for a cookies and cream cone in a store with a million flavor options. I was extremely excited to be able to create a decadent, three layer ombre cake to show my love for all things Oreo!

FULL VIDEO INSTRUCTIONS:

Two iconic foods – COOL WHIP and Oreo are mixing together for the ultimate dessert! I am considering this my new “secret ingredient” because it tastes like something that an upscale bakery would use. Everyone who tries this cake is definitely going to ask what makes it taste so delicious and unique.

If I had created this layer cake with traditional icing, it would be very heavy and not anywhere near as delicious. The light, airy texture of new COOL WHIP Mix-

Ins, Oreo makes you feel like you can indulge a little without the calories.

I was extremely impressed with this product, it’s going to become a staple ingredient in my home!

The Oreo Mix-Ins worked so well to add the finishing touches to my cake – I used an icing bag fitted with a star tip and added little dollops around the bottom of the cake. Next, I added a few dollops on top and finished with a mini Oreo cookie! What a perfect homage to my favorite cookie ever!

This cake reminds me so much of the birthday cakes that my grandparents would treat me to each year as a child. They came from an Italian bakery in the Chicagoland area, and was something I looked forward to each year, and now I can nourish that tradition in my own family and friends. I am seriously excited for whichever one of my friends has the next birthday because I cannot wait to make another one of these cakes already.

I hope you enjoy this cake as much as I did. This cake tastes like it was made from scratch, when in reality, this cake took just around an hour to make!

OMBRE OREO CAKE

PREP TIME: 30-40 minutes

TOTAL TIME: 1 hour – 1.5 hours depending upon decorating time

INGREDIENTS:

3-4 containers of COOL WHIP Mix-Ins, Oreo (found at Walmart or your local retailer)

1 box of white cake mix, plus ingredients to make cake

1 box of Devil’s food cake mix, plus ingredients to make cake (use the same brand for both)

Mini Oreo cookies to decorate cake

OTHER MATERIALS:

3 round cake pans

Hand Mixer

Parchment paper, cut into circles to fit into round pans

Rotating cake decorating stand

Flat icing spatula

Icing Bag + Large Star Icing Tip

INSTRUCTIONS:

  1. Bake cakes. To create the ombre effect, I mixed up both of my cake mixes according to the packages, then added 3 cups of vanilla batter to one pan, 3 cups of chocolate batter to another pan, then in my third pan, I swirled the remaining batters. It created a gorgeous middle layer. I made sure to use two cake mixes of the same brand so that they contained the same ratio of ingredients for each layer.

  2. Once cakes have completely cooled, carefully slice the cakes so they are flat on top (they tops will have rounded during baking). I used a serrated bread knife and it worked super well.

3. Remove the paper from the first layer, and place the chocolate layer onto the cake stand, upside down. Cover that layer with ½-1 container of Cool Whip Mix Ins Oreo. Smooth out the Oreo Mix-Ins and place the second “swirled” middle layer onto that. Again, cover the top of the second layer with Oreo Mix-Ins, then place the vanilla layer on top UPSIDE DOWN, to ensure a flat cake on top. Note – when I first opened the product, it had a lot of fluffy light texture. Once I stirred it and started icing the cake with it, the COOL WHIP got a lot smoother.

4. Cover the top of the cake with a smooth layer of Oreo Mix-Ins, then add a thin layer to the entire outside of the cake, smoothing several times with the icing spatula. Make sure this layer is as smooth as possible, then place cake into freezer for around 1 hour.

5. Time to decorate the cake! Using that same delicious COOL WHIP Mix-Ins, Oreo as before, pipe little shapes along the entire bottom of the cake. Make sure to keep as consistent of shapes as you can.

6. Lastly, add dollops of icing swirls around the top of the cake (I did 8 total), and add mini Oreo cookies on top. I also added one larger dollop in the middle of the top of the cake and it all turned out so well!

I was SO happy to see how the layers stayed perfectly together with the help of the Cool Whip Oreo layers. I am thrilled to share this recipe because it’s practically fool proof.

Thank you so much for taking the time to check out this recipe. I hope it has inspired you! This cake would be perfect for birthdays, Mother’s Day, Father’s Day, graduation parties, and even just because!

Learn more about this wonderful new COOL WHIP Mix-Ins,Oreo here and retailers near you carrying it, and connect with COOL WHIP on social!

FACEBOOK

INSTAGRAM

PINTEREST

5 Ingredient Super Moist Pistachio 7UP Layer Cake with Pistachio Frosting Recipe

This shop has been compensated by Collective Bias, Inc. and its advertiser. All opinions are mine alone. #JustAdd7UP

Looking to create a delicious pistachio themed dessert for St. Patrick’s Day and beyond? I have a fun and unique idea for you that looks super elegant but only took a little bit of time to create. This would also make an excellent cake for a birthday, Mother’s Day, Father’s Day, other holiday, or just because! In fact, I will be making another one tomorrow evening for a friend’s birthday and she is SO excited!!

I was honored when 7UP asked me to create something special for a holiday that means everything to me. My late grandmother, Pat, was born on St. Patrick’s Day and was one of my very favorite people in the whole wide world. She taught me lots of her recipes and I use several of them quite regularly, and I think of her all the time. She instilled such amazing values on me, and I love her so very much! So, with her in mind, and the luck of the Irish on my side, I present you with this Super Moist Pistachio 7UP Layer Cake with Pistachio Frosting. It’s quite possibly the MOST delicious creation on Earth!

It’s really quite impressive that the base of this cake contains only 5 ingredients, one of them being a can of 7UP. This versatile ingredient adds a lot of moisture to the cake, and with the homemade frosting on top, the two flavors mesh together just perfectly.

If you like pistachio, then you are going to LOVE this delicious and easy-to-create cake! It turned out very elegantly too, which I was very happy with! I didn’t use any super special decorating tools, which made things even easier.

Luckily, I was able to grab all of my supplies at Walmart (I always love when life is easy!)

CAKE INGREDIENTS:

Serving Size: 8-10, Prep Time: 25 Minutes, Total Time: 1 hour 25 Minutes

1 can 7UP®

1 box of vanilla cake mix

1 (3.4 oz) box of pistachio pudding mix

3 eggs

1 cup Vegetable Oil

FROSTING INGREDIENTS:

1 (3.4 oz) box of pistachio pudding mix

8 oz softened cream cheese

½ cup softened butter (1 stick)

5 Tbsp milk

5-5 ½ cups powdered confectioners sugar

1 Tbsp vanilla or almond extract


INSTRUCTIONS:


  1. To make the cake, preheat oven to 350 degrees F. Grease two 9” round pans with non-stick spray and add a circle of waxed paper or parchment paper to the bottom of each pan. Spray the paper circle, then add a little bit of flour to your pans. Use your fingers to help move the flour around and coat the pans, and knock out any excess flour.

  2. In a large bowl, combine all cake ingredients and mix on medium to high speed for 4 minutes. Scrape sides of mixing bowl at 2 minutes.

3. Using a measuring cup, add half of the batter to each cake round. Bake for 30-35 minutes, or until cake springs back when you press onto it.

4. While the cake is baking, make your icing. In a large mixing bowl, first add pudding mix, then butter, cream cheese, and vanilla or almond extract. Beat with a mixer until smooth.

5. Now, to finish your icing, add powdered confectioner one cup at a time, first folding it in with a spoon, then mixing with your mixer so sugar doesn’t fly everywhere. Lastly, add 4-5 Tbsp of milk to begin to thin your icing. Once it’s at your desired consistency, set aside.

6. Once cakes have completely cooled, remove them from the round pans, remove the paper off of the cakes, and add feel free to even out the tops of the layers very carefully with a sharp knife.

7. Add icing to one layer of the cake, smooth into an even layer, then add the second cake round on top. Lastly, cover the top and sides of the cake with a smooth layer of icing with a silicone spatula. Lastly, feel free to use an icing tip or icing in a zip top bag with the corner cut off to draw more designs and textures to the top of the cake. Finish the cake with pistachio pieces around the sides and sprinkled on top! Enjoy!

If you are lucky enough to create this recipe, I would absolutely LOVE to see what you make! Tag me on Instagram as @happysolez, or share the link in the comments below to let me know how it turned out. And, if you have any questions, leave them below too.

How To Make A Simple Yet Spooky No-Bake Halloween Ghost Cake

I created the cutest Halloween Cake ever and I am so happy to share it with you. I designed two versions, one in a more black and white color scheme, and also one with a bit more color. You can use the design as inspiration for whatever sort of Halloween decor you may enjoy best.

The most important part of sourcing the Ghost Shaped Peeps. I found mine at Walgreens (not my local grocery store though). I used the Ghost Peeps packs containing 9 pieces each, and two packages fit around the cake with a few to spare. 

Well, let's get spooky and decorate this cake!!! And, please comment below if you're making any special treats inspired by Halloween. I'd love to hear all about them!

No baking is required for this awesome cake! 

- 2 Sour Cream Bundt Cakes in Chocolate or Vanilla

Raspberry Jelly

Dark Chocolate Icing (1-2 containers)

Ghost Peeps

Candy Corn + sour Gummy Worms (Optional, only for more colorful cake design)

Silicone Spatula for icing cake

1.) Remove the plastic top of the first bundt cake's container. Using a serrated bread knife, CAREFULLY slice the top off of the bundt cake to make it as flat on top as possible.

2.) Invert the cut cake onto a plate or cake stand and make sure it's level.

3.) Add a thin layer of raspberry jelly to the top of the first bundt cake.

4.) Carefully slice the top off of the second bundt cake, and invert that to sit it on top of the first layer of cake. 

5.) Add dark chocolate icing to the entire outside of the 2 layer cake. Make it as smooth as you can! The bottom half of the chocolate icing will be covered with Ghost Peeps, so don;t worry too much about how smooth it is, mainly making sure it's not too messy. Wipe off any excess chocolate icing around the bottom of the cake and the plate as possible, with a wet paper towel.

6.) Time to decorate! Open up two packages of Peeps, and keep the Peeps in their sets of three. Support the cake with one hand, and gently apply each set of three ghosts around the bottom edge. I used 12 or 15 Peeps around the bottom plus one extra Peep to fill in the small gap I had. Make sure to keep supporting the cake as you add Peeps or it may fall over! I just LOVE how chic and elegant this cake looks!

But, I had to go a little further with the design. If you're looking for a more colorful version of this cake, here you go.

By carefully adding sour gummy worms one at a time, I was able to make a neat pattern out of them, leaving attractive negative space in between each worm. I kind of shaped them as I stuck each one on. I also added candy corn to the top of the cake, and LOVE how it turned out! What do you think?

PIN IT FOR LATER: