Pull Apart Cupcake Cake Recipe

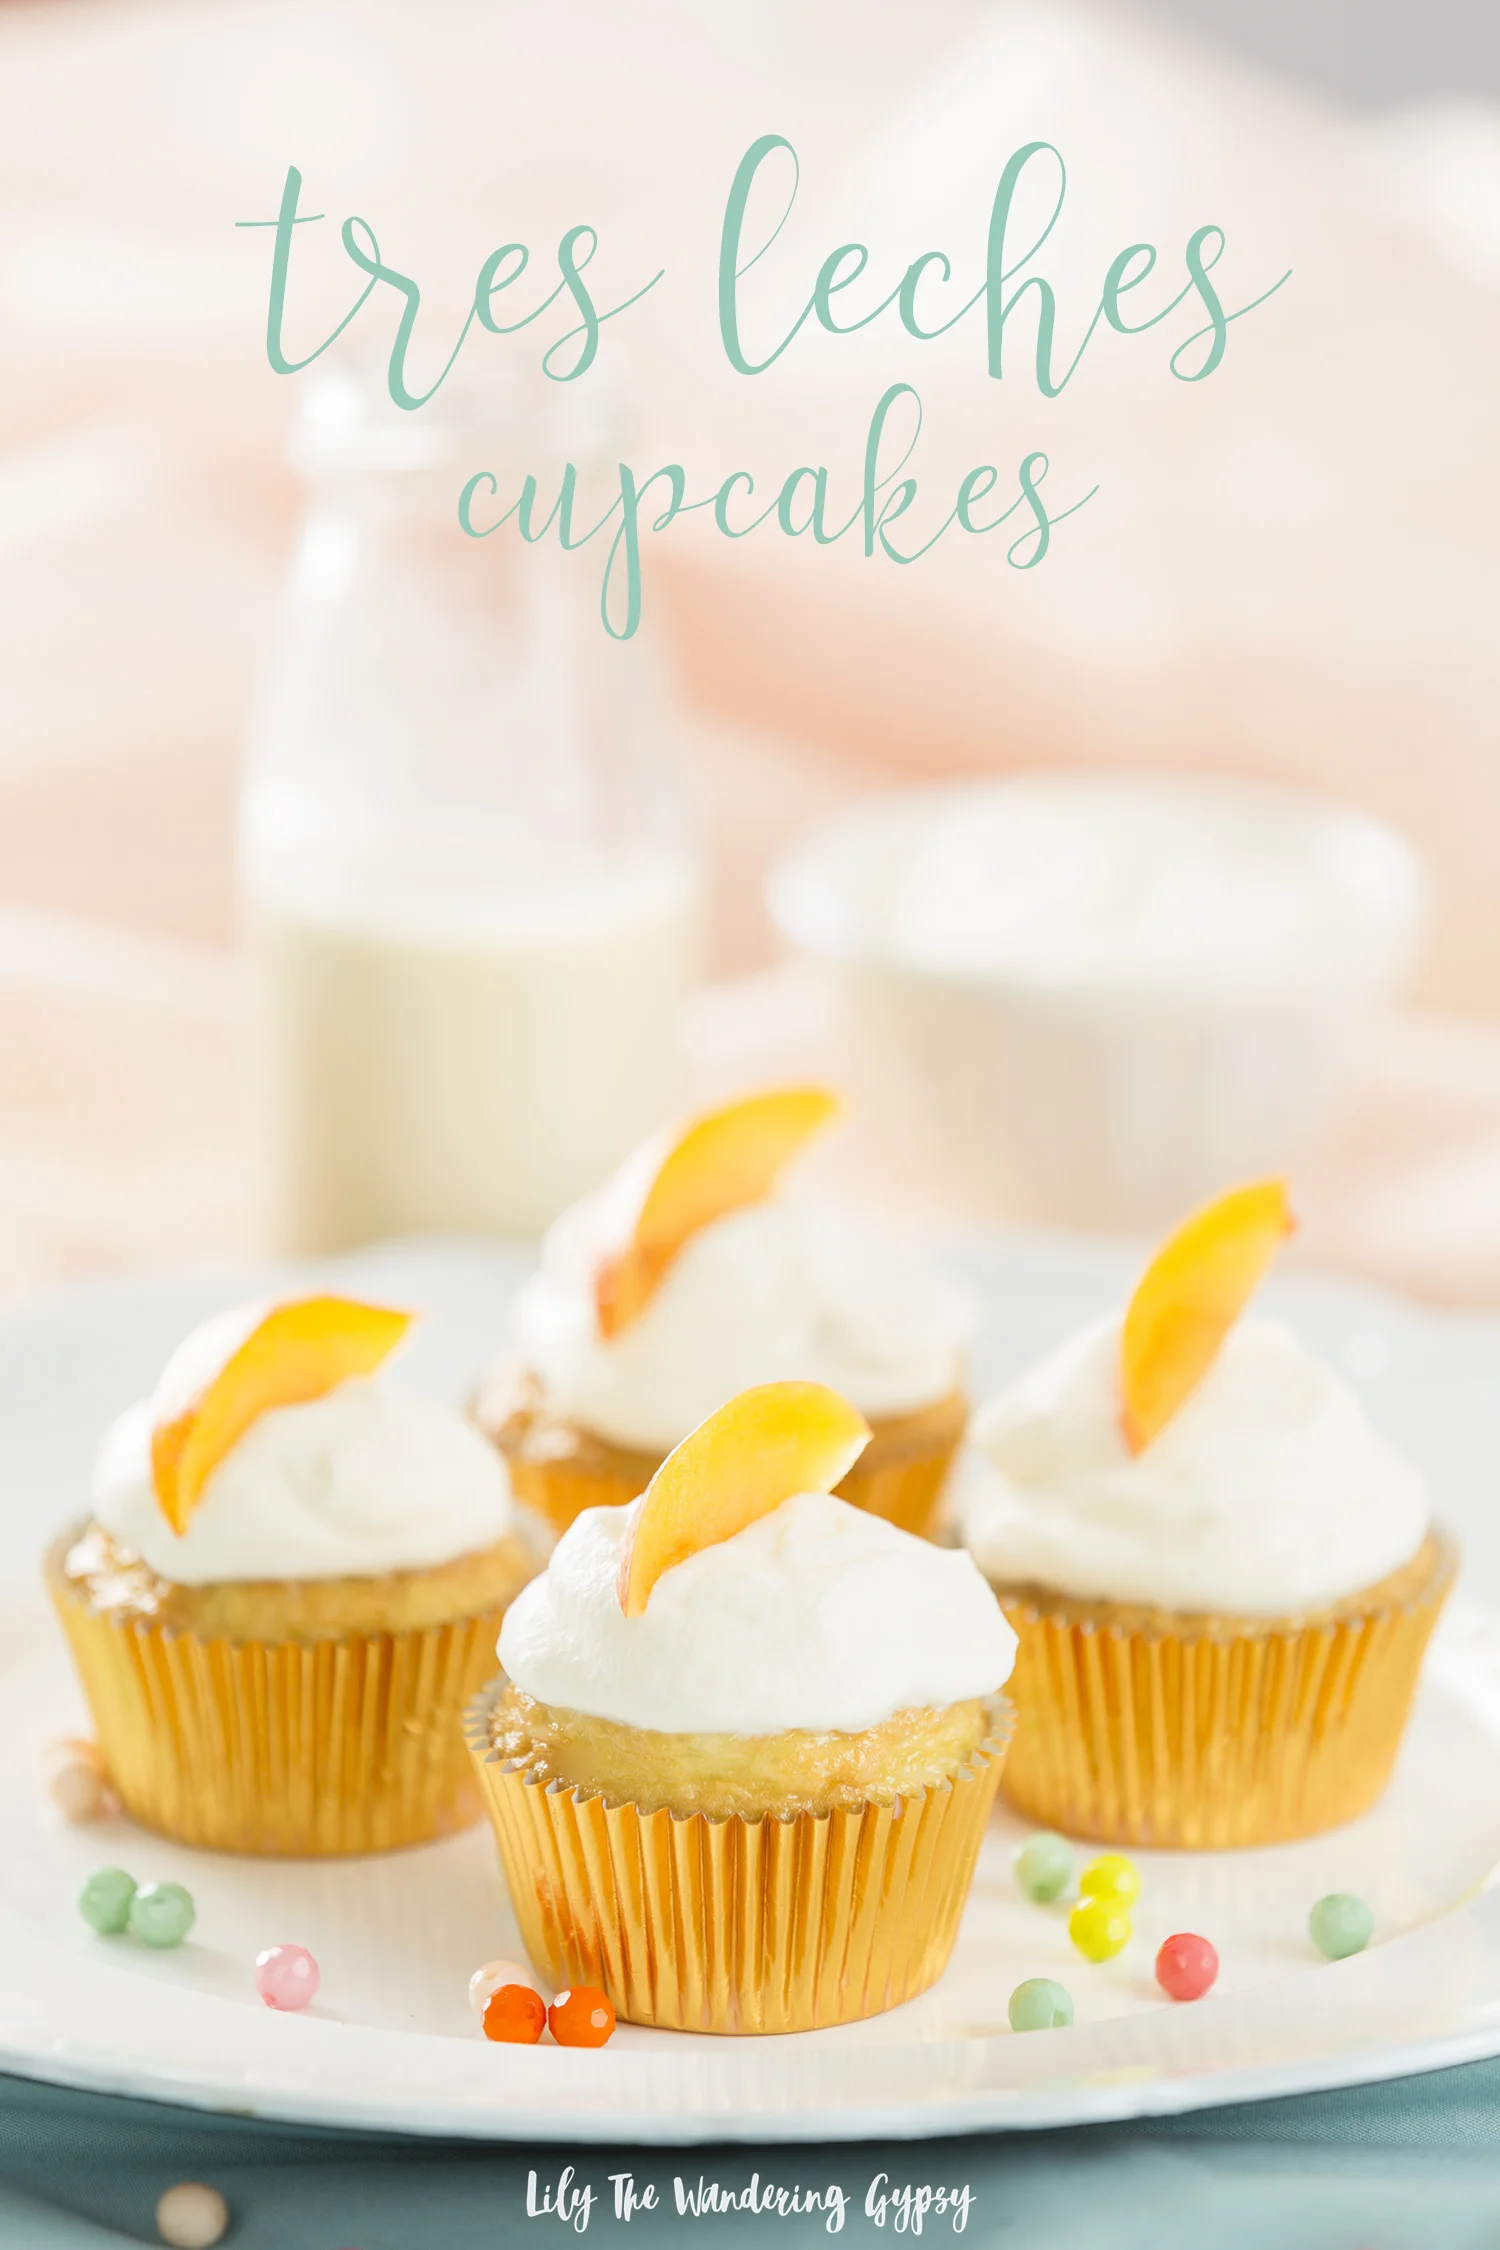
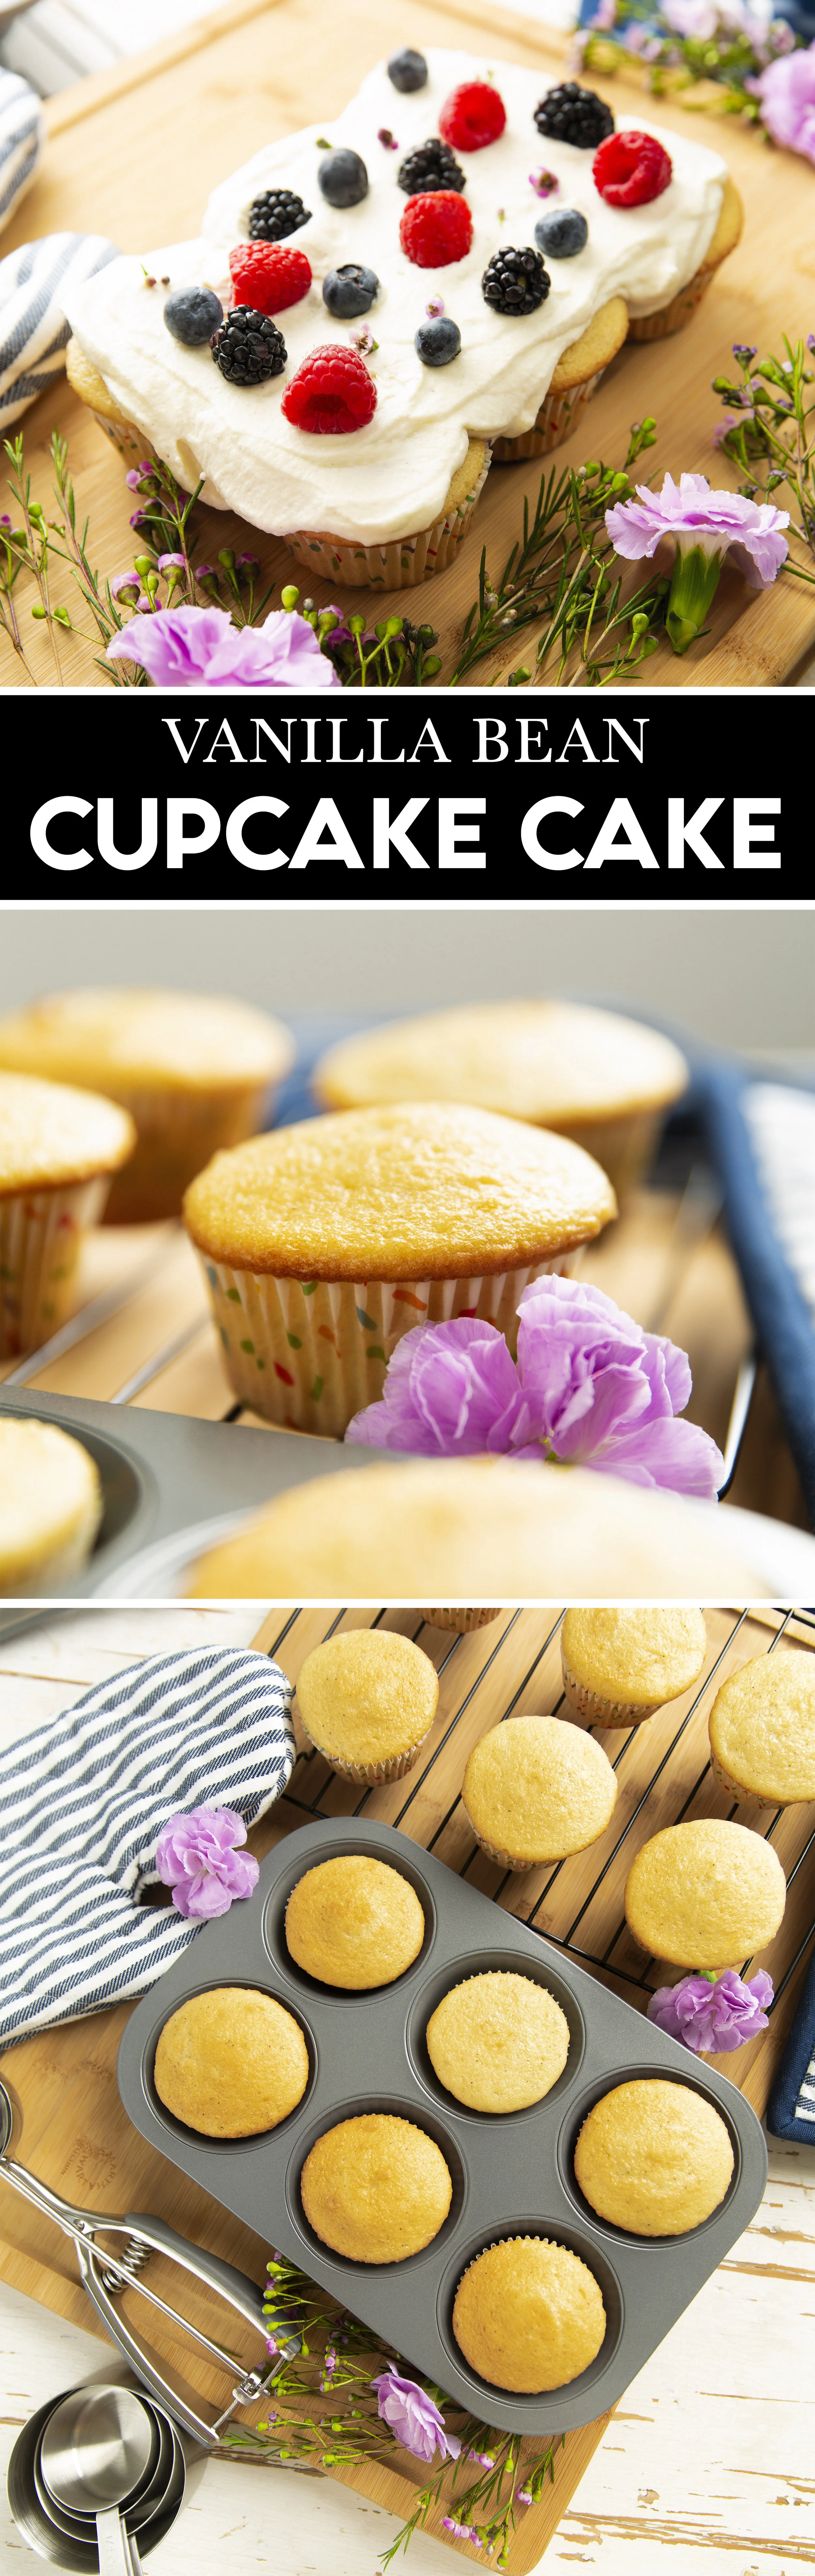
This recipe is PERFECT for parties and holidays, because it's easy to eat! Everyone has their own individual cupcake to share the joy, no need to cut THIS cake. 

We were ecstatic when we learned that we had the opportunity to collaborate with Martha Stewart to promote her baking items at Macy's. It's quite the honor, and several times throughout this process I exclaimed, "I am shooting recipes for Martha Stewart"!!! 

In order to creatively incorporate her Essentials collection into pins that would encourage people to want to learn more, I thought that a sweet treat would obviously be perfect, so I found a fun recipe on marthastewart.com and creates it! Below, you will find that very recipe, and I hope you are inspired by this fun post to make your very own cupcake cake!

MARTHA STEWART RECIPE (originally found here):

Pull-Apart Vanilla-Wafer Cupcake Cake with Berries

Talk about a fun dessert! It looks like a sheet cake on top, but there are actually vanilla-coconut cupcakes underneath the fresh berries and fluffy whipped-cream frosting. It's easy to make and even easier to serve -- no slicing required.

Source: Martha Stewart Living, May 2018

INGREDIENTS

  • 45 vanilla-wafer cookies, pulsed in a food processor until finely ground (1 1/2 cups)
  • 1/2 cup unbleached all-purpose flour
  • 1 teaspoon baking powder
  • 1/4 teaspoon kosher salt
  • 1 stick unsalted butter, softened
  • 3/4 cup granulated sugar
  • 2 large eggs, room temperature
  • 3/4 cup whole milk
  • 1 cup sweetened shredded coconut
  • 1 teaspoon unflavored gelatin
  • 1 cup cold heavy cream
  • 2 tablespoons confectioners' sugar
  • 1/4 teaspoon pure vanilla extract
  • 1 1/2 cups mixed fresh berries, such as blueberries, raspberries, and blackberries

DIRECTIONS

  1. 1. Preheat oven to 350 degrees. Line a standard muffin tin with paper liners. Whisk together cookie crumbs, flour, baking powder, and salt.

  2. 2. Beat butter with granulated sugar on medium speed until pale and fluffy, about 1 minute. Beat in eggs, one at a time. Reduce speed to low and add flour mixture in 3 batches, alternating with milk, beginning and ending with flour mixture and beating until combined after each addition. Fold in coconut.

  3. 3. Divide batter among cups. Bake until cupcakes are golden brown and centers bounce back when gently pressed, 22 to 24 minutes. Let cool completely in tin on a wire rack.

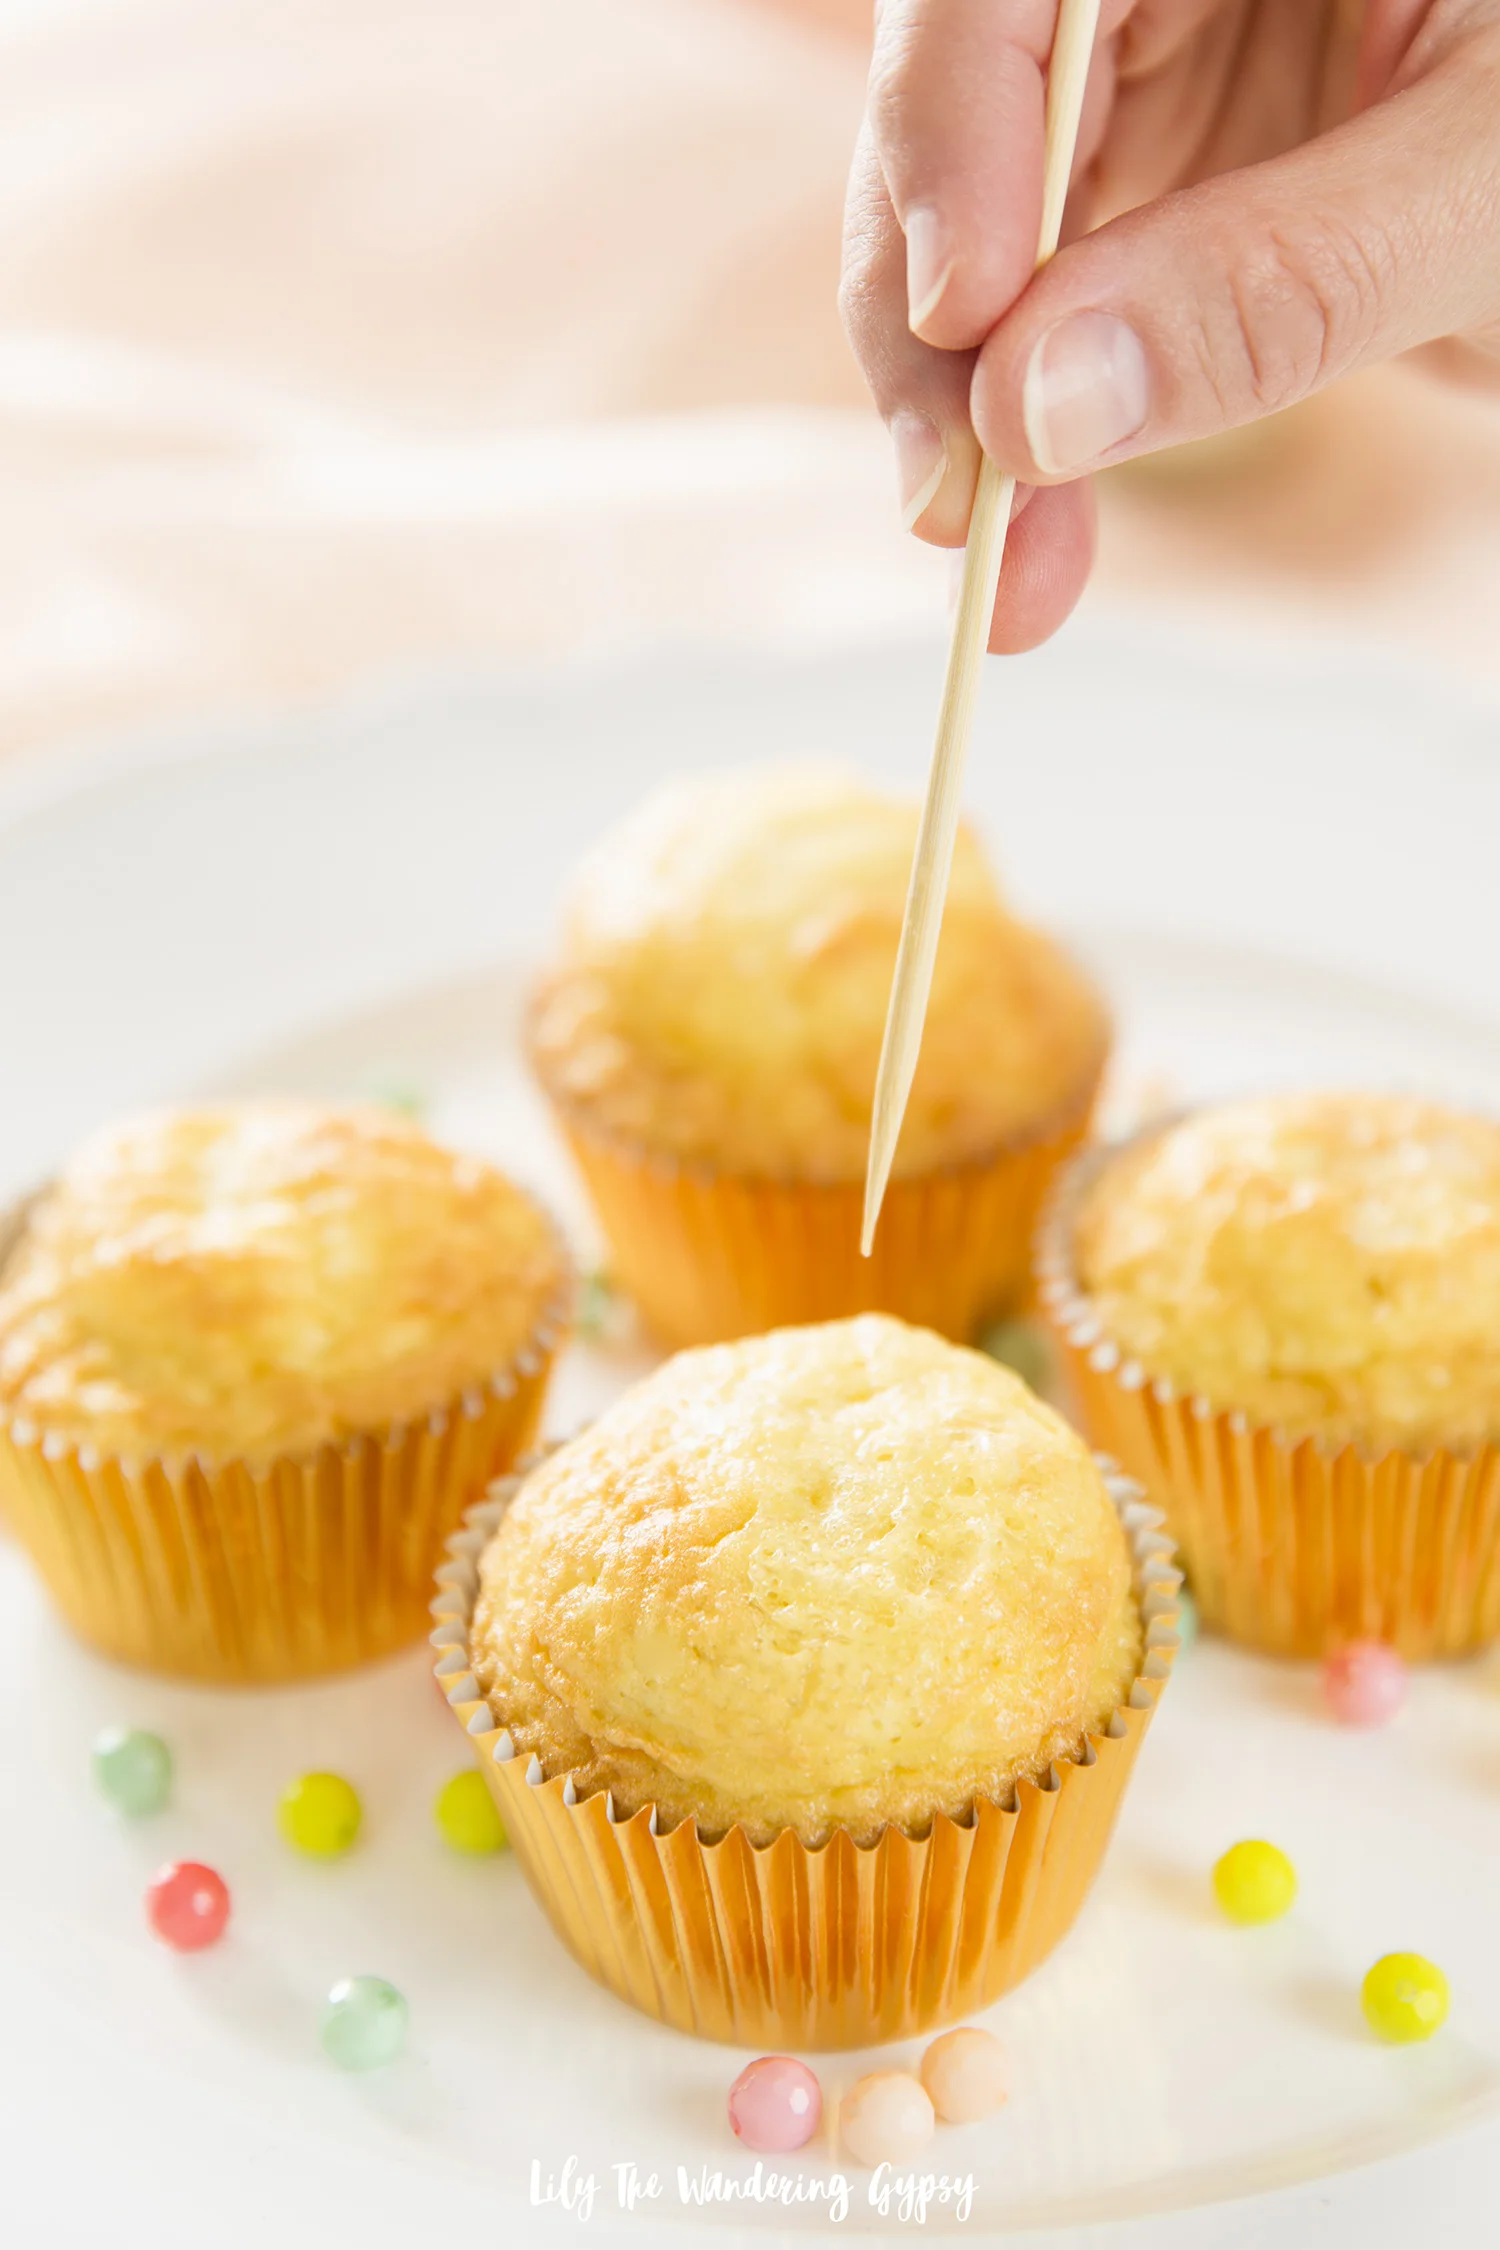
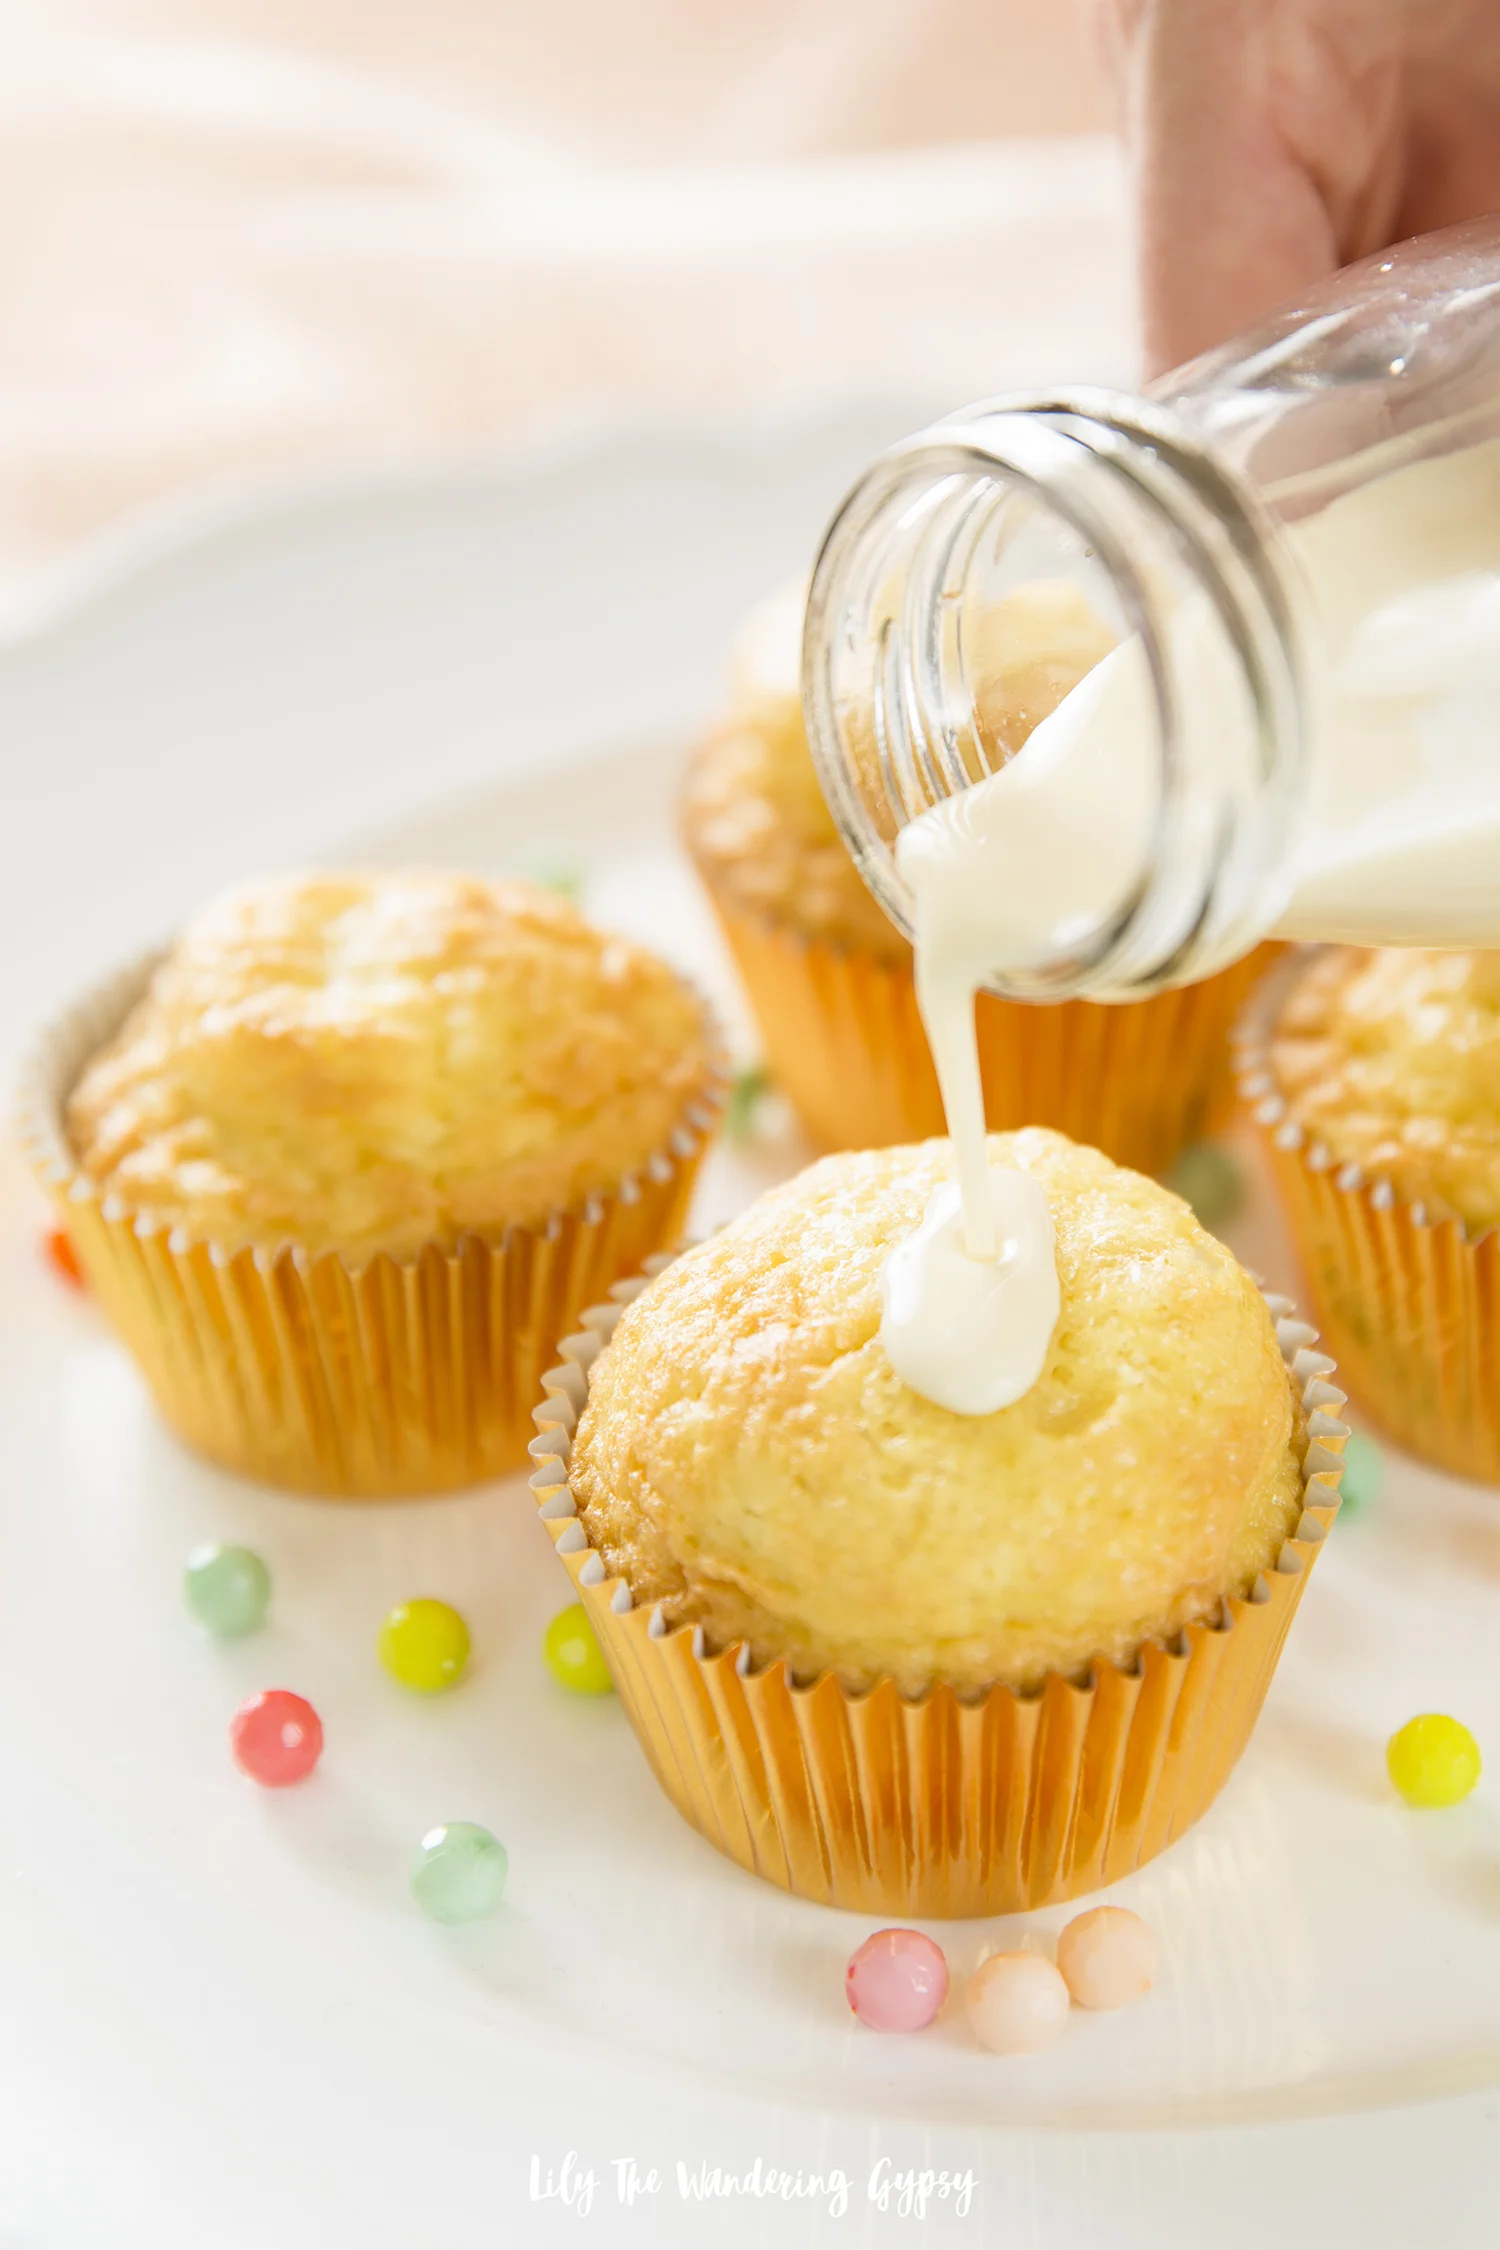
  4. 4. Add 2 tablespoons water to a small saucepan. Sprinkle with gelatin; let stand until thick, about 5 minutes. Gently heat over medium until gelatin has dissolved. Remove from heat; let cool 5 minutes (but don't let it set).

  5. 5. Beat together cream, confectioners' sugar, and vanilla on medium speed until very soft peaks form, 1 to 2 minutes. Add gelatin mixture; beat on medium until stiff peaks form, about 1 minute more.

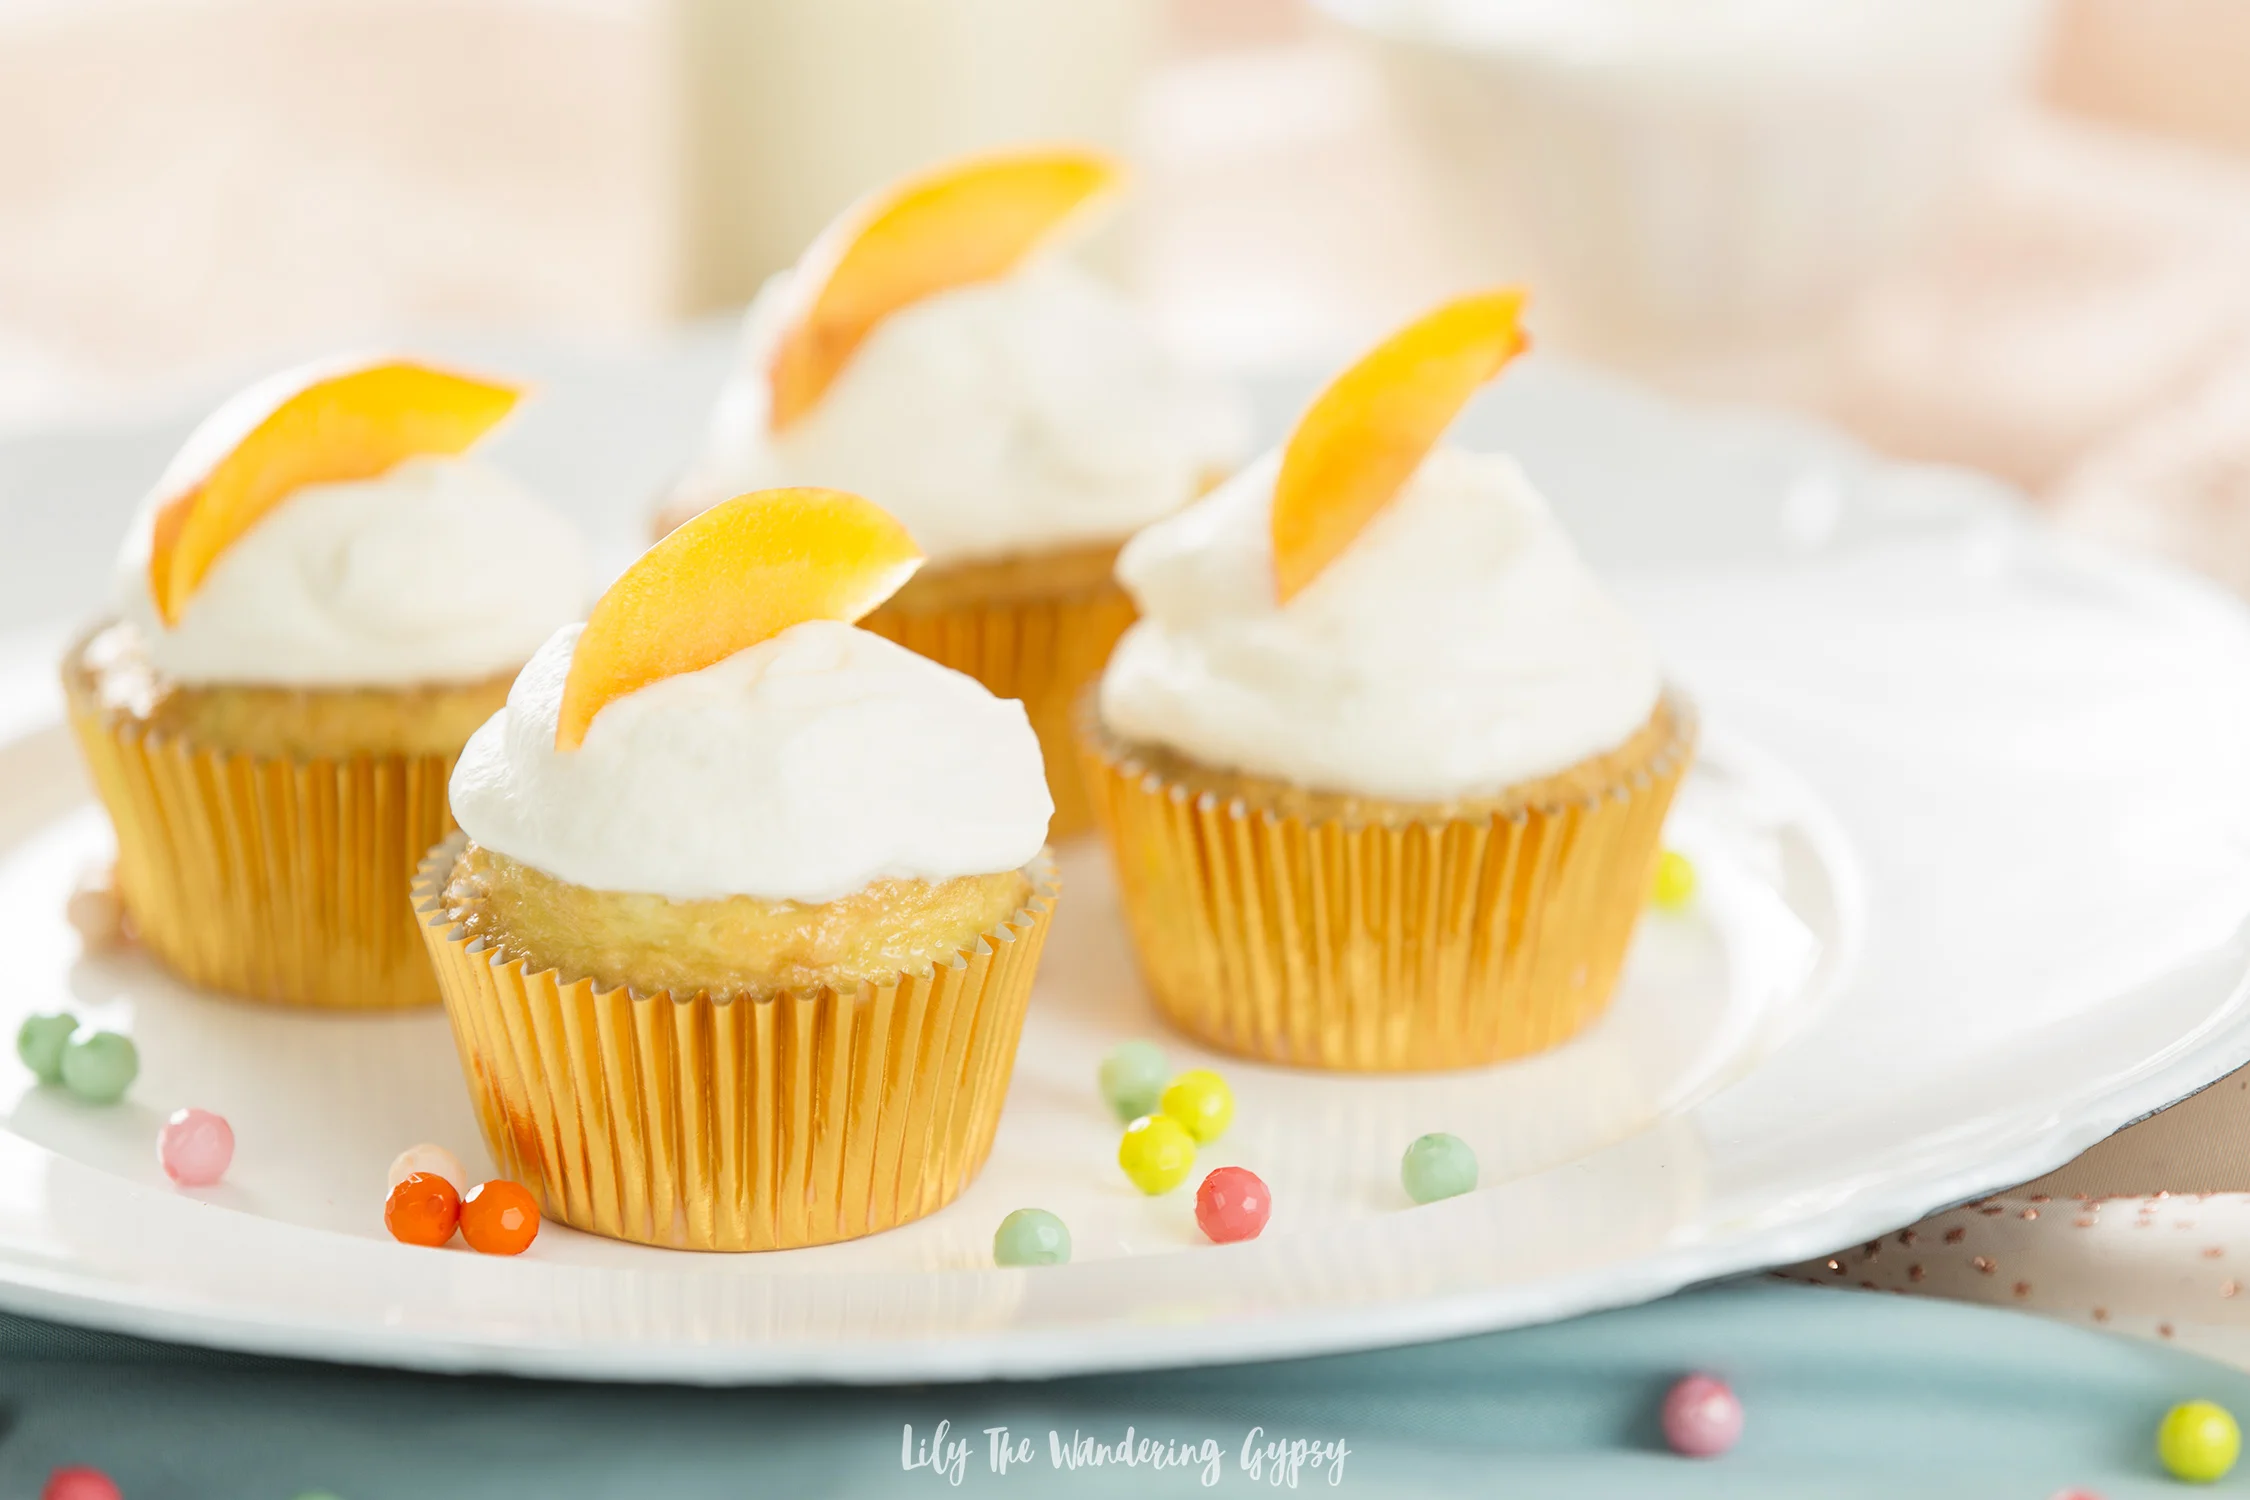
  6. 6. Remove cupcakes from tin and arrange on a platter in a three-by-four rectangle. Spoon frosting over each row of cupcakes; using an offset spatula, smooth to cover tops, forming a rectangular shape. Refrigerate at least 1 hour and up to 3 hours. Sprinkle with berries before serving.

Tres Leches Cupcakes Recipe

These deliciously moist tres leches cupcakes are a new take on a traditional Mexican dessert recipe. 

I was extremely happy with how these Tres Leches Cupcakes turned out. Just as delicious as the traditional Tres Leches Cake, but more easily handled at a party or shower. 

Tres Leches Cake (Recipe originally posted here on the Tastes Better From Scratch Blog)

Prep Time: 1 hr 30 mins  //  Cook Time: 40 mins  //  Total Time: 2 hrs 10 mins

Ingredients

  • 1 cup all-purpose flour
  • 1 1/2 teaspoon baking powder
  • 1/4 teaspoon salt
  • 5 large eggs , separated
  • 1 cup sugar , divided
  • 1/3 cup whole milk
  • 1 teaspoon vanilla
  • 12 oz can evaporated milk
  • 14 oz can sweetened condensed milk
  • 1/4 cup whole milk
  • Metallic cupcake holders (silicone ones would work well too) - paper cupcake liners will not work for this recipe.
  • Alternately, use a 9"x13" cake pan

For the whipped topping:

  • 1 pint Heavy Cream , for Whipping
  • 3 Tablespoons Sugar
  • 1/2 teaspoon vanilla
  • ground cinnamon , for topping

Instructions

  1. Preheat oven to 350 degrees F. Add foil cupcake liners to tin or alternately, lightly spray a 9x13'' pan with non-stick cooking spray.

  2. In a medium bowl combine flour, baking powder, and salt in a large bowl. Separate the eggs into two separate bowls.

  3. Add 3/4 cup sugar to the bowl with the egg yolks and mix on high speed until yolks are pale yellow. Add the 1/3 cup milk and vanilla and stir to combine. 

  4. Pour the egg yolk mixture over the flour mixture and stir gently just until combined (don't over-mix).

  5. Use electric beaters to beat the egg whites on high speed. Gradually add the remaining 1/4 cup of sugar as you mix and continue beating until stiff peaks.

  6. Fold egg whites into the batter gently, just until combined. Pour batter into prepared pan(s). If making cupcakes, fill batter about 2/3 full, if making a cake, make sure to smooth batter into an even layer so your baked cake doesn't have divots in it.

  7. Bake cupcakes for 15-20 minutes, or bake cake for 35 to 40 minutes, or until a toothpick inserted in the center of the cake comes out clean. Remove from the oven and allow cake(s) to cool completely.

8. Combine the evaporated milk, sweetened condensed milk, and whole milk in a small bowl. Once the cake has cooled use a wooden skewer to poke holes all over the top of the cupcakes or cake. 

9. Slowly pour the milk mixture over the the top of the cupcakes - Make sure to poke LOTS of holes into cupcakes, or milk mixture will fall over the sides. Pour slowly to avoid overflow, and you will want to soak the cupcakes 2-3 times each. The foil cupcake liners help a lot here, so the milk stays in the liners, making sure to pour near the edges and all around.

10. Refrigerate the cupcakes or cake for at least 1 hour or overnight, to allow it to soak up the milk.

11. In the meantime, whip the heavy cream, sugar and vanilla until stiff peaks. Smooth over the top of the cake or cupcakes. Optionally, sprinkle cinnamon on top. Serve with fresh sliced strawberries or raspberries, if desired. Enjoy!

This was the first recipe where I made successful, homemade whipped cream and have never looked back since!!! 

An Elegant Fall Bake Sale {Raise Love for Ronald McDonald House Charities}

Who's ready for Fall? I know I am! The weather has finally cooled down a bit at night here, which means it's time to mix up a few ingredients, get out the decorating materials, and perhaps it's time to get ready to give back by hosting a Fall Bake Sale! If you're here looking for ways to make your baked goods look gorgeous, you're in the right place. 

I'm here today with Ronald McDonald House Charities (RMHC) to share some Creative and Elegant Bake Sale Tips. Selling food is all about the presentation - we eat with our eyes first! In order to make the maximum amount of money from anything you're selling, make it cute and make it approachable! 

CUPCAKE INSTRUCTIONS:

Above, I baked a box of chocolate cake mix into 24 cupcakes, using metal liners.

I then grabbed a quart freezer Ziploc bag and a rosette icing tip. I placed the tip into the corner of the bag, cut a tiny bit of the bag corner off, then taped the icing tip into the hole with electrical tape. This worked pretty well, or feel free to use a pre made piping bag and metal icing tip. 

I then applied a swirl of icing to each cupcake and placed Fall Leaves sprinkles carefully onto each one. I thin they look like a little swirl of leaves on a windy, Fall day!  

CHOCOLATE CHIP COOKIE BARS

Also, shown above, I made a batch of chocolate chip cookie dough, spread it into a baking sheet, and followed the instructions on the packaging for best results. I then cut the cookie bars into squares, and set them on top of a slice of decorative wood and set them on a mint cake stand I got from Target. I love how this display turned out!

Did you know that in 2016, RMHC provided 2.4 million overnight stays to families? And in doing so gave the ability to spend more time with their sick children, to interact with their doctors, and to make important decisions about their children’s care?

Below, you will see the juggling balls that Ronald McDonals House Charities sent me! 

Below, you can see a cute way to offer customers a cute gift bag with a Fall leave glued onto the bag, perfect for gifting that special treat!

Through the Ronald McDonald House and Ronald McDonald Family Room programs, RMHC provides places for families with sick children to stay just steps from the hospitals where they are receiving critical medical care.

Starting a fundraiser is simple and gives the fundraiser the freedom to do whatever it is they love to do to in order to help RMHC reach our goal of providing 12,500 more overnight stays to families of sick children this year.


1.) Always keep gloves and several pairs of tongs on the bake sale table, so you can serve customers their food without touching it. Also, make sure to keep plenty of to-go bags and containers for customers to bring their treats home in. 

2.) Always use rubber gloves while baking the items too.

3.) Presentation! Presentation! Presentation! I loved the use of this light pink crushed velvet tablecloth material! I headed to my local craft store and spent around $8-10 for 1.5 yards of it. I was so happy to incorporate one of the year's trendiest fabrics into my bake sale display! 

4.) Find a unique location like a popular, locally owned clothing boutique to have your bake sale in front of. Make sure people know to enjoy their treats before they head into shop, and food may not be allowed in the store. Office buildings, malls, and even breweries are also amazing location ideas because there is a larger amount of foot traffic.

5.) Spruce up desserts by adding bakery-style details like icing piped with icing tips, and seasonally adorable sprinkles! I also loved adding cupcake toppers, which can be made with toothpicks and scrapbooking paper or even pom poms! They can also be purchased for around $2.00.

6.) Place hand painted price signs at eye level, and make items affordable. Feel free to have a range of prices on the table too. For instance, I thought that .50 cents per mini cupcake, $2.00 per large cupcake, and $1.00 per chocolate chip cookie bar would be appropriate. I really, really wanted to make some caramel apples for this bake sale, and I believe you could get around $4.00 for them! 

7.) Display the charity name for which you are fundraising! I made a hand painted sign for FREE with black paper and white paint to showcase the "Raise Love #forRMHC" campaign info. Shoppers may also want to tag your cause on social media, so that is also what inspired me to create that sign.  

Learn more about starting a fundraiser here, and also get the details on Ronald McDonald House Charities here!

An Easy Treat For Labor Day And Beyond

I have an awesome, tasty, and amazingly easy dessert idea for Labor Day festivities and beyond. Definitely want to admit that I did not make my own cupcakes, though - I got some delicious pre-made Red Velvet Cupcakes from our local Schnuck's grocery store, and also found the berries there too. But, the little special touches always make people smile, so you can recreate your own by simply adding some blueberries and raspberries to some cupcakes of your own. You could even grab the 3 ingredients on your way to a party, and decorate the desserts when you arrive! I also love how the seersucker fabric and little silver stars confetti makes for a patriotic yet elegant decor idea for any holiday that's red, white, and blue! 

If you do want to make your own Naturally Colored Red Velvet Cupcakes, Food52 has an awesome recipe that uses beets (instead of red food coloring) - which is incredible! 


NATURALLY DYED RED VELVET RECIPE FROM FOOD52:

For the cake:

  • 1 cup beet purée, from fresh red beets (not cooked)
  • 3/4 cup buttermilk
  • 1 tablespoon white wine vinegar
  • 2 tablespoons lemon juice
  • 1 tablespoon vanilla extract
  • 2 1/2 cups cake flour
  • 3 tablespoons cocoa powder, not Dutch-process
  • 2 teaspoons baking powder
  • 1 teaspoon cream of tartar
  • 1 teaspoon salt
  • 1/2 cup neutral-flavored oil
  • 1/2 cup unsalted butter, softened
  • 2 cups granulated sugar
  • 3 large eggs

For the cream cheese frosting:

  • 8 ounces cream cheese, at room temperature
  • 8 ounces unsalted butter
  • 2 tablespoons crème fraîche
  • 1 pound confectioners' sugar
  • 1/2 teaspoon lemon zest
  • 1 teaspoon vanilla extract
  • 1 pinch salt

Instructions:

Add the beet purée, buttermilk, vinegar, lemon juice, and vanilla extract to a food processor fitted with the steel blade and process until very smooth.

Sift the cake flour, cocoa powder, baking powder, cream of tartar, and salt together in a bowl. Beat the sugar, oil, and butter together in a large bowl until creamy, then add the eggs one at a time, mixing for 30 seconds after each addition.

Alternate adding the flour mixture and beet mixture to bowl, beginning and ending with the flour mixture. Divide between the cupcake papers and bake until a cake tester inserted into the center of the cake comes out clean, 20 to 22 minutes.

Cool the cupcakes on a rack for 20 minutes or more. Then, get the icing ready. 


To make the frosting, beat the butter and cream cheese together on high speed until fluffy and smooth, then add the crème fraîche. Turn the mixer to low and gradually add the confectioners' sugar until just combined, then turn the mixer up to medium-high and beat until fluffy and smooth, making sure to stop the mixer and scrape down to the bottom of the bowl so everything is evenly mixed. Add the lemon zest, vanilla extract, and salt. Enjoy!