Never Too Hungover & Halloween Treats, Drinks, and Party Ideas

This shop has been compensated by Collective Bias, Inc. and its advertiser. All opinions are mine alone. Messaging below is intended for ages 21+ and is intended to be enjoyed responsibly, in moderation. #NeverTooHungover #CollectiveBias

Halloween is almost here, and I have some fun DIY ideas for you!! I have been wanting to create a few of these for a while now, so when I had the chance to create a post for Never Too Hungover Prevention, I put all of my ideas into one "party" for adults, and I hope you get inspired to take a few extra steps to make your Halloween party spooky, creative, and the best party anyone has attended! These ideas didn't even cost a lot, and you can take bits and pieces of my ideas and then run wild with your own. 

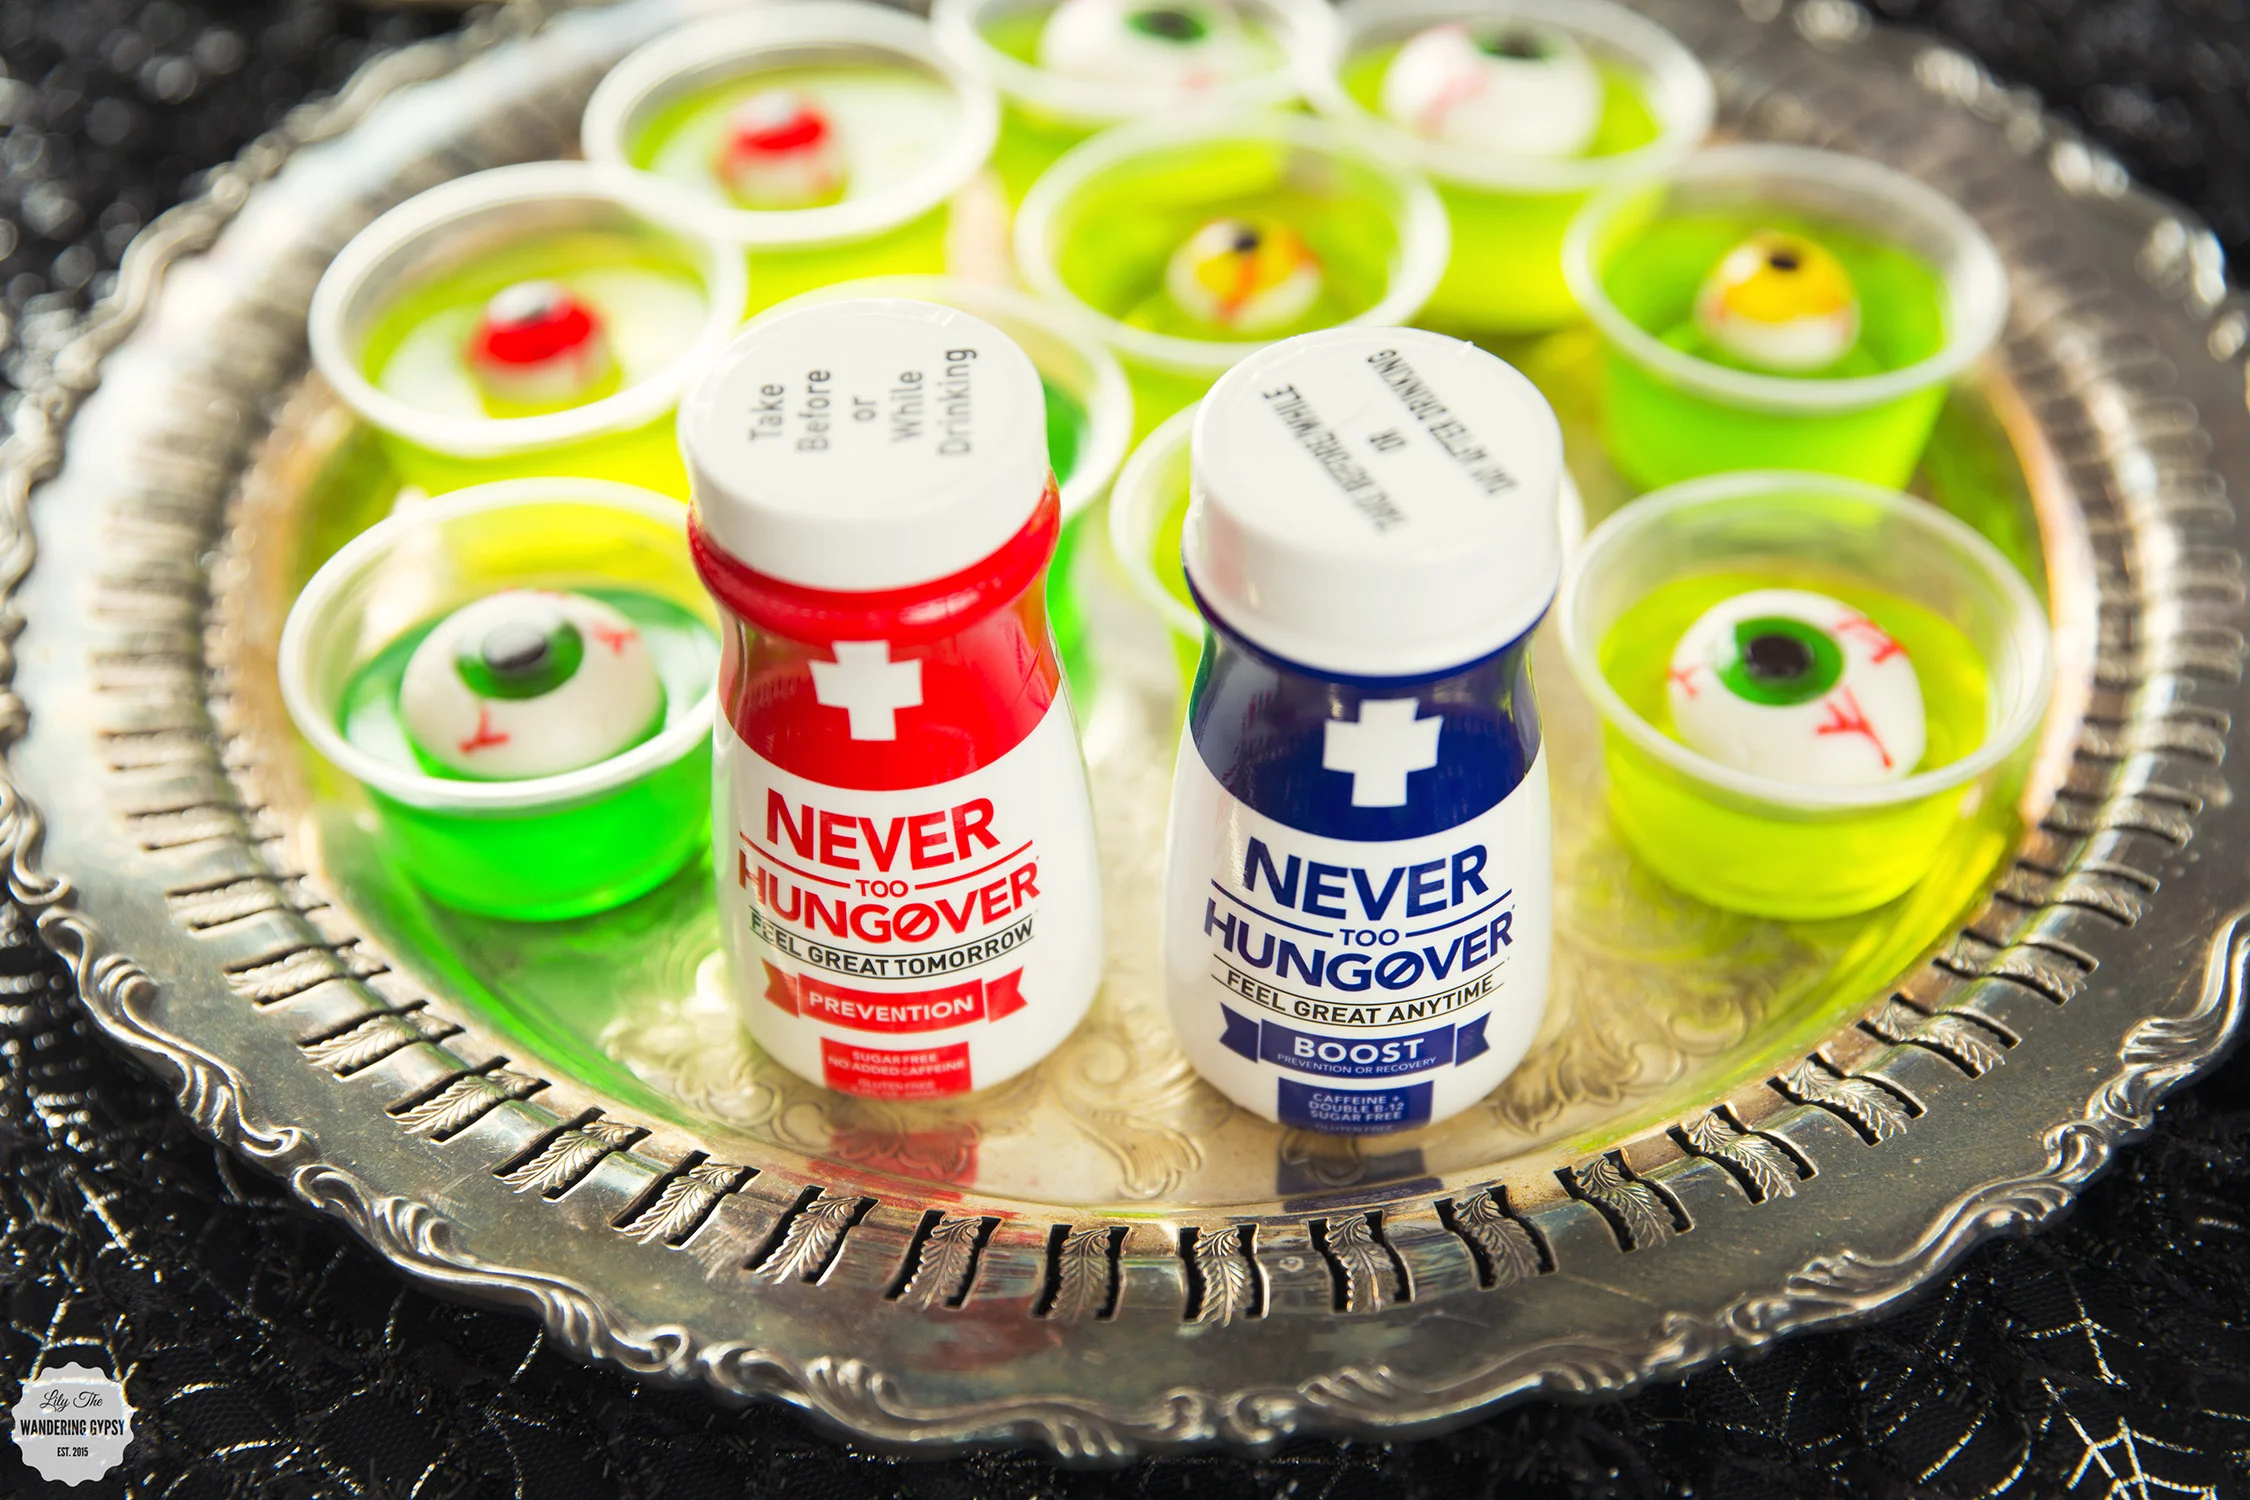
Never Too Hungover is a healthy vitamin blend that helps neutralize toxins, restore vital nutrients, and rehydrate the body. It is the BEST TASTING and MOST EFFECTIVE way to help PREVENT or RECOVER from hangovers – or simply get a healthy energy, electrolyte, and multivitamin boost. 

It is sugar free, gluten free, and low calorie (7 calories per serving). In addition it is made of quality vitamins and is rich in amino acids, antioxidants, and minerals.

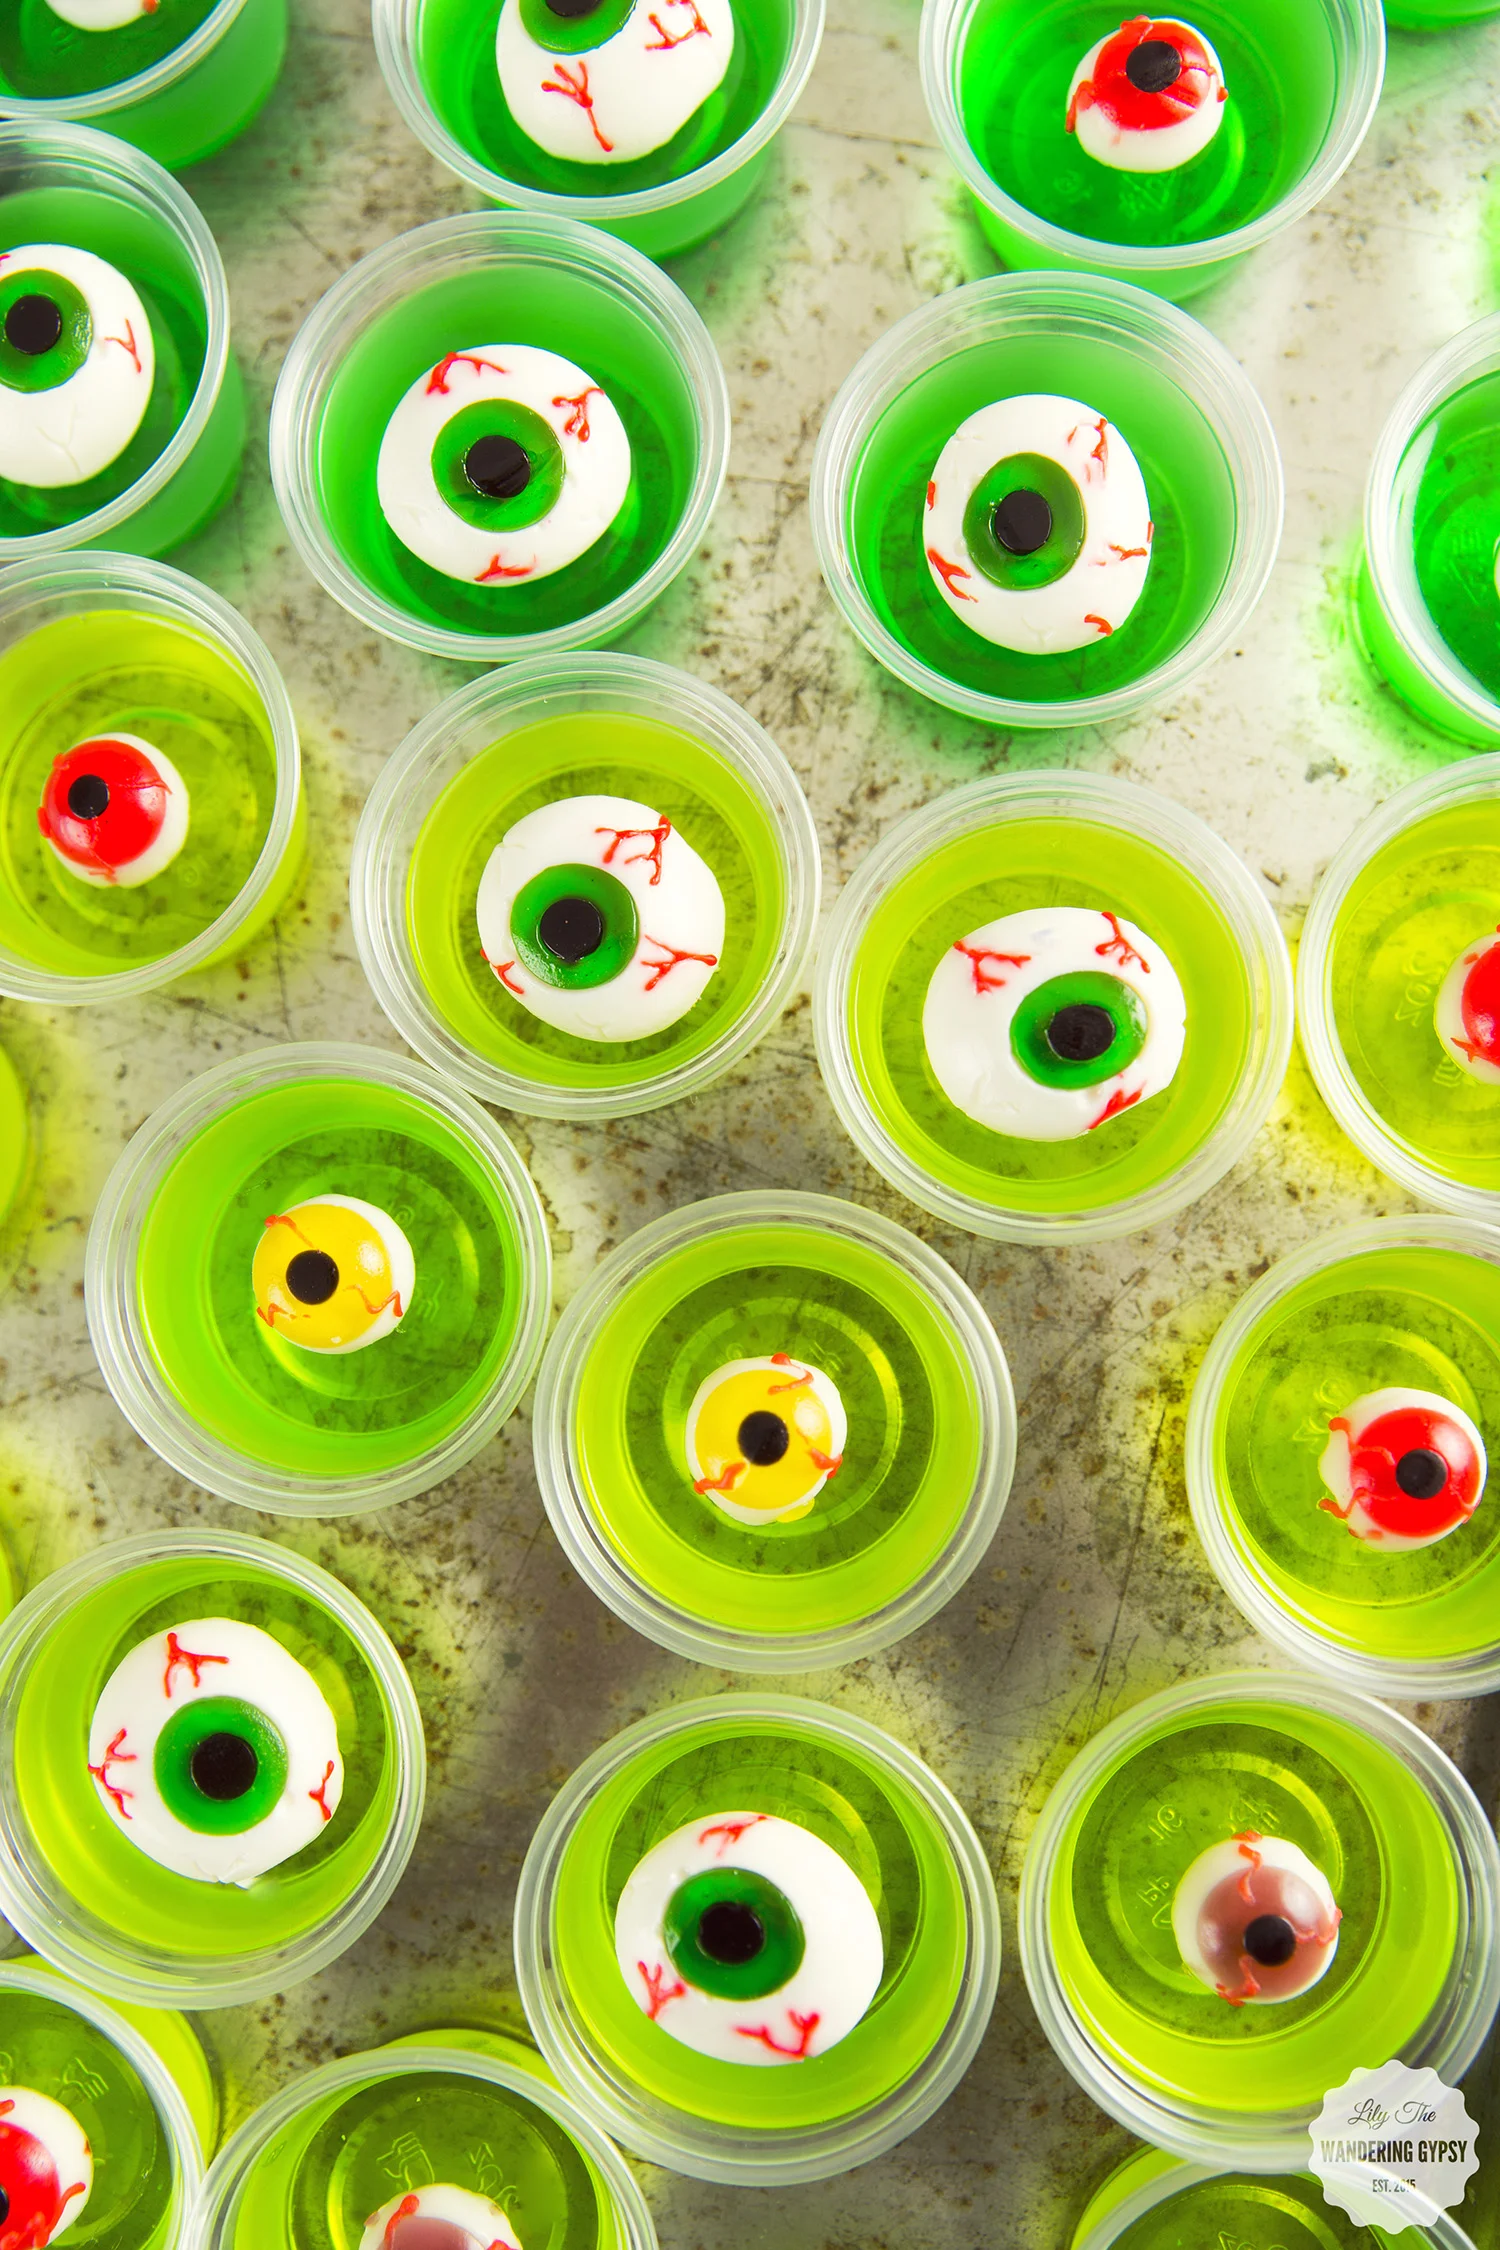
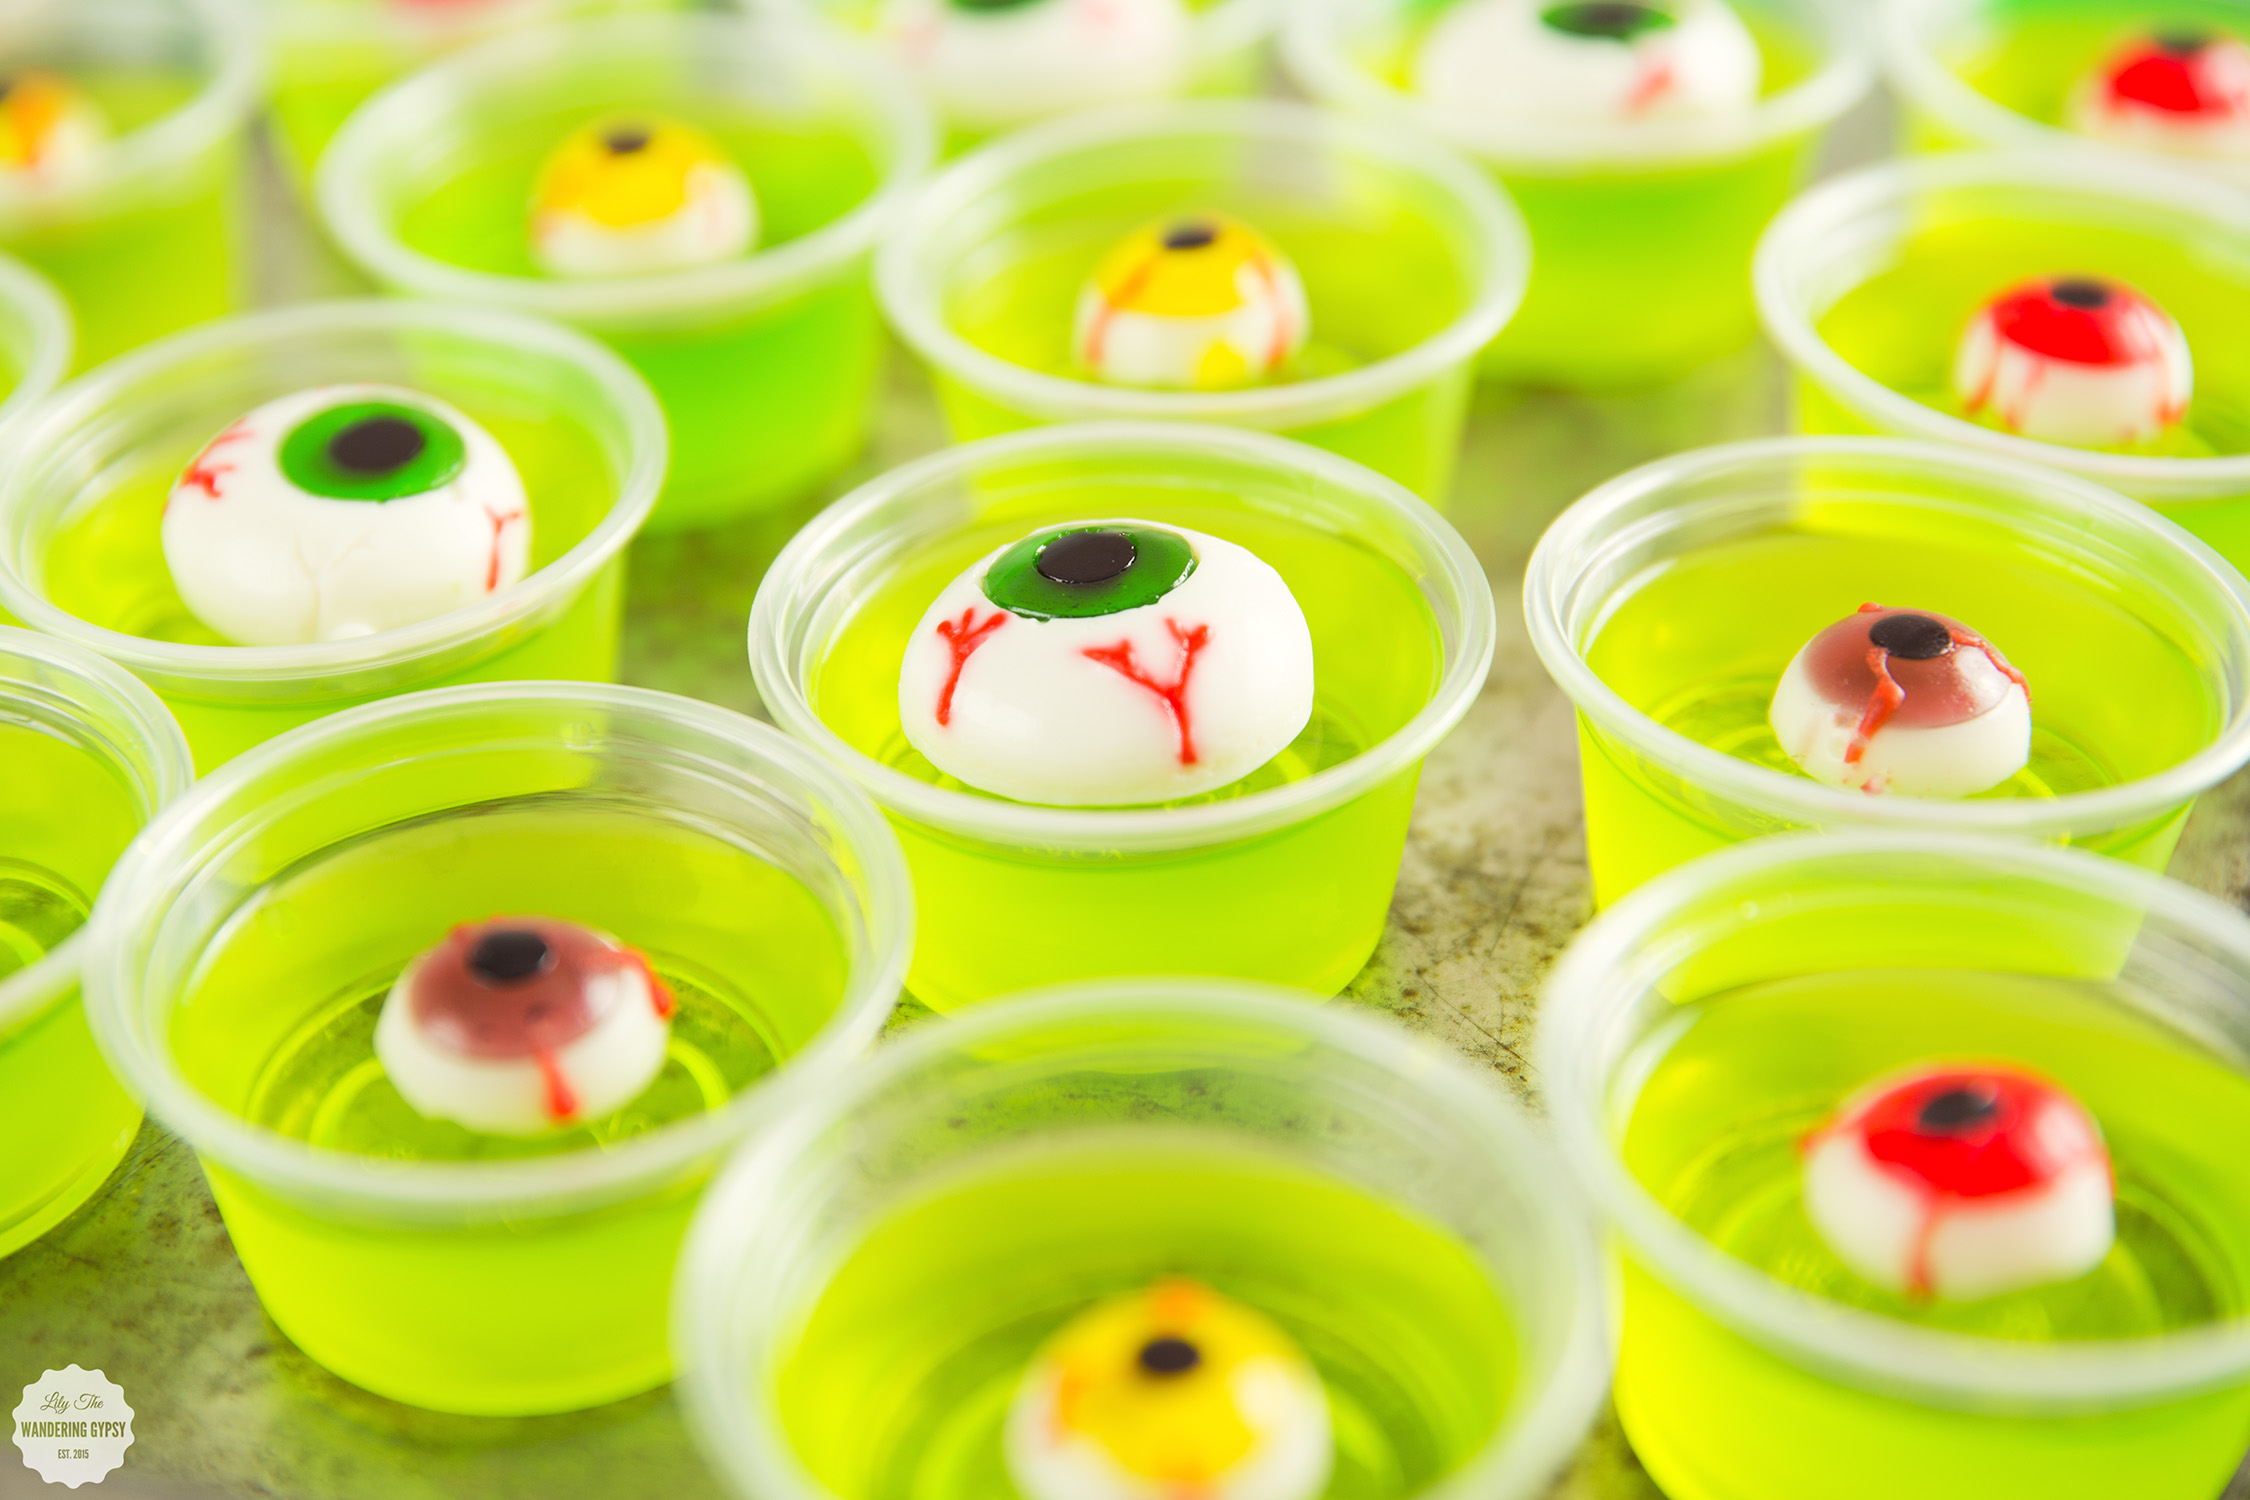
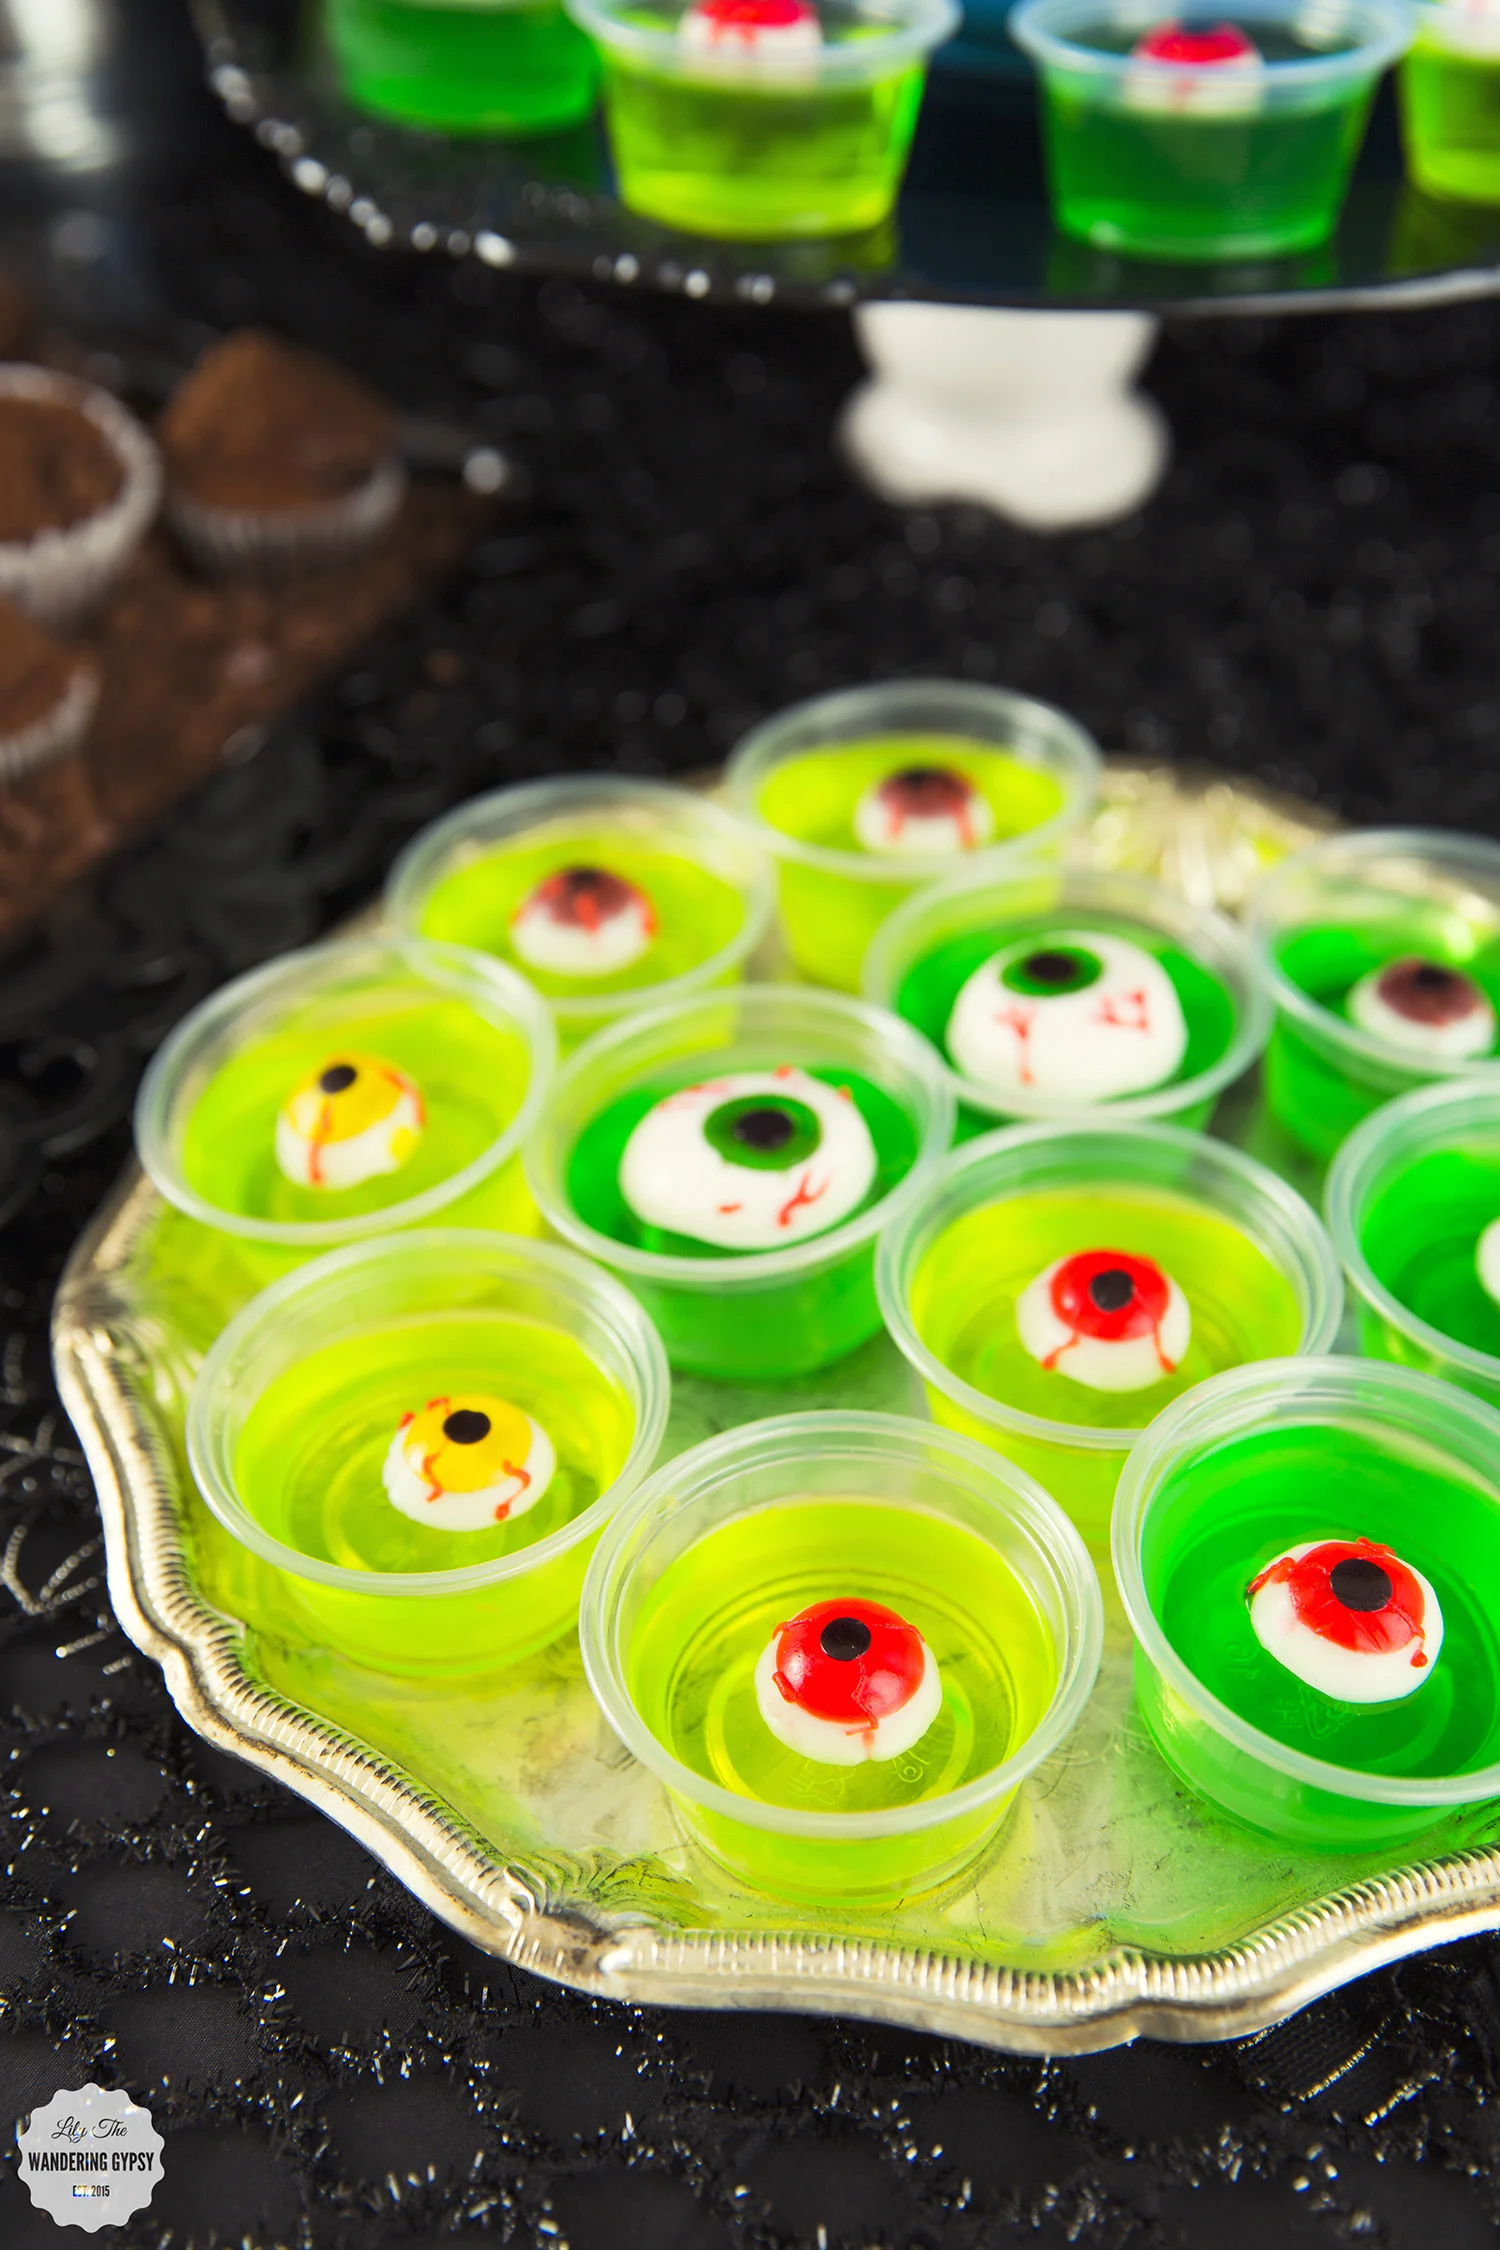
I thought that these lime-green colors would be perfect for my Halloween theme. Looks like literally everything wound up being this fun, slime green color, which I just loved. So, I used a green apple flavor and a lime flavored Jell-o, and made my Jell-O Shots by replacing half the water with any liquor you would like. Vodka is a good choice, but you can also use something like rum, which would go down a lot easier :) I got these eyeball gummies at Walmart, too. I also found these individual cups (which also come with lids, for serving on the go or at a party). This project was so much fun! Wait until the Jell-O has completely firmed up before adding the eyeballs on top.

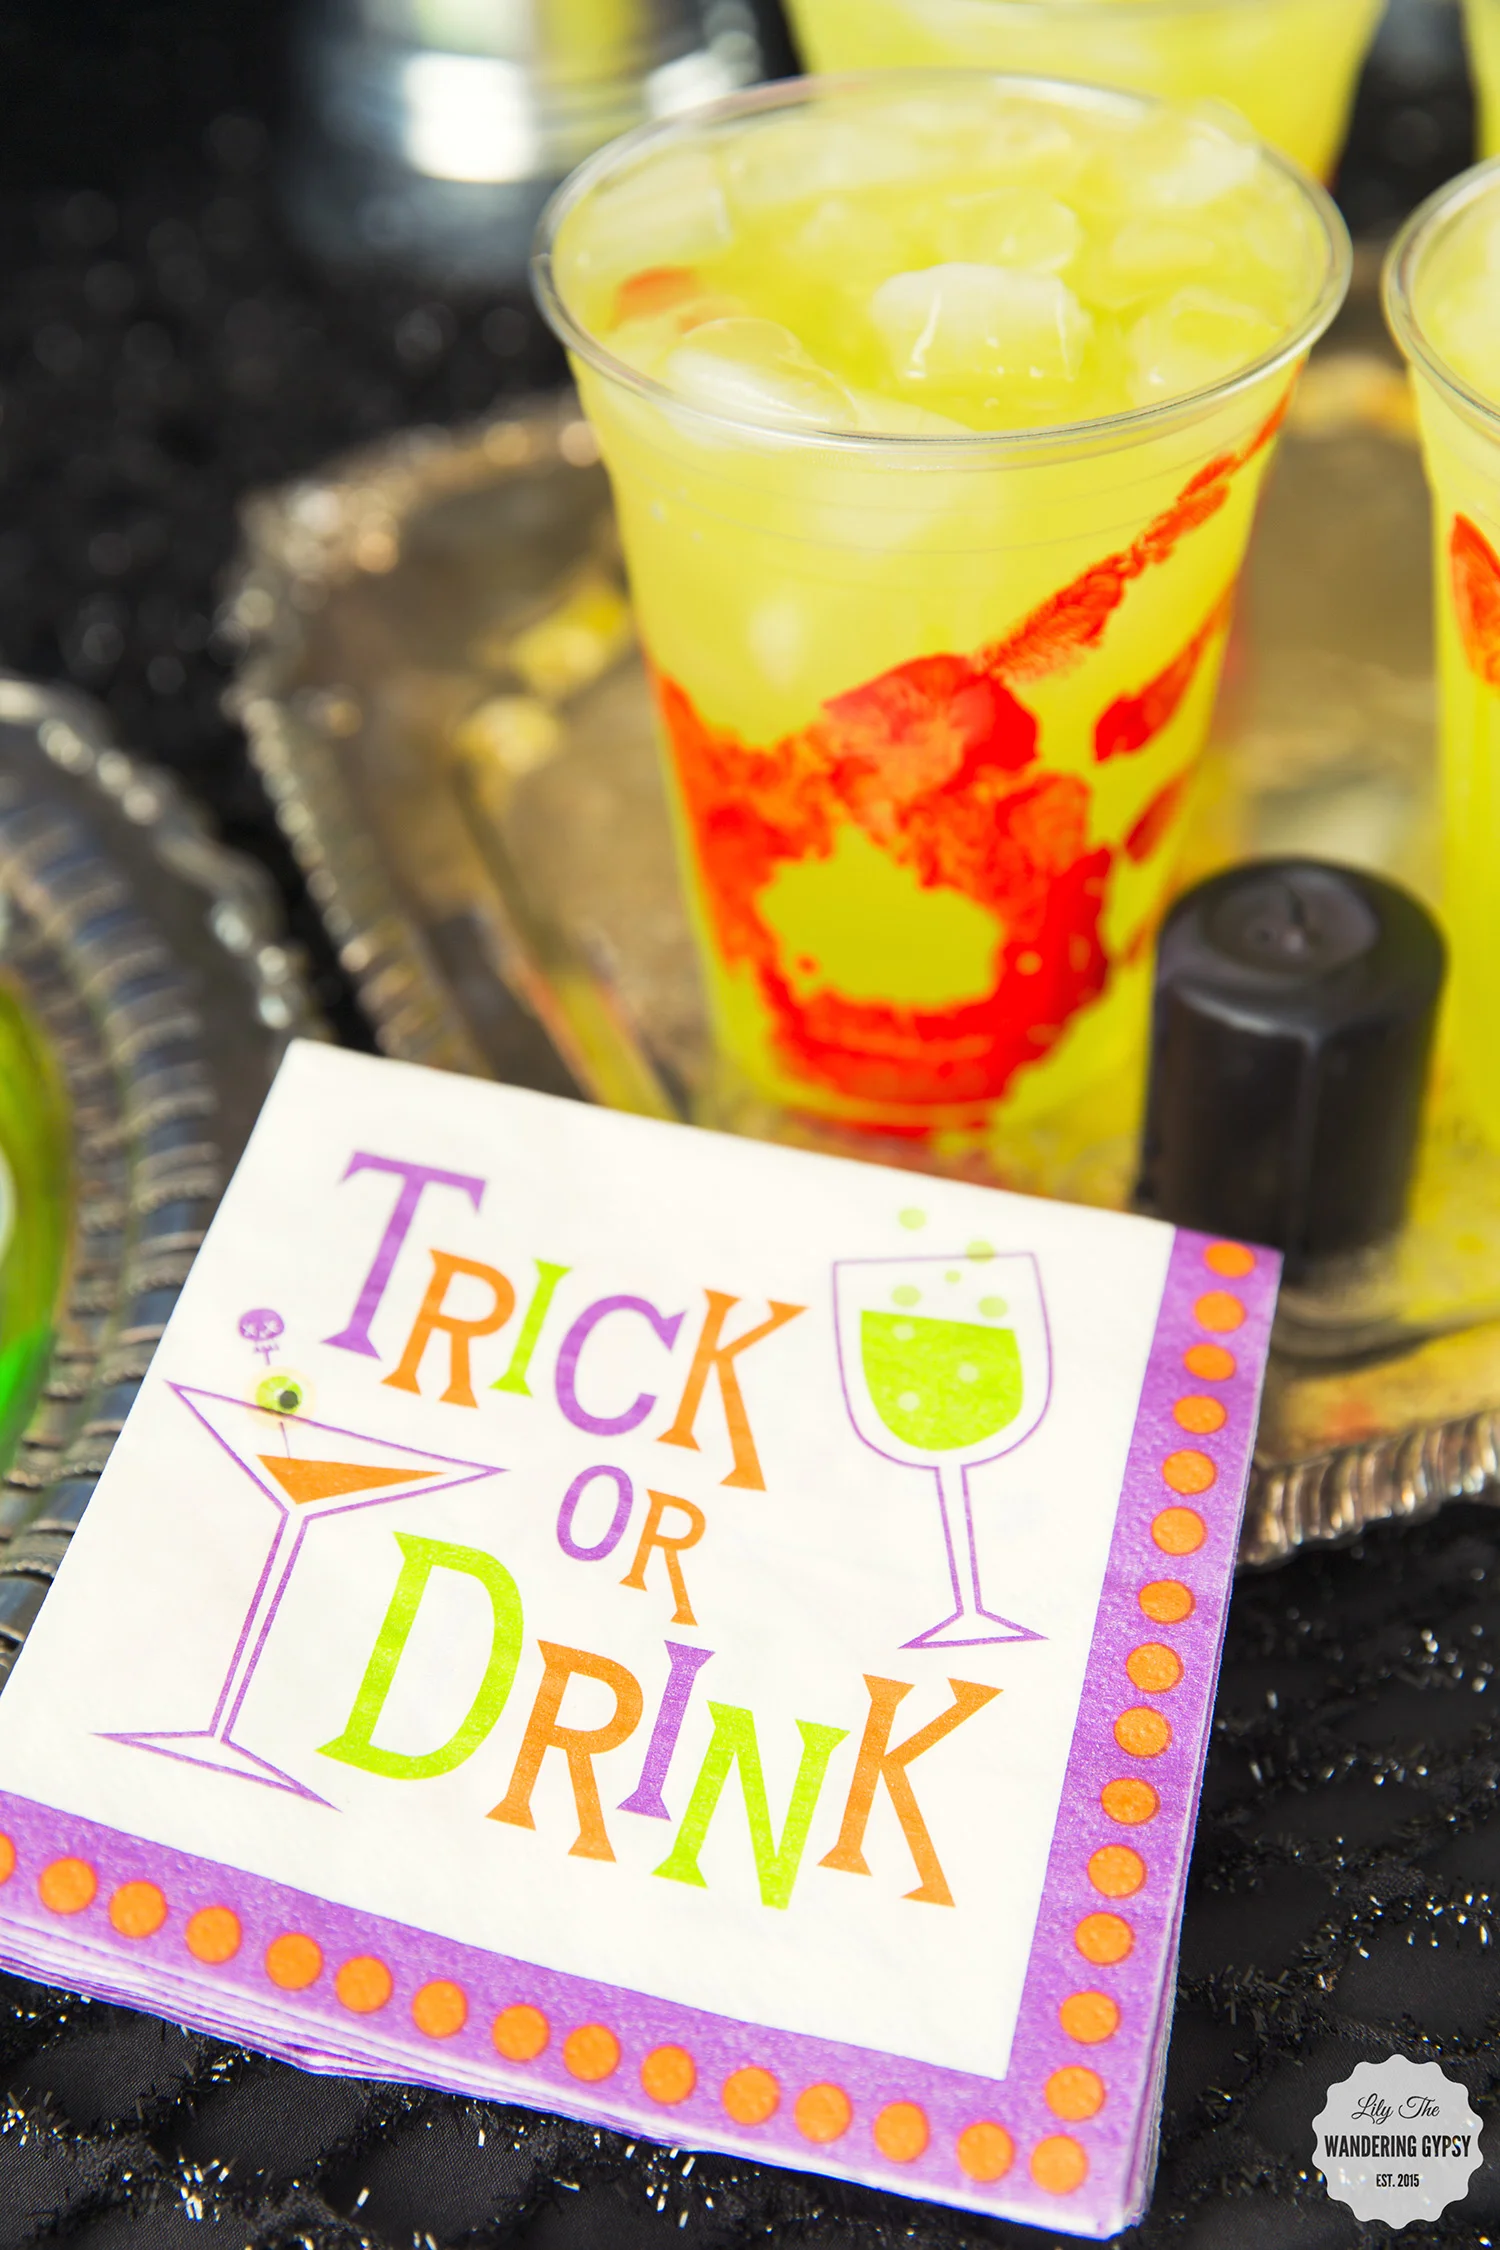
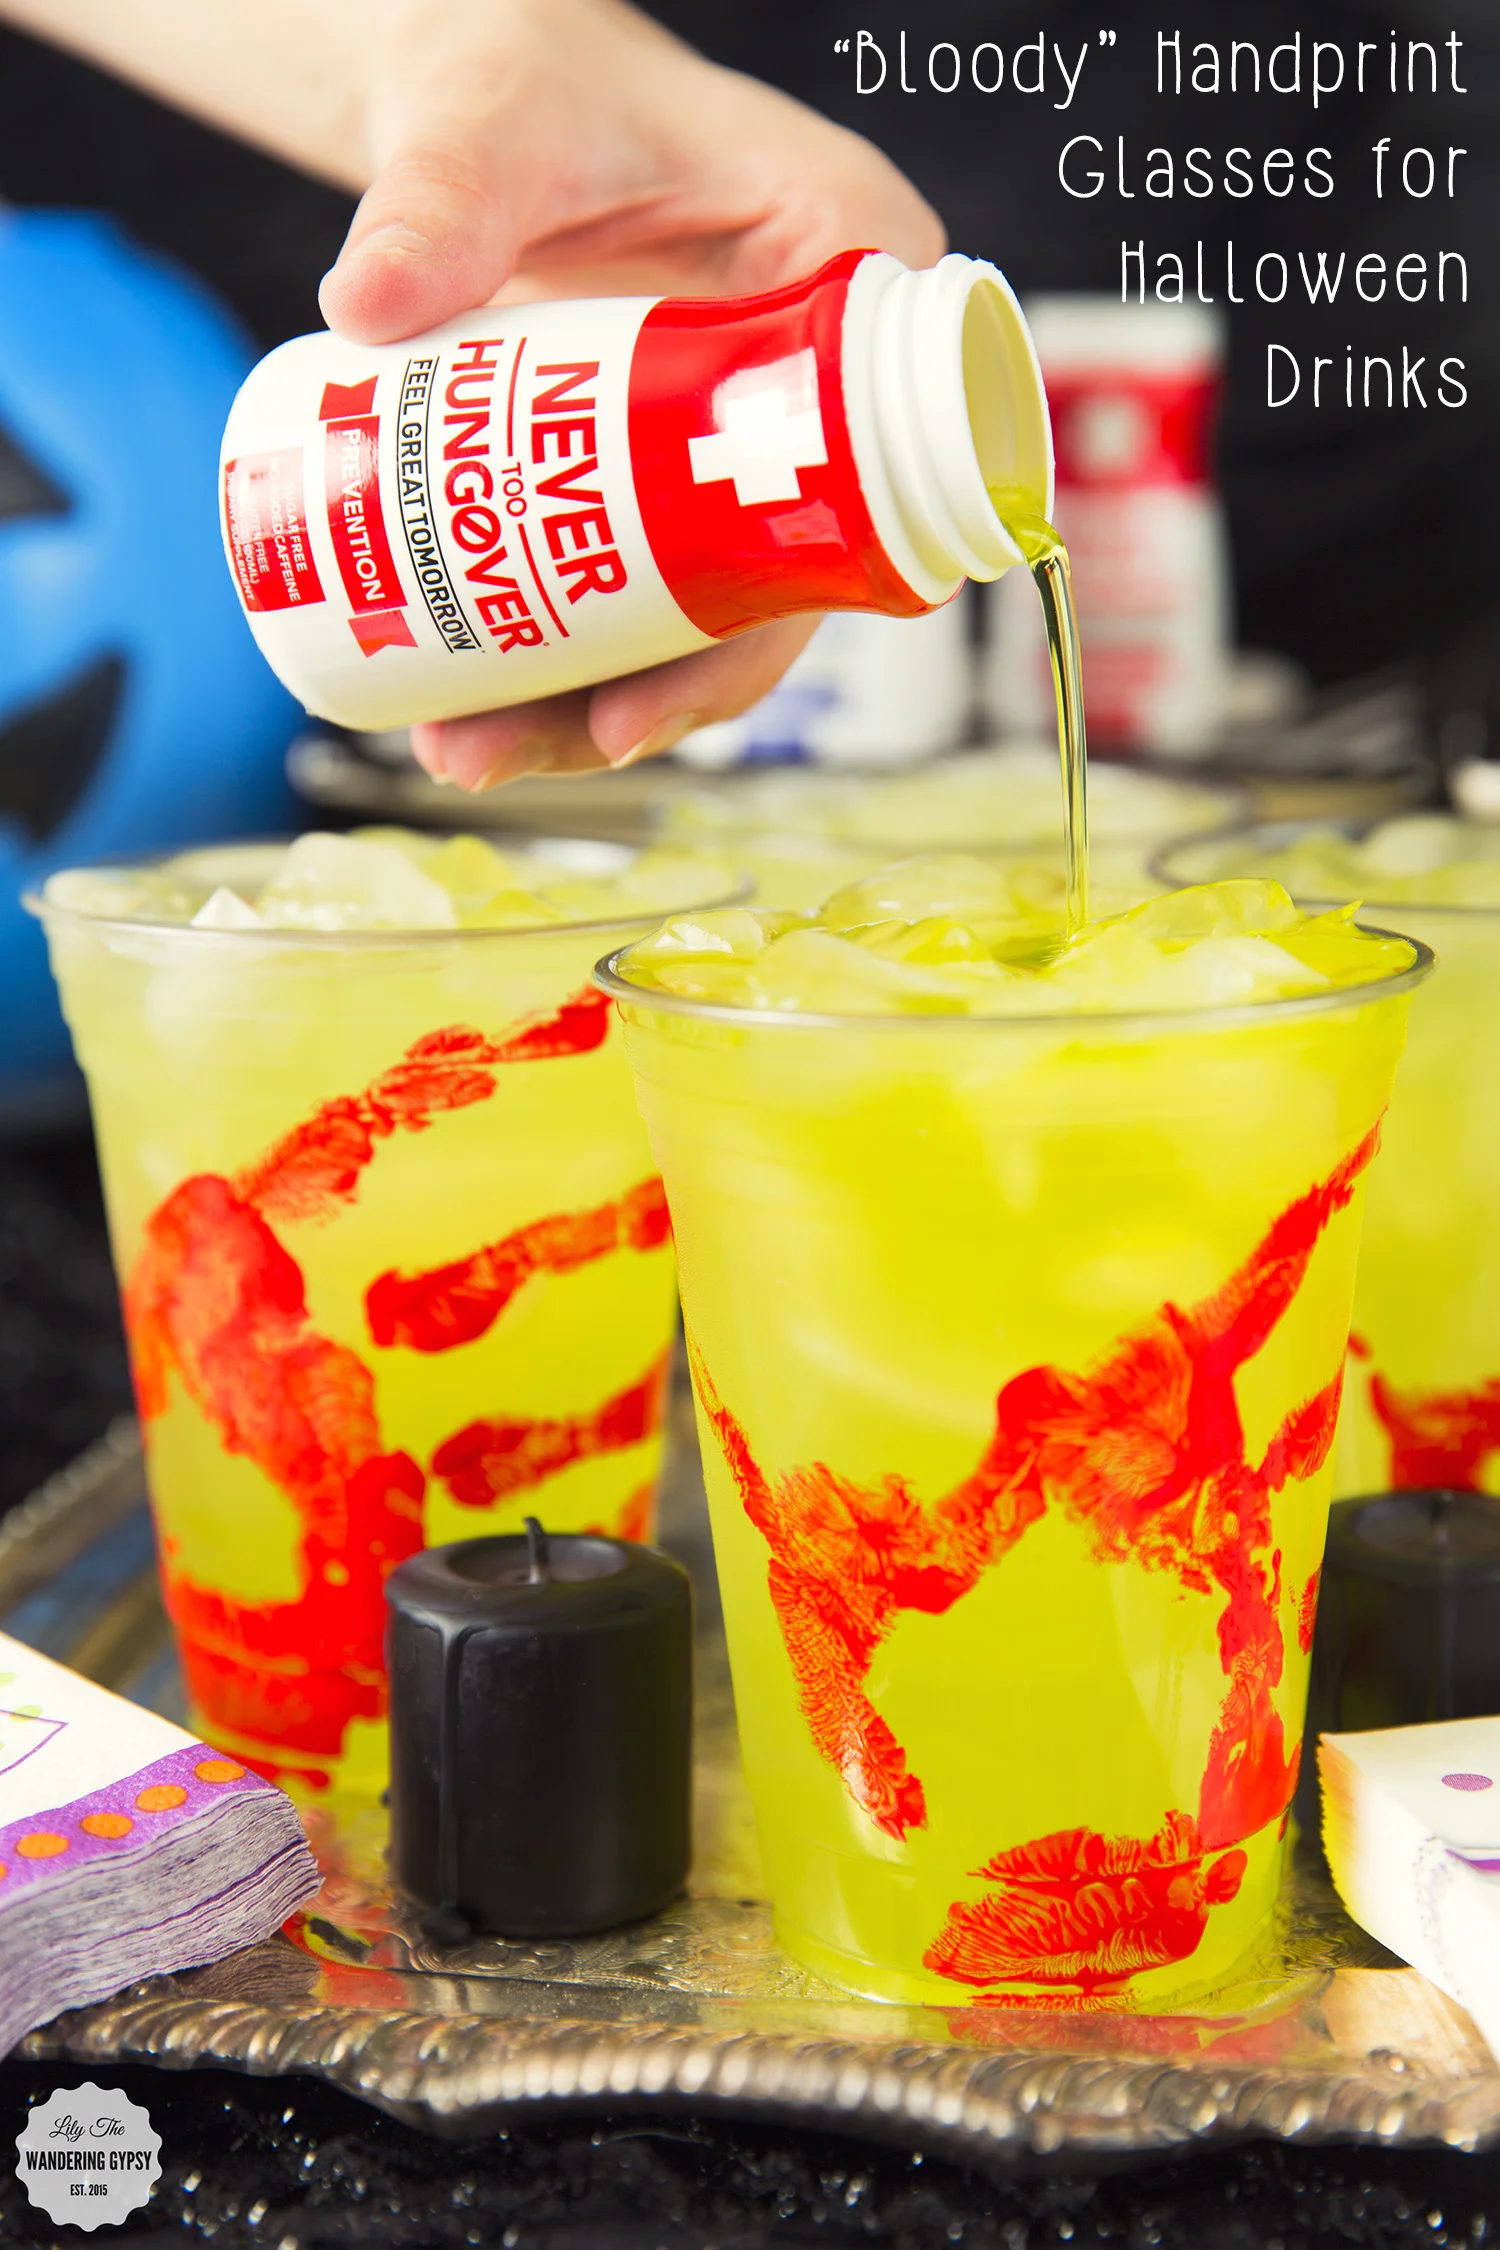
Use any latex-based red paint and some clear plastic glasses for this fun project! I painted red paint one of my hands, and wrapped my hand around the glass as if someone with a blood on their hands reached out and tried to steal your drink! I let them dry for about 20 minutes, and was surprised at the fact that the paint stayed put even while the glasses became wet from condensation! Definitely would not recommend any paint besides acrylic for this reason. This whole project only cost like $3 plus the price of the ice and drinks inside. Margaritas or some lime-based drink would be best for this, because you could carry the slime green color throughout this part of your setup too. Also, Never Too Hungover comes in a limeade flavor AND, you can mix it into your drink! I was pleasantly surprised to see that the Never Too Hungover was the exact same color as my drinks! So funny :)

Visit NeverTooHungover.com for more info about their awesome products.

Connect With Never Too Hungover + Sam's Club Around The Web:
Twitter
Sam's Club Instagram
Never Too Hungover Instagram
Never Too Hungover Facebook
Never Too Hungover Twitter

Never Too Hungover’s proprietary formula helps neutralize toxins, restore vital nutrients, and rehydrate the body; helping prevent or recover from the negative effects of a hangover. it's comprised of a proprietary natural vitamin blend, amino acids, antioxidants, nutrients, and minerals. It is sugar free, gluten free, and low calorie (7 calories per serving). Key ingredients include Vitamin B, Potassium, Electrolytes, Milk Thistle, Green Tea Extract, Aloe Vera, and Gotu Kola; but unlike Prevention which has no added caffeine, Boost contains natural caffeine and double b-12.

Usage Directions:

For optimal results, one 3.4oz bottle is recommended for up to 7 drinks.

For maximum protection, take two 3.4oz bottles.

Never Too Hungover Prevention must be consumed before/while drinking to help prevent the negative effects of a hangover.

If consuming more than 7 alcoholic drinks, take 2 bottles for optimal results.

Never Too Hungover Boost can be consumed before/while or day after drinking to help prevent or recover from the negative effects of a hangover.

If consuming more than 7 alcoholic drinks, take 2 bottles for optimal results.

Never Too Hungover Prevention has a great limeade taste.

Never Too Hungover Boost has a great berry taste.

Boost can be used as an energy boost, even without alcohol.

These awesome cupcakes are spooky but not too scary :) I started with store-bought chocolate iced, chocolate cupcakes. I used a food processor to grind up chocolate graham crackers to make the "dirt". Then, I put about 2/3 of the "dirt" onto a black, rectangular serving plate to create the ground. I then put the rest of the chocolate crumbs into a shallow dish, and dipped the tops of the cupcakes into the crumbs to basically make them look like they were fully covered in "dirt". I then grabbed some dolls at the dollar store, "borrowed" their arms, and stuck them into the cupcakes, which I arranged on the plate. I added a bit of red gel icing to make it look like "blood". 

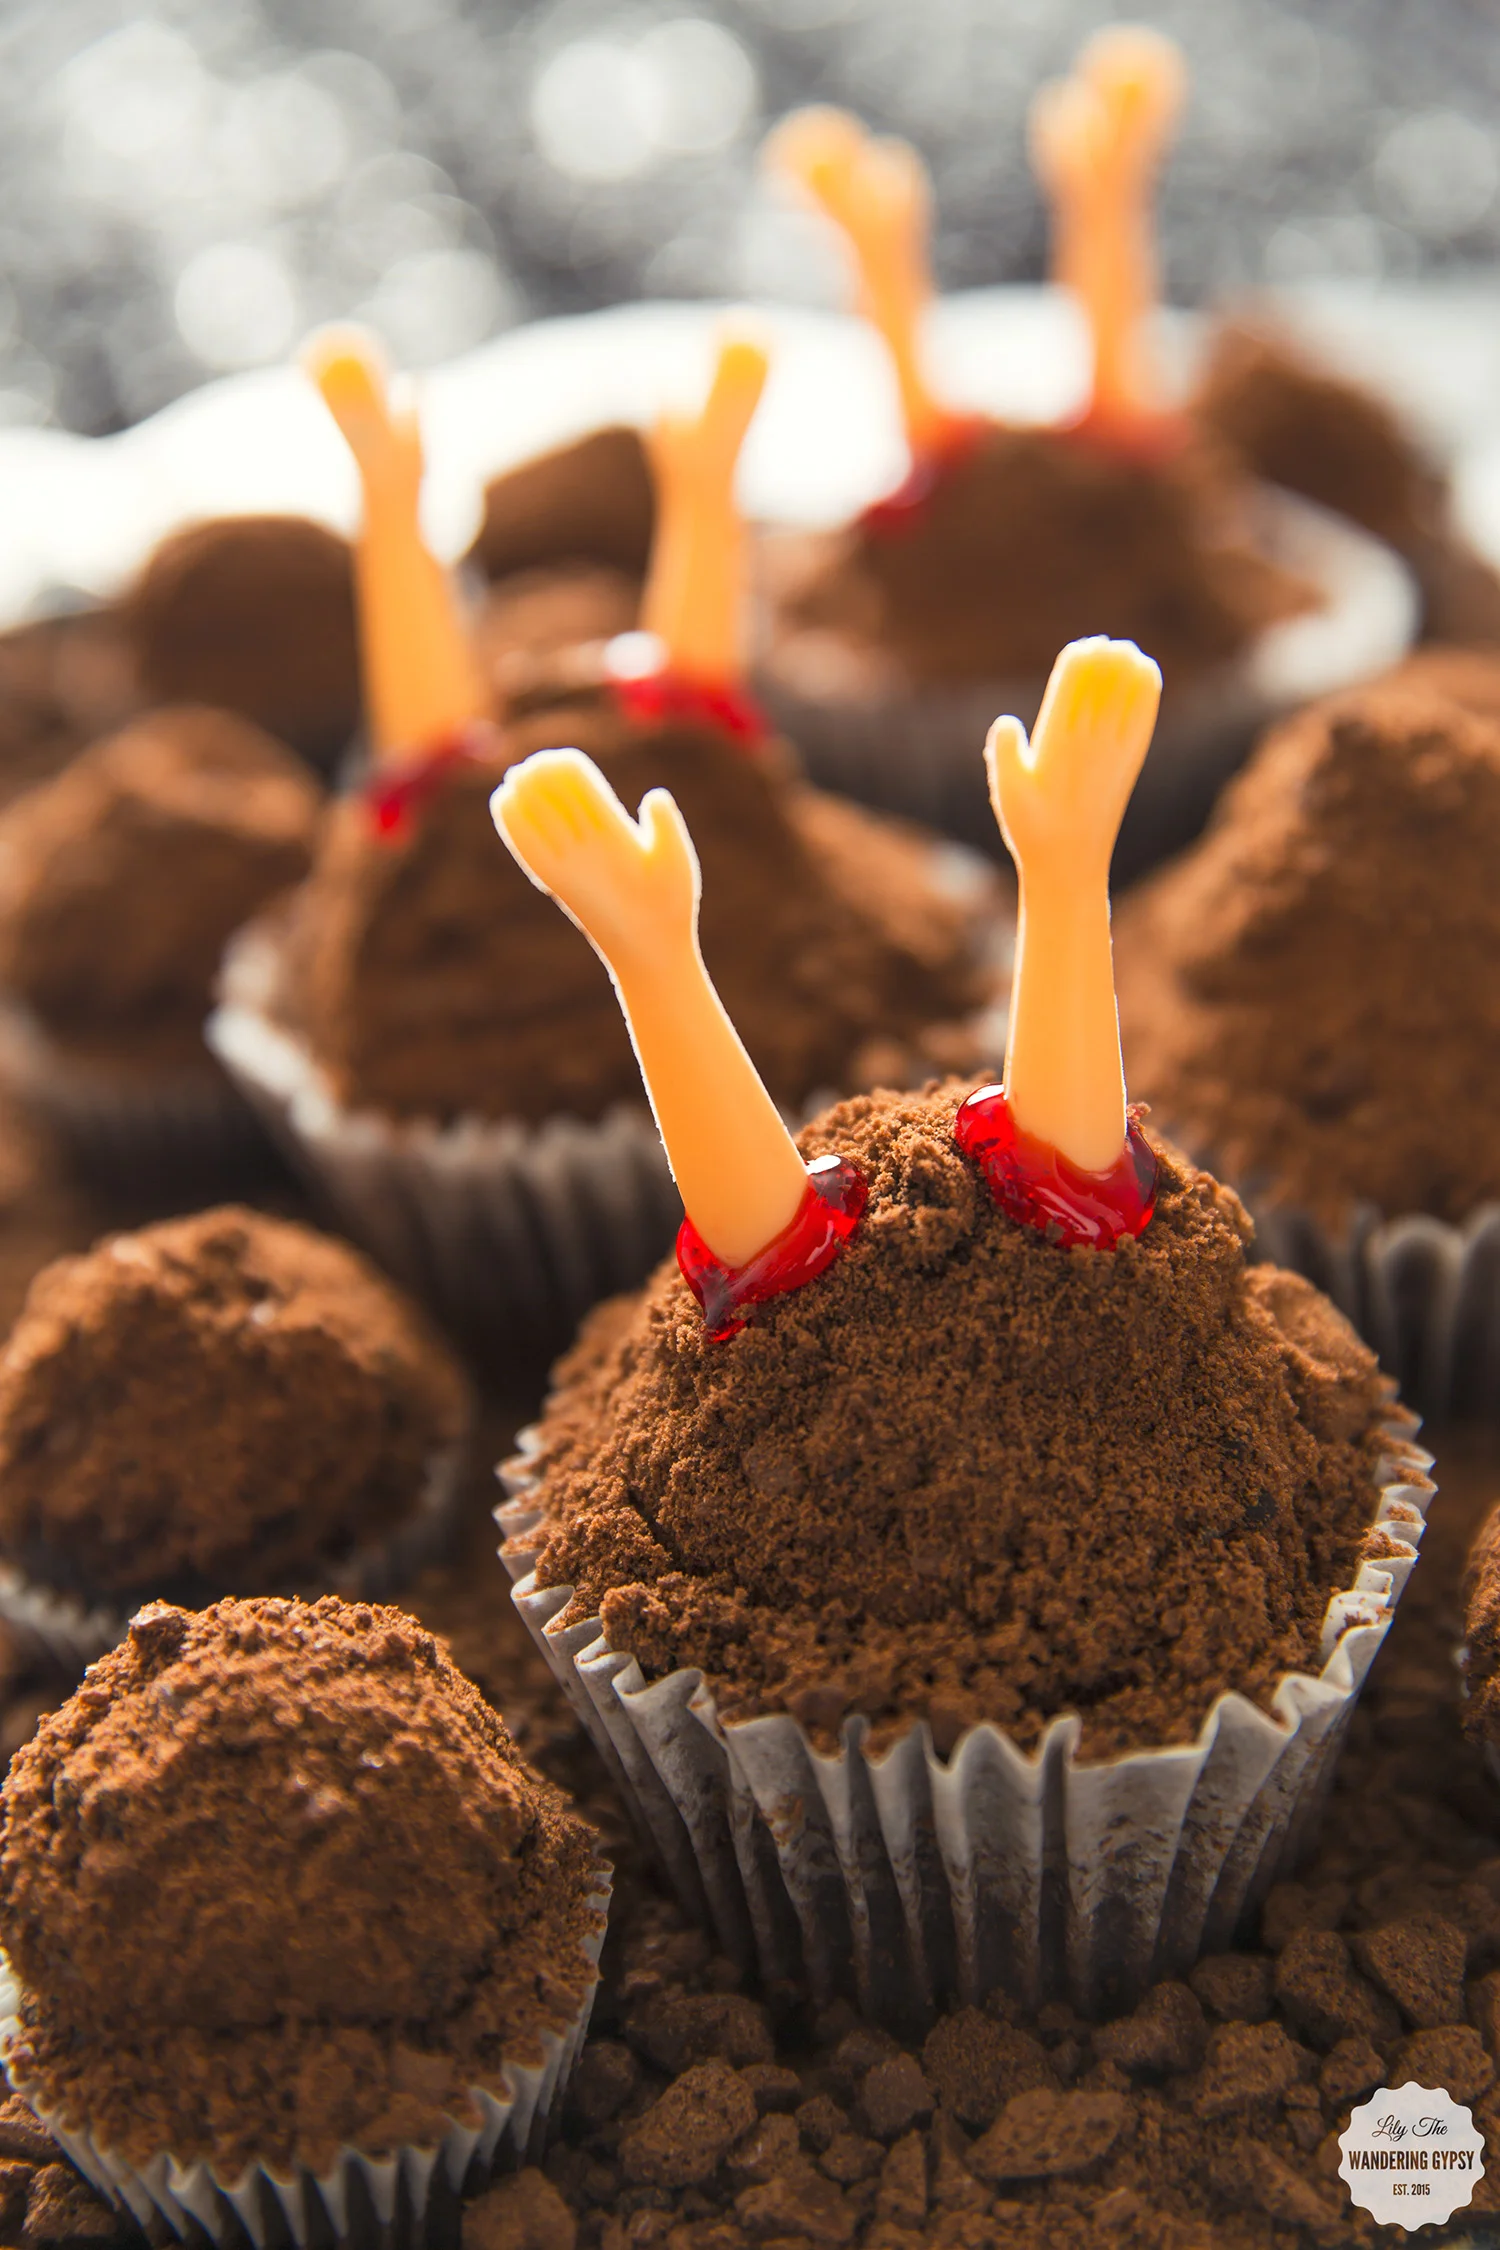
I just LOVE how these turned out! See the photo below, to see what the cupcakes originally looked like!

The Never Too Hungover Road Show is happening at Dallas and Houston area Sam's Clubs.

Dallas: October 27-30, November 3-6, November 10-13

Houston: October 27-30, November 3-6

This is a limited time only Never Too Hungover Road Show being promoted at Sam's Club, so if you're in the area, make sure to stop by and check it out.

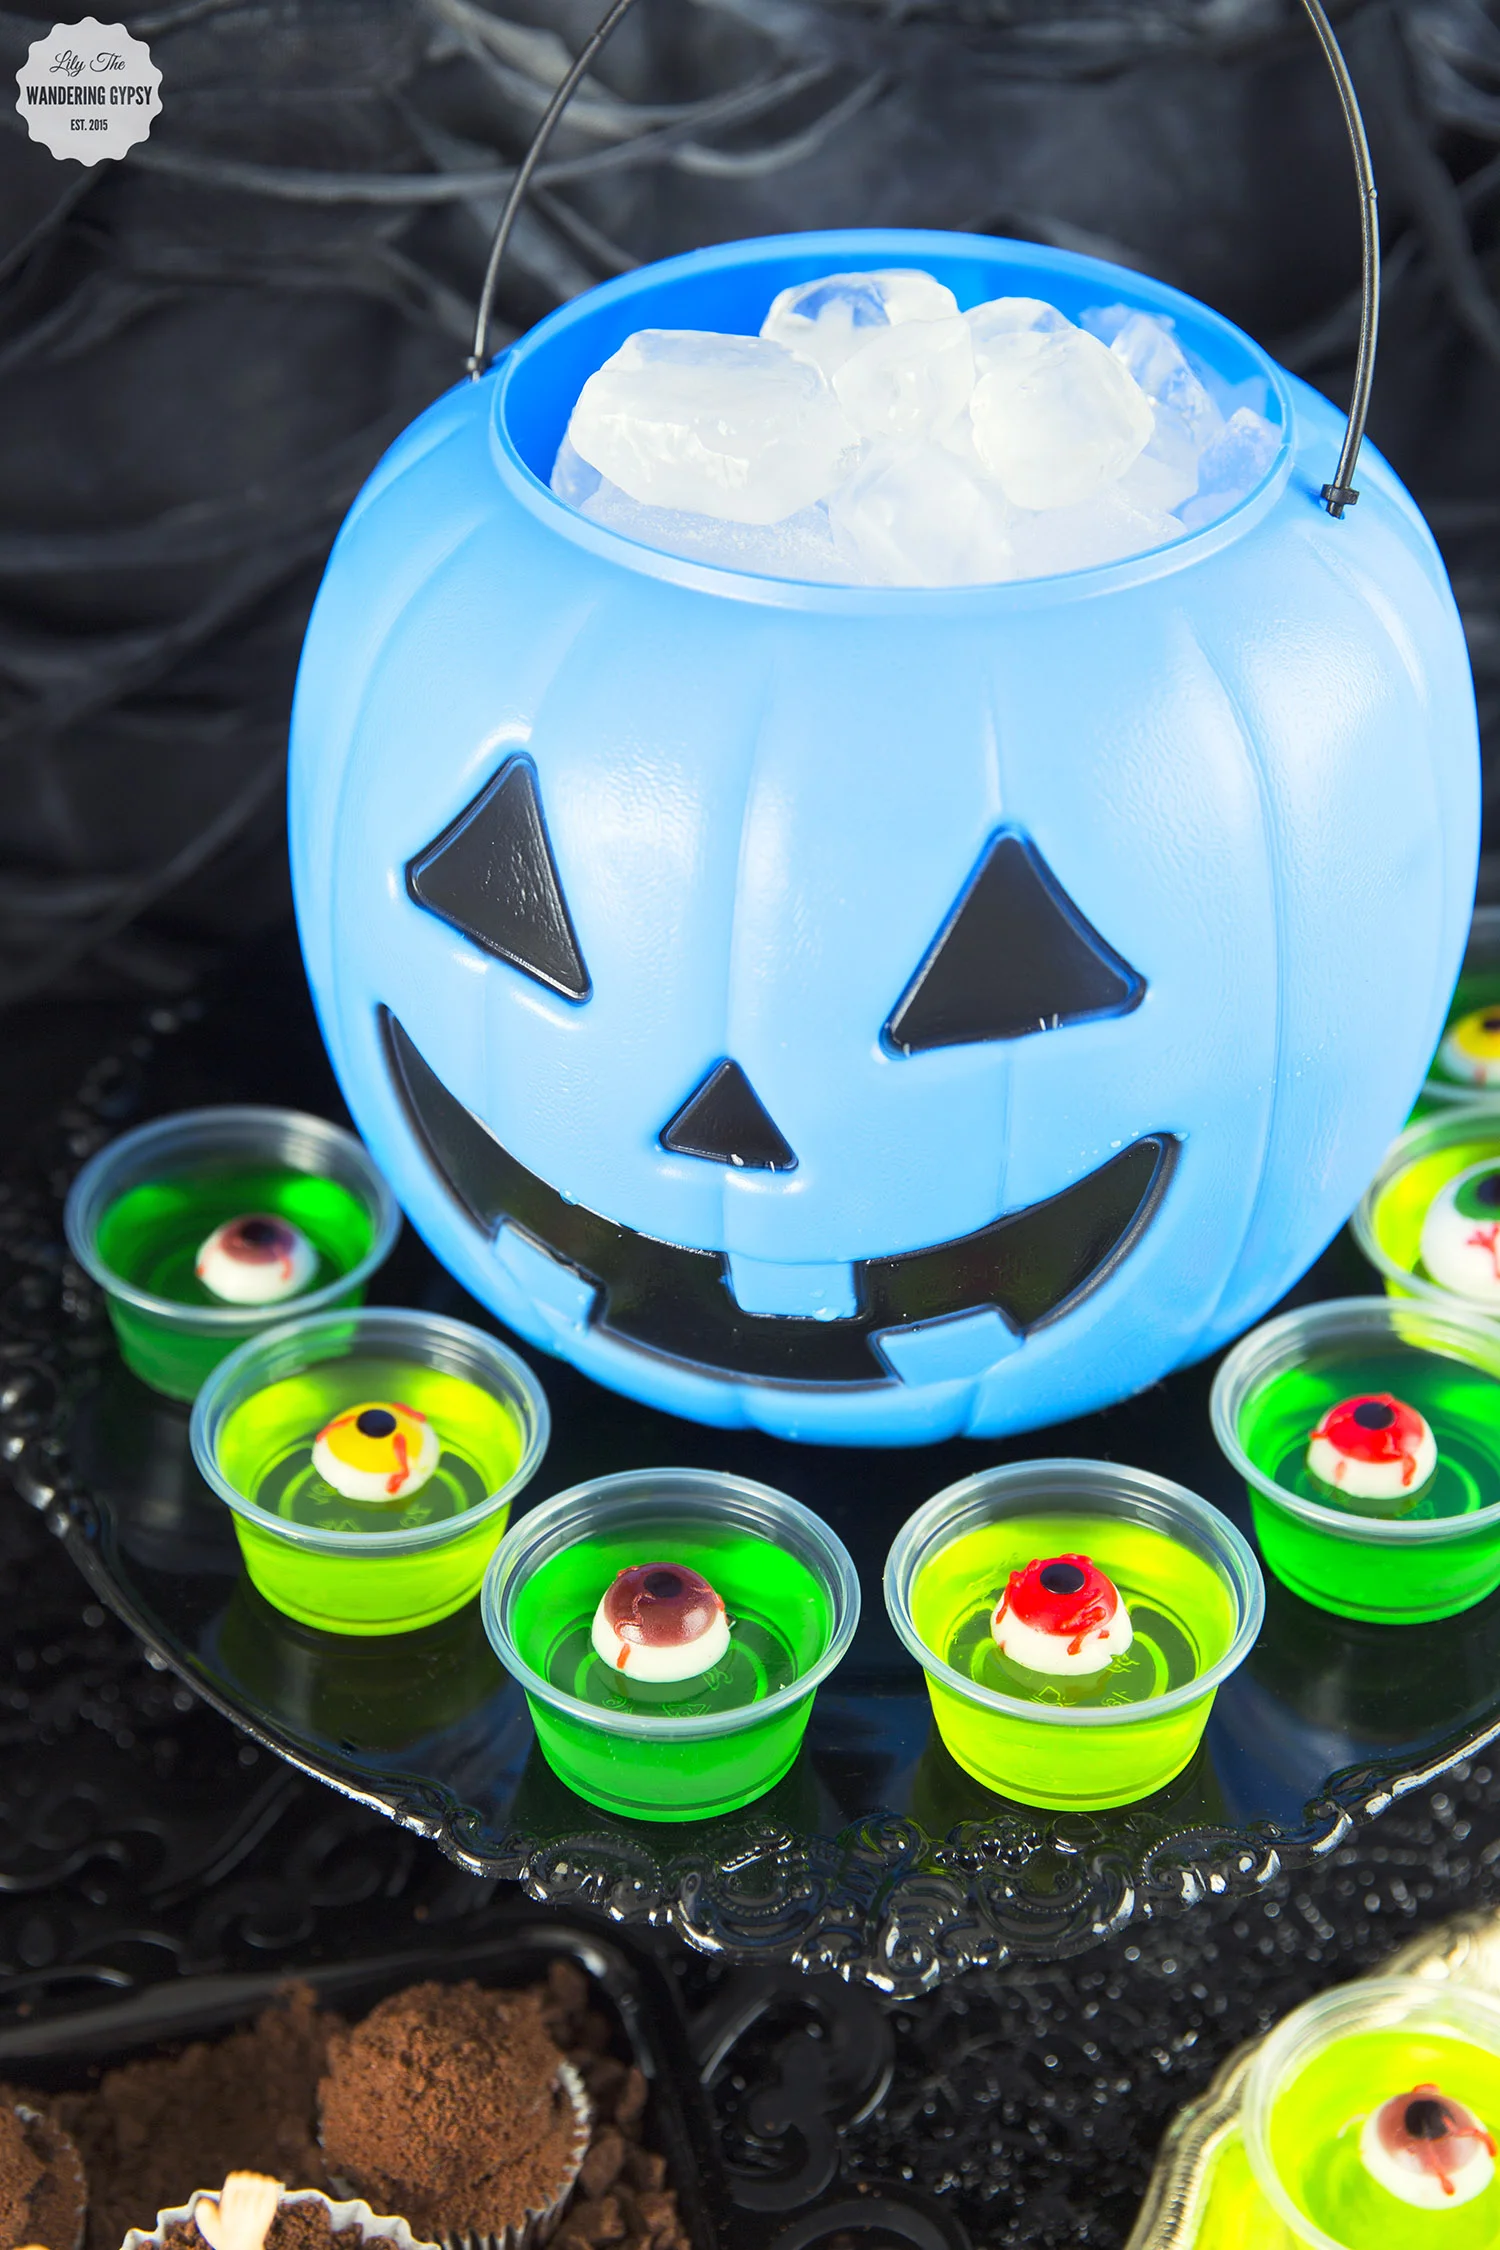
Above, I used a plastic pumpkin for my ice buckets! Such a cute way to serve ice to guests. 

Marinated Pork + Greens Nourshment Bowl - Real Flavor, Real Fast

This shop has been compensated by Collective Bias, Inc. and its advertiser. All opinions and content are mine alone. #RealFlavorRealFast #CollectiveBias

Looking for a quick, hearty meal that will fill you up, and add lots of nourishing ingredients to your repertoire? This tasty meal can be eaten multiple ways, and make a great meal the next day as well.

Nourishment Bowls, also referred to as Buddha Bowls are packed so full of good ingredients and can be made in under 30 minutes. People of all ages will love the addition of this Smithfield Marinated Pork Tenderloin, encrusted in bacon and black pepper, that they will also love being introduced to ingredients like cabbage, carrots, mushrooms, and quinoa. That pork flavor really enhances the flavor of everything. Read more to learn what I used for this Nourishment Bowl, so you can make your own. 

Basically, you choose your greens, veggies, grains, protein, and healthy fats, so you can really take this concept and run wild with it. Add your favorite ingredients, and for the most balanced dish, use at least one ingredient from each of those categories.

NOURISHMENT BOWL INGREDIENTS:

- Smithfield® Smoked Bacon & Cracked Black Pepper Tenderloin

- Quinoa (I used a boxed one with seasonings)

- Cabbage of your choice (I featured Savoy Cabbage and Purple Cabbage)

- Carrots (I used a peeler to prep them)

- Sliced Mushrooms 

SMITHFIELD MARINATED FRESH PORK

Learn more about this tasty marinated pork tenderloin here: Smithfield Real Flavor Real Fast.

Learn more about this tasty marinated pork tenderloin here:

Facebook.

Ibotta {Save $1 on 1 NEW Marinated Product}.

Social Channels and Website:
Twitter
Pinterest
Instagram
Website

Smithfield Marinated Fresh Pork Flavors Available

Sweet & Smoky Boneless Roast

Homestyle Boneless Roast

Hardwood Smoked Bacon & Cracked Black Pepper Tenderloin

Boneless Pork Shoulder Seasoned Carnitas

INSTRUCTIONS:

1.) Preheat oven to 425 degrees. If you want a darker color on the edges, seer the pork tenderloin on both sides for about 8-10 minutes. I used a lidded skillet because the bacon kind of pops a bit. That's just for safety reasons. I used tongs to flip the tenderloin a few times while cooking.

2.) Once you are happy with the color, transfer the tenderloin into a baking dish (use non-stick spray), and bake for about 25 minutes or more. At this point, you could also add chopped carrots and cabbage into your baking dish to get the full flavor of everything. I also covered the dish in foil to prevent more popping/spattering.

3.) Once pork is cooked thoroughly, remove from oven, and carefully transfer to a cutting board with the tongs. I then sliced the pork as thin as I could and got read to construct my Nourishment Bowl.

4.) In a wide bowl or really any container you wish, layer: cabbage

But wait, there's more!

Looking for a way to use these wholesome ingredients again the next day? Create a Jar Salad by layering quinoa, chopped (roasted) Smithfield Pork Tenderloin, Sliced Carrots, Simple Dressing of your choice, and Cabbage. Bring this to work the next day, pack it for a school lunch, or bring this awesome, nourishing meal on a road trip with you.

Goose Island Brewery - Chicago, IL

So, the Cubs just won Game 6, which means they are heading to the World Series! I just wanted to show Chicago some love and share a quick Chicago brewery visit with you! Goose Island is located at 1800 North Clybourn in the Lincoln Park area of Chicago. They have quite a large selection of beer on tap, so whatever your taste, you'll likely find something. I definitely found that the more expensive beers were way, way more worth ordering - so, go for one of their Belgian styles or something barrel aged, and you are in for a treat! Below, you will see their Cuban Sandwich and amazing Onion Rings! 

Have you ever eaten Poutine? I had not even heard of it before this, but our friends insisted we order one for the table. WOW, that gravy was for real! It's a Canadian dish that consists of fries, topped in gravy, cheese, and a fried egg! And, the roast meat on the dish tasted incredible, like the best beef stew I've ever had.

Love the food and food pairing recipes they offer on their website - the photos and recipes are super unique. 

And, the BBQ Sandwich was also good! 

Mocha Meringue Cocktail With Sprinkles

Love iced coffee? Looking for a tasty, new cocktail recipe that is so easy to make and tastes delicious? This recipe can be made as a single drink, or make it for a party! Topped with meringue cookies, and covered in sprinkles, this drink makes for such a festive drink for any occasion!

A little while back, I was browsing Instagram, and came upon this awesome company, Gypsy Vodka. I loved the free-spirited attitude they convey, and since my blog is called Lily The Wandering Gypsy, I figured I would reach out and see if they wanted to send me anything. They loved the idea, and sent me the prettiest bottle of vodka I have ever seen. The artwork is so pretty, and the bottle shape is super unique. Gypsy Vodka was founded in Michigan, and is very proud of that fact! #LetLoveConquer

HOW TO MAKE THE DRINK:

1.) Prepare your sprinkles. Have you seen those cute designer sprinkle websites, that sell colorful, cheerful mixes of sprinkles at super high prices? Well, I am definitely inspired by them, but I sure didn't have the time to order offline, so I created my own! Here, I mixed some colorful star-shaped sprinkles from the dollar baskets at Target, and a few other sprinkles I had from the grocery store, and I love how they turned out! Below, you will see that I mixed white ball sprinkles, those itty-bitty multi colored ball sprinkles, and also the longer, more primary-colored sprinkles together. At first, I was unsure about how it would look, but I think the more textures and colors, the better for this one. Sprinkles are NOT an option here, friends!

2.) Melt chocolate and put into a shallow, round, glass jar or Pyrex/plastic container. One that is wider than your glasses, but not too deep. Dip the rim of each glass (shot glasses would also be adorable!!!), scrape off excess chocolate with a utensil, and dip the chocolate rim into the sprinkles. I used my hand to push sprinkles anywhere they did not get from the dipping process. Let these cool and let's mix the cocktail!

3.) Mix your favorite pre-made mocha coffee with 1 shot of Gypsy Vodka over ice, or use this recipe:

1 part coffee liquor

 1/2 part chocolate liquor

1 part vanilla vodka

1/2 - 1 part heavy cream

Ice

HERE'S ANOTHER RECIPE:

2 oz. expresso or strong coffee

1 oz. vodka

1 oz coffee liquor

1/2 oz. simple syrup

HOW TO:

Combine espresso, vodka, coffee liqueur, and simple syrup into a cocktail shaker and fill with ice. Shake well and strain into a chilled glass. Garnish as desired.

Gypsy Vodka is naturally gluten free!

"We had only been out of college for a few months, working as consultants, and we had already grown unsatisfied with the 9-5 work life. We headed west to Breckenridge Colorado in search of inspiration and a new perspective. While in Colorado we met a whiskey distiller who lived nearby, and after talking to him, and feeling his passion for his craft, we set out to learn as much as we could about the art of distilling.  It wasn’t long before we too, were hooked, and Gypsy was born.  We didn’t just want to make vodka; we wanted to build a brand for young, free-spirited explorers like ourselves. 
The name Gypsy represents our lifestyle and reflects the way we live. Whether climbing the peaks of Colorado looking for the perfect sunset, or finding new family at a music festival, we were taught long before we graduated college that living the life you want is within your grasp.  We owe so much to the people who have shown us this, and Gypsy is as much theirs as it is ours.
The road to this point has not been easy. We have dedicated ourselves to our brand, spending long nights living out of our van and tent, seeking investors, and working too many odd jobs to count.  From festivals and ski shops, to party promotion and landscaping, we were able to muster up enough cash to turn our dream into a reality.
After exploring 50 different formulas and hosting countless taste tests, we believe Gypsy is the best tasting, smoothest vodka on the market. Gypsy is distilled with corn six times using only reverse osmosis treated water. Our specially selected American-grown corn brings out naturally sweet tones and subtle earthy notes that make the Gypsy experience like nothing else.
Cheers to your Gypsy Soul"

Find Gypsy Vodka online, on Facebook, and on Instagram

Over The Knee Boots for Fall from DSW

Hey friends! I am so excited to share another pair of shoes I received from DSW! This time, I got the chance to try out my first pair of Over The Knee Boots. At first, I was wondering what in the world I was going to pair with these boots. They were admittedly a bit intimidating at first, but the rich, chocolate brown color, thicker heel (compared to a thinner, stiletto style) is easy to walk in, and the fact that these boots have a cute drawstring detail in back to keep them in place all make the boots easy to wear with so many outfits.

I’m sharing #DSW in my life as part of a Designer Shoe Warehouse sponsored series for Socialstars™. All opinions and content are my own. #MyDSW. 

I wanted to style these Unisa Saranaa Over The Knee Boots in Charcoal Faux Suede with a Fall outfit that contained a shorter dress and a looser jacket. LOVE how everything came together so much. I can't wait to tell you a little bit more about these boots! 

This dress was a bit on the shorter side, and looked so cute underneath a loose fit olive green, Army jacket. I would definitely feel comfortable in this outfit for so many occasions.

Find all of the DSW Over The Knee boots, here. 

Sweet Potato Bites - A Quick And Easy Tailgate Recipe

This recipe turned out SO well! I also thought they would be cute as a tailgating or football viewing party recipe. I found some adorable football napkins at TJMaxx, and also found the food serving supplies at Hobby Lobby (links provided below). 

Really excited that I have a new, super easy recipe in my arsenal now :) I love how easy these were to make, and would be such a great idea for a crowd, a side dish for any meal, or would even be perfect an easy and wholesome snack. I used 2 sweet potatoes, and made way too much. So, 1 potato for every 2 people would likely be enough. I also show a little bit of Ketchup here (I love the new Simply Heinz one), but most people prefer honey on their sweet potatoes. So, get creative, and serve these Sweet Potato Bites with just about any sauce, and you're golden. 

INSTRUCTIONS:

1.) Preheat oven to 375 degrees F, and line a baking sheet with foil or use non-stick spray. I then washed the potatoes, and opted to peel the skins off of the potatoes, but it's possible that leaving the skins on would be just fine. Cut potatoes into small, bite sized pieces, and put them into a bowl with olive oil (enough to coat everything), and seasonings like salt, pepper, a bit of cayenne pepper, and a bit of an Italian seasoning blend that contained a bit of rosemary and parmesan cheese. 

2.) Mix ingredients well, and make sure the potatoes are coated completely. Pour the potatoes onto the lined baking sheet, spread evenly so nothing is overlapping, and bake for 20 minutes, checking on and stirring them on the baking sheet, then baking for another 10 or so minutes. They will start to get brown and crispy around the edges and still be soft and scrumptious. Make a little, or make a lot!

SERVING IDEAS:

I love the trick of using patterned tissue paper (found in the gift wrap section at a craft store), and cutting pieces a little bigger than the container you will serve the food in. It really dresses things up! In this post, I used these food containers (found here), small paper condiment cups (similar here), and patterned tissue paper. I also used some gold utensils (found here), but you could use any color.

The Must Have Booties For Fall - the Orena Bootie by Franco Sarto

Finding that perfect pair of shoes that goes with literally every outfit is such a challenge. When you do have that pair of shoes in your closet, it makes life easier and makes your outfits so polished. Shoes can definitely make or break an outfit, and these Orena Booties by Franco Sarto multi task. 

I’m sharing #DSW in my life as part of a Designer Shoe Warehouse sponsored series for Socialstars™. All opinions and content are my own. #MyDSW.

Super excited to bring you another post for DSW! It's been so fun styling these suede booties for Fall. I love refreshing my wardrobe with versatile items that last forever, and these booties not only look adorable, but are definitely way more comfortable than other similar styles I have tried. They're absolutely gorgeous! Last week, I shared a post where I styled the Orena Bootie by Franco Sarto with a cute printed dress with 3/4 sleeves. This time around, I wanted to pair dark, distressed denim with them. 

I also wanted to bring a bit of that New Western flair into the outfit, so I chose a Southwest-inspired bracelet and necklace that has turquoise and red details. The fringe cardigan is also amazing, and was so super soft.

The booties featured in this post are the Orena Bootie by Franco Sarto, available at DSW. Check out all of the amazing shoes in the Western Edge section of their site. Keep an eye out next week as I share another way to incorporate these gorgeous shoes into another fun outfit. 

Hosting A Food Photography Party For World Arthritis Day

This shop has been compensated by Collective Bias, Inc. and its advertiser. All opinions are mine alone. #WhatInconvenience#CollectiveBias

Are you aware that today, October 12th, is World Arthritis Day? I know so many people are afflicted with arthritis, and with so many tasks at hand each day, living life without joint pain is so important. 

Today, I am teaming up with Advil to help spread the word about this important day, and to help raise awareness about Arthritis, that effects an astounding 53 million Americans. And to also help spread the word about the #WhatInconvenience campaign and some of the resources from Advil and the Arthritis Foundation.

My career really inspires those around me, so I thought it would be SO much fun to host an event and provide all of the ingredients and tips to create beautiful food photography. It's so fun to give several people the same materials then to see how everyone interprets the project a bit differently? I love that, and am so excited to present you with this Food Photography Party, in honor of those who experience Arthritis which makes everyday tasks, like preparing food, a challenge. 

Food Photography is SO popular these days, but not everyone understands how to achieve beautiful photos. In addition to good lighting and a decent lens, it's important to create a beautiful scene with lots of greenery and thoughtful styling. This party is a way for me to share these tips and more with those who attend. 

 BEtter Living Toolkit
 photo get-advil.png

Live life to the fullest, without letting Arthritis pain get in the way. Daily tasks like chopping food or preparing for a party should be done with ease, thanks to the help of Advil, which helps reduce joint pain.  

The EZ Open Cap is in deed, very easy to open, and is perfect for people struggling with Arthritis. Nothing is proven stronger on Arthritis and other joint pain.* (For minor arthritis pain. Among OTC pain relievers).

The medicine in Advil is the one that doctors recommend most for joint pain. More than the medicine in Tylenol or Aleve.** (**Based on a survey of monthly doctor recommendations).

Available at Walmart stores nation wide, making it very easy to stock up on Advil for those days when you wake up with discomfort.

"More than 1 in 5 people over the age of 18 have been diagnosed with Arthritis by a doctor. Almost 300,000 babies and children have Arthritis (that is 1 in 250 children). And, by the year 2030, it is expected that nearly 67 million people will have Arthritis. It's the number one cause of disability" - arthritis.org.


I also thought these DIY Herb Markers, shown below, would make a really whimsical addition to the beautiful herbs I am providing guests. Below, you can see a graphic I created to show you what herbs I am providing people. We are so fortunate to have a community garden, here in Carbondale, so I went ahead and spent a few minutes there gathering herbs and edible flowers that I knew would be perfect for this party.

Below, you can click on the graphic, that contains my Herb Marker Signs and Food Photography Bookmark Printables. Simply save the image to your computer, and print off onto card stock paper. Then, cut out the labels, and, hot glue them to skewer sticks. For the herbs, I found them at our local community garden, and then placed them into clear glass and silver containers that I already had. A FREE project, how great! 

Since I thought it would be great for everyone to have their food photography props provided, I put these Food Photography Gift Boxes together for guests. I found these cute, wooden boxes at a local craft store (although these could literally be either wood, cardboard, metal, or just about any container. Next, I filled them with a cotton kitchen towel, notebook for taking notes and recipes ideas, a wooden cutting board, clear glass bowl (that I later filled with goat cheese), and a knife, so guests could cut radishes and herbs as they liked. Make sure guests take notes on flavors, ingredients, and more. Remember, everyone's skill levels will be different, and everyone has different interpretations of beauty, so just have fun with the party, and look forward to seeing what everyone creates!

Once your guests have arrived, you can give them their gift boxes, find them a seat at the table, and get started! 

INGREDIENTS INCLUDE: French Bread Toast, Goat Cheese In 2 Flavors, Radishes, Fresh Herbs.

I researched lots of images of this same appetizer, and it's always SO beautiful! I figured that this would be the perfect thing for guests to create because ti was simple, elegant, easy to put together, customizable, and would look so pretty in their photographs. Have them choose their favorite herbs, based on look and smell. 

Have you ever tried Goat Cheese before? It's creamy, and comes in several flavors. It has an interesting aftertaste that really sets it apart from other creamy cheeses. 

I always have Advil on-hand, for when any joint pain creeps up. 

Thank you SO very much for stopping by! I hope everyone who is afflicted with Arthritis can find some relief, and I hope you have found a bit of inspiration from this fun, Food Photography Party! 

Celebrate New Starbucks® Caffé Latte K-Cups®! Love These Flavors!

This post has been compensated by Collective Bias, Inc. and its advertiser. All opinions are mine alone. This post was sponsored by Starbucks as part of an Influencer Activation. I received compensation and complimentary products to facilitate my review. #StarbucksCaffeLatte #MyStarbucksatHome #CollectiveBias

Cooler temperatures mean it's time to test out some new Caffe Latte coffee flavors! Starbucks® now offers a two-step Caffè Latte that you can create with your Keurig machine at home, and they were delicious. Read on to learn more about this new style of coffee prep. Read on to learn more about incorporating new Starbucks® Caffè Latte K-Cup® pods into your routine!

I also have a clever way to put those K-Cup® pods to use a second time around. Read on to learn about my idea. 

Learn more about the Starbucks® Caffè Latte K-Cup® pods and find lots of drink inspirations on the Starbucks® website.

When I received this Starbucks® Influencer Gift Box in the mail, I was pleasantly surprised by how beautiful everything looked. It included: A Glass Starbucks® Mug (which is amazing!!), A Gold Spoon, Confetti popper, three samples of Starbucks® Caffe Latte K-Cup® pods, one (1) 6-Ct box of Caramel Caffè Latte K-Cup® pods. SO excited to have been so lucky to have received something SO nice to sample and ahre with you on my blog. 

I could not wait to open the flavors up and test each one. This two-step method involves adding a packet of whichever flavor sweetened dairy blend (which had the consistency of a packet of hot cocoa), pouring it into a coffee mug, then add the Starbucks® Caffè Latte K-Cup® pods to your Keurig and set it to the 8 oz. setting (the middle of my 3 settings). Then, after it has cooled a tiny bit, stir everything together for a creamy because the product is made from milk. 

Starbucks® Caffè Latte K-Cup® pods are delicious because they are made from milk, with no artificial flavors, and they come in 3 great Starbucks® signature flavors (Caramel, Mocha, and Vanilla) and 2 beloved Starbucks® seasonal flavors (Pumpkin Spice and Peppermint Mocha, available for a limited time).


MY FAVORITE FLAVOR

I tried all 3 flavors while working on this project, and found that my favorite flavor was Caramel! So lucky that I have another box of 6 that came with this gift set. I also received an awesome coupon for 6 more K-Cup® pods at any retailer! The caramel was my favorite because I always feel like caramel coffee drinks can taste a bit fake. Not this one! Every single sip tasted like real caramel, my favorite Fall flavor of all time. Other flavors available include: Caramel flavor, Vanilla flavor, Real Cocoa (Mocha), Real Pumpkin. 

Luckily, these awesome products are available nationally at your local grocery store. And, with this many flavors you will probably want to stock up on every flavor. 

A GOOD REUSE

While these particular Starbucks® Caffè Latte K-Cup® pods came with filters because they are coffee, you can either tear out the filter, or use a K-Cup® from hot cocoa, and then use the cups for individual servings of pre-heated caramel. I heated my caramel in a double boiler, but was surprised at how much caramel each cup actually held! 


The Mocha Flavor was chocolatey without being overly sweet. I really loved also styling this photo with organic chocolate chips AND chocolate-covered espresso beans. How perfect! Read on to check out how to use this two-step process. 


How To Prepare The New Starbucks® Caffè Latte  K-Cup® pods:

Step 1 - Choose your flavor and pour the packet into your coffee mug. 

Step 2 - Insert a Starbucks® Caffè Latte K-Cup® pod into your Keurig machine, and place your mug with chosen flavor packet in Keurig®. Set to 8 oz setting, and be ready to indulge!

***

BE VERY CAREFUL! These machines make very hot coffee! Stir the drink, wait until it cools to your liking, and enjoy!

2016 Starbucks Corporation. All rights reserved. Keurig, Keurig HOT, K-Cup and the K logo are trademarks of Keurig Green Mountain, Inc., used with permission.

How To Host A Clothing Swap Party!

I'm super excited to bring you this fun idea! Since Fall is my favorite season, and it's definitely a fun time to transition into Fall garb, now is a great time to host a Clothing Swap Party with friends and family members. Have some of your favorite ladies over and serve some tasty coffee drinks and provide lots of snacks. This would be an amazingly fun way to spend an afternoon or evening with those who you enjoy spending time with.

HERE'S HOW:

1.) Gather any clothes you are willing to part with. I love this swap party idea, because I tend to be able to pass along much nicer items if I have a friend in mind. 

2.) Send an invite or e-vite to friends, using this graphic. Feel free to save or even screenshot the image, and just send it to anyone who you want to invite. 

3.) To Make The Banner: Print the 5 pages of provided files (below) in color, and cut out each letter. I used a paper cutter and a pair of scissors. Glue ribbon or decorative pom pom trim to the top of each letter flag, and then tape a length of rope to the back of the letters. Tape to the wall behind your party table - I just love how this turned out! 

4.) Next, gather up food and drinks. I chose to provide some chocolate cookies, maple cookies, other snacks, AND iced coffee drinks! Feel free to use whatever you want here - the sky is the limit! 

PARTY DECOR PRINTABLES:

Print each of these 5 pages once, in color on card stock. Save these images to your computer then print at home or at a copy shop. This costs less than $5 to print on traditional 8.5 x11" card stock.

Page 1

Page 2

Page 4

Page 3

Page 5

MAKING THE BUNTING

I love the how cute these letter flags looked with the pom pom ribbon trim on top. 


SWAPPING CLOTHES...

When everyone arrives, have them place their clothes on a table or in a corner of your room. I would suggest mixing everyone's clothes together, then basically sorting everything by type (pants, dresses, shirts, etc) so it's more of an anonymous way to select new clothes. 

I thought it would be fun to greet guests with this beautiful party tablescape, then after people have grabbed their snacks and coffee, pile the table with everyone's clothes. You can of course let people spread out in your living room or a guest bedroom, and have everyone sit in comfy chairs and on floor pillows. This way, guests can have a comfy seat while swapping out for friends' clothes. 


RATE THE LOOKS:

I thought it would be so fun to let guests rate each other's new clothes they have chosen. By writing a 1-10 on the chalkboard signs, you can help your friends decide whether the clothing they chose honestly looks good or not. Kind of like scoring at the Olympics, ya know?!


An extremely easy refreshment is pre-made iced coffee from the grocer store, topped with whipped cream and chocolate sprinkles. 

I also decorated with smaller paper shopping bags and adorable tissue paper!

Boho Boots For Fall - Add Some Western Edge To Your Wardrobe

These shoes are absolutely gorgeous. Super flattering shape, great heel height, they're made of suede, and I love where the shoe meets my ankle. I’m sharing #DSW in my life as part of a Designer Shoe Warehouse sponsored series for Socialstars™. All opinions and content are my own. #MyDSW.

The booties featured in this post are the Orena Bootie by Franco Sarto, available at DSW. Check out all of the amazing shoes in the Western Edge section of their site. Keep an eye out next week as I share another way to incorporate these gorgeous shoes into another fun outfit. 

While I didn't go ALL out on the Western-inspired look, I thought that this dress was the perfect nod to Fall. These boots add such an elegance to anything you wear them with, and they are very well-made. That suede material on the booties is beyond soft. Looking through the DSW Facebook page, I noticed that they are styling their ladies in similar dresses to what I wore, and also adding an adorable denim jacket, a utilitarian olive or tan vest, rolled cuff jeans, and comfy olive pants and a loose fit yet dressy tank top. The outfit possibilities are endless, and I would love to know what you would pair with these Orena Booties by Franco Sarto.

So lucky that the mums were in full bloom when we visited Rendleman Orchards for these photos. What a fun excuse to take a little road trip on a beautiful day around sunset! 

Designer Shoe Warehouse (DSW) has been providing shoes to men and women since 1991. They're the leading branded footwear and accessory retailer, with lots and lots of styles and sizes for people of all ages. Are you a fan of DSW? I know they tend to carry a few exclusive brands like Mix No. 6 and Crown Vintage, but also arry brands like Marc Fisher, Lucky Brand, and Adidas (check out this last post I did for DSW and my new Adidas NEO Sneakers).

Peanut Butter + Yogurt "Smoothie" Bowl

I was recently challenged to create something containing a certain cinnamon-flavored peanut butter. I tried the stuff, and it was kind of interesting. I have never imagined a combo like this, and it was pretty good. But, I also had it in my mind to create something like a smoothie bowl that was topped with all sorts of tasty and nourishing things like pumpkin seeds, granola, crushed peanuts, and a few other things. I also love those smoothie bowls I see that have edible flowers on top, and this recipe was the perfect opportunity to "scout" my neighborhood for marigolds to top the smoothie bowl with. 

HOW TO MAKE IT:

1.) For the base: Mix 2 parts vanilla yogurt to 1 part cinnamon (or any flavor) creamy peanut butter. Make sure everything is combined well. Pour into bowl and smooth top with spoon. 

2.) Top with your favorite trail mix (I used a mix of pumpkin seeds, raisins, and sunflower seeds). I also crushed up some peanuts and then sprinkled those in the center, then also added a handful of granola. Lastly. I topped the smoothie bowl with marigolds, for a cute touch of edible flowers. That's it, enjoy! Have fun with your food :)

For the marigolds, I actually looked at 3 different places, and the only flower really available right now is mums. They're all looking gorgeous as ever, but when we visited local farms a couple of weeks ago (post coming soon...), I saw lots of marigolds. I guess it's way too late into the year to find marigolds at any stores, so thankfully as I was driving home, I saw marigolds out of the corner of my eye! I hope the people who grew them don't mind I borrowed just a few :)

Sun Dried Tomato Alfredo Chick and Broccoli Bake

The other night I was hungry, surprise, surprise, and knew I wanted to incorporate chicken into my dinner somehow. Well, I scanned the pantry, and am so happy with what I created! 

INGREDIENTS:

- 2 Chicken Breasts

- 1/3 of an onion

- 1 - 2 cloves garlic

- 1 - 2 C. Broccoli

- 1 Jar of Tomato Alfredo Pasta Sauce 

- Italian Seasonings ( I adore this one)

- 1 box Penne Noodles

- 1 C. Mozzarella Cheese

- Shredded Parmesan Cheese

- Bread Crumbs

INSTRUCTIONS:

1.) Boil noodles until al dente.

2.) While the noodles are boiling, add a bit of olive oil and chopped onion to a skillet. Season with salt and Italian seasoning. 

3.) Once onions are sautéed nicely, add chopped chicken breasts and garlic. Season generously with the Italian seasonings, and cook chicken until the middle is no longer pink. 

4.) During this time, also boil your chopped broccoli, until tender, and strain. 

4.) In a large bowl (there is a lot to mix, here - just warning...), mix 1 jar of tomato Alfredo sauce, cooked chicken, all of the noodles, mozzarella cheese, part of the parmesan cheese, steamed broccoli, and more seasonings if desired. Mix thoroughly.

5.) Coat a 9"x13" baking dish with non-stick spray, pour the mixture in, and smooth out. Top with bread crumbs, and bake at 350 degrees for about 25 minutes covered with foil, then 5-10 more minutes uncovered to get a crispier top. Let cool and serve! This turned out SO well.

#SoFabSeasons - TONS Of Great Apple Recipes For Fall

Apples are such a huge part of the landscape and economy here in southern Illinois, and I love how versatile apples can be - in recipes, decor, and DIY projects. Have you created anything from apples lately? 

You may remenber my Baked Apple Donuts that I created for this apple-themed post roundup for #SoFabSeasons.
 photo donut 1.jpeg

One of my favorite things that brings up memories of fall is Apples! Do you remember apple picking with your family? How about all of those those tasty fall recipes for everything from fresh apple fritters to hot apple cider! We are excited to share with you this collection of amazing apple themed posts from many of our outstanding members here in the Social Fabric community. We know that you will enjoy them and hope that you can create some new fall memories for yourself and the ones you love.
SoFabSeasons Apples  
DESSERT RECIPES (* denotes recipes used in graphic)

*Lily the Wandering Gypsy - Fresh Apple Donuts with Bacon, Caramel Pecan Glaze

Home and Garden Cafe - Apple Pie Coconut Ice Cream

*Joy's Life - Apple Pie Dessert Pizza

*Kitchen Concoctions - Toffee Apple Pie Cookies

The Bandit Lifestyle - Delicious Apple Fritters Perfect for Fall

Roasted Beanz - Easy Crustless Almond Raisin Apple Pie

Wondermom Wannabe - Clean Eating Apple Crisp with Caramel Sauce

Anti June Cleaver - Mini Dutch Apple Pear Pie to Get You Ready for Fall

Basic N Delicious - Apple Cinnamon Bundt Cake

Mostly Homemade Mom - Caramel Apple Pie Fudge

Little Blog in the Country - Pressure Cooker Canned Apple Pie Filling

Diana Rambles - Apple Spice Dump Cake

The Tip Toe Fairy - Apple Plum Skillet Cobbler

Five Marigolds - Sweet and Savory Salted Caramel Apple Dip

Intelligent Domestications - Apple Cinnamon Roll Cake & Apple Cream Cheese Icing

Home Maid Simple - Easy Apple Crisp

More or Less Cooking - Best Apple Fritter Coffee Cake

My Big Fat Happy Life - Skinny Caramel Ice Cream

* An Alli Event - Apple Bundt Cake with Praline Frosting

Tobin's Tastes - Caramel Apple Cheesecake Dip

Ginger Casa - Delicious Apple Cranberry Pecan Crumble

Sweet Sensations - Apple Cobbler with Oatmeal Muffin Crust

A Labor of Life - How to Make Delicious Apple Roses

Julie Is Coco and Cocoa - Fried Cinnamon and Sugar Apple Rings

Polka Dotted Blue Jay - Mini Carmel Apple Bites

Finding Sanity in Our Crazy Life - No Bake Oatmeal Apple Pecan Cookies

Being Tazim - Strawberry Apple Crumble Vegan and Dairy Free

Upstate Ramblings - Caramel Apple Cake

Rebecca Lately - Baked Apple Recipe

Simple Food 365 - Light and Fluffy Apple Cinnamon Coffee Cake

Mama Plus One - Homemade Apple Cider Donuts

Bento Lunch (dot) net - Caramel Apple Pudding Parfaits

MORE APPLE RECIPES

Broken TeePee - Salmon and Rice Noodles on Apples, Carrots & Zucchini

Revel & Glitter - Autumn Cranberry Apple Pear Salad

* Happy Go Lucky - Bacon Cheddar Apple Dip

Honest and Truly - Delicious and Easy Mini Apple Pancakes

Smiling Notes - Healthy Apple Pie Oat Pancakes

Creative Southern Home - Apple Bread

Beyond Mommying - Apple Bacon Grilled Cheese

Momcrieff - Apple Pancake Rings for Breakfast or Snack

Tiaras and Tantrums - Favorite Autumn Apple Snacks

Injenious Life - Gluten Free Applesauce Muffins

Everyday Party - Simple Caramel Apple Cider

A Paper Arrow - Apple Bread for the Fall

Happy and Blessed Home - Delicious Apple Recipes

Mom Saves Money - DIY Dehydrated Apple Rings

Gluesticks Blog - Baked Apple Chips

Life With Lorelai - Caramel Apple Crumbly Bread Recipe

Ava's Alphabet - Baked Apple Pancake

Life with Lovebugs - Spiced Applesauce and Oatmeal Muffins

For the Love of Crust - Homemade Crockpot Apple Cider

Oat & Sesame - Maple Your Applesauce

Southern Mom Loves - Cheddar and Apple Goldfish Snack Mix Recipe

My Life Cookbook - Cinnamon Apple Breakfast Bread (Gluten Free)

ACTIVITIES

Tales of Mommyhood - Apple Picking Favorite Family Activity

Mama Luvs Books - Apple Picking in Rhode Island

Kori at Home - Apple Tot School Unit with FREE Printables

Jenny at Dapperhouse - DIY Apple Basket Sorting Game

To & Fro - Tips for Apple Picking with Your Family

CRAFTS

Little Mama Jama - Apple Stamping Sensory Activity for Preschoolers

Creative Ramblings - Fabulous Fall Wood Apple Sign

Woods of Bell Trees - Quilted Apple Pillow

For What It's Worth - Apple Themed Party with DIY Apple Craft

The Kennedy Adventures - Paper Plate Apple Craft

Babs Projects - Apple Scented Potpourri Pouches

Great Contradictions - Apple Themed Candy Bar Wrapper Printables

BEAUTY

* Momerish - Apple Pie Sugar Scrub Perfect for Fall Pampering

Can you believe all these incredible Apple themed posts? Bookmark this page so you can come back and try out all the recipes, crafts and activities with you and your family! Check back next month when Social Fabric features posts with a pumpkin theme. You can always search the hashtag #SoFabSeasons to find more of what you're looking for!

The adidas Sneakers I Love For Fall with DSW

I am absolutely thrilled to present you with our latest collaboration - with a company that I love so very much! I’m sharing #DSW in my life as part of a Designer Shoe Warehouse sponsored series for Socialstars™. All opinions and content are my own. #MyDSW

As the weather {finally} starts getting chilly, as much as I love my sandals, I get so excited to wear regular shoes! I love the fact that sneakers are trending so much right now, and I also love the trend of more cropped length jeans with freyed hemlines. The combo of a new pair of sneakers and these jeans makes my heat go pitter patter :) 

These adidas NEO Courtset Sneakers are available on DSW, and I love that the toe box is roomy. I really need to be able to wiggle my toes when I'm wearing sneakers (especially with socks on), and these are perfect. 

I absolutely love the bright, white details on top of the Navy Blue sneakers. They also come in a grey and white color way that is gorgeous! 

I shot some of these images at Twig Floral Design in Carbondale, IL. It's a cute store, with tons of home decor items.

Top 10 Booties For Fall - Starting at $25

SO excited for Fall! Yesterday kind of seemed to mark the first day of cooler, Fall temperatures, which I am thrilled about! So sick of wearing shorts and dresses at this point, and I am super excited to wear leggings, boots/booties, and long sleeves. The southern Illinois heat and humidity really kicked my butt this year, so it's my time to enjoy the weather again {finally}!!!

So, I rounded up some of the cutest booties around, and you can click on the images to shop any of them. Prices start at $25.00 and go up from there. Enjoy!!!


Photography Field Trip: Scratch Beer Book Signing And Bottle Release

We are so fortunate to have such an incredible place like scratch brewing company in southern Illinois. It's definitely a destination brewery, being in Ava, IL, which is about 25 or so minutes outside of Carbondale. It's well worth the scenic drive out there. On September 10, 2016, I visited their brewery, and captured a bit of their book signing, homebrewing day, and a bottle release. I brought home the Single Tree Hickory Sour, and the Spring Tonic (so good!!). We also have a bottle of the Black Trumpet Bier De Mars, but haven't broken that open just yet...

Their newly released book, The Homebrewer's Almanac, which contains around 15 recipes for their famous foraged beers. 

"The Homebrewer's Almanacis a practical guide for those who are interested in incorporating fresh and foraged ingredients into their beer, written by the brewers of one of the country’s hottest new breweries. " - Amazon

Below, Aaron and Marika sign copies of their first book. It's always inspiring talking to these two. 

More photos coming soon! Can't wait to share the rest with you. Visit Scratch online, on Instagram, or on Facebook. 

Easy Grilled Squash Recipe

A super easy, super filling vegan recipe to please even the pickiest of eaters. This is great chopped up as a side dish, or as a whole mean in itself. 

Fresh Apple Donuts With Maple, Bacon, Caramel Pecan Glaze!

So, these fresh baked apple donuts turned out great. I adapted this recipe, from A Latte Food just a tiny bit, and they worked out so well. I loved each of the steps involved in this project. I also substituted buttermilk with vanilla yogurt (it worked out great!!). 

This is actually the first time that donuts have actually worked for me. Last time, they did not rise much, they were kind of bland, and I basically put the donut tin in the back of the cabinet to be forgotten for a while. 

But, I was recently invited to join a little blog post link up with some other bloggers, and the only requirement for #SoFabSeasons was that it had to do with apples. Well, off to Pinterest I went, and within minutes, I knew that donuts had to go down.

This was also my first time really making a glaze for donuts, and it turned into more of a caramel because I heated the mixture a bit too long, bringing the sugars to kind of caramelize. Oh well, these are amazing, and I loved topping them with an unexpected ingredient - bacon bits and pecans. That bacony flavor really goes so well with the other flavors, that I am so happy I added the bits. 


Another great thing about living in southern Illinois is that you don't have to go very far to find an apple (or peach tree) orchard. I photographed these apples, below, one day after I visited Flamm Orchards. I am sure they have been picked by now, because this was shot maybe 2 weeks ago :)

Donuts

  • 1 1/4 cups all purpose flour
  • 1/2 cup sugar
  • 1/4 cup brown sugar
  • 1 tsp baking powder
  • 1/4 tsp nutmeg
  • 1/4 tsp salt
  • 1 egg
  • 1/3 cup buttermilk
  • 2 Tbsp sour cream
  • 1 tsp vanilla extract
  • 1 Tbsp butter

And, here are the apple crates at Flamm Orchard. I would LOVE to get one of those for a photography prop/surface! 


Maple Glaze

  • 2 Tbsp butter

  • 1/4 cup pure maple syrup

  • 1/2 cup powdered sugar

  • 1/4 tsp vanilla extract

  • 1/8 tsp ground cinnamon

Apples

  • 1 large apple, chopped finely
  • 1 Tbsp brown sugar
  • 1 Tbsp butter
  • 1/4 tsp vanilla extract
  • 1/2 tsp cinnamon

Topping

  • 1/2 cup chopped pecans
  • 1/2 package bacon bits

INSTRUCTIONS

  1. (APPLES) On med-low heat, cook apple filling mixture for about 3-4 minutes. Pull off heat and allow to cool.
  2. (DONUTS) Preheat oven to 425 degrees and grease a 6-count donut pan liberally with baking spray.
  3. In a large bowl, sift flour, sugar, brown sugar, baking powder, nutmeg, and salt together.
  4. In a second bowl, whisk egg, buttermilk, sour cream, and vanilla extract together.
  5. Make a well in the center of the dry ingredients and add in the wet ingredients. Gently mix the batter until combined.
  6. Add in melted butter and apples and mix until combined.
  7. Spoon the batter into the donut pan, evenly distributing the batter between the 6 donut cavities (you may have enough batter to make 7-8 donuts).
  8. Bake for 10-12 minutes, or until the donuts are lightly golden and 'spring' back when touched.
  9. Allow to cool for 10-15 minutes.
  10. (MAPLE GLAZE) Melt butter, maple syrup, vanilla extract, and cinnamon over low heat. Once melted together, pull off the heat. Sift in powdered sugar, and whisk until fully combined. Allow to cool for 8-10 minutes so the glaze can thicken. You want to work kind of quickly on this step, because the glaze can cool kind of quickly, and thickens. 
  11. Dip each donut into the glaze and immediately sprinkle with chopped pecans. The elongated-shaped dish shown in white, is one I got at IKEA, it was the perfect shape. Allow to cool on a wire baking rack.
  12. Enjoy!

PIN IT FOR LATER...