Easy Vegan Potato Soup Recipe

Vegan Potato Soup Recipe

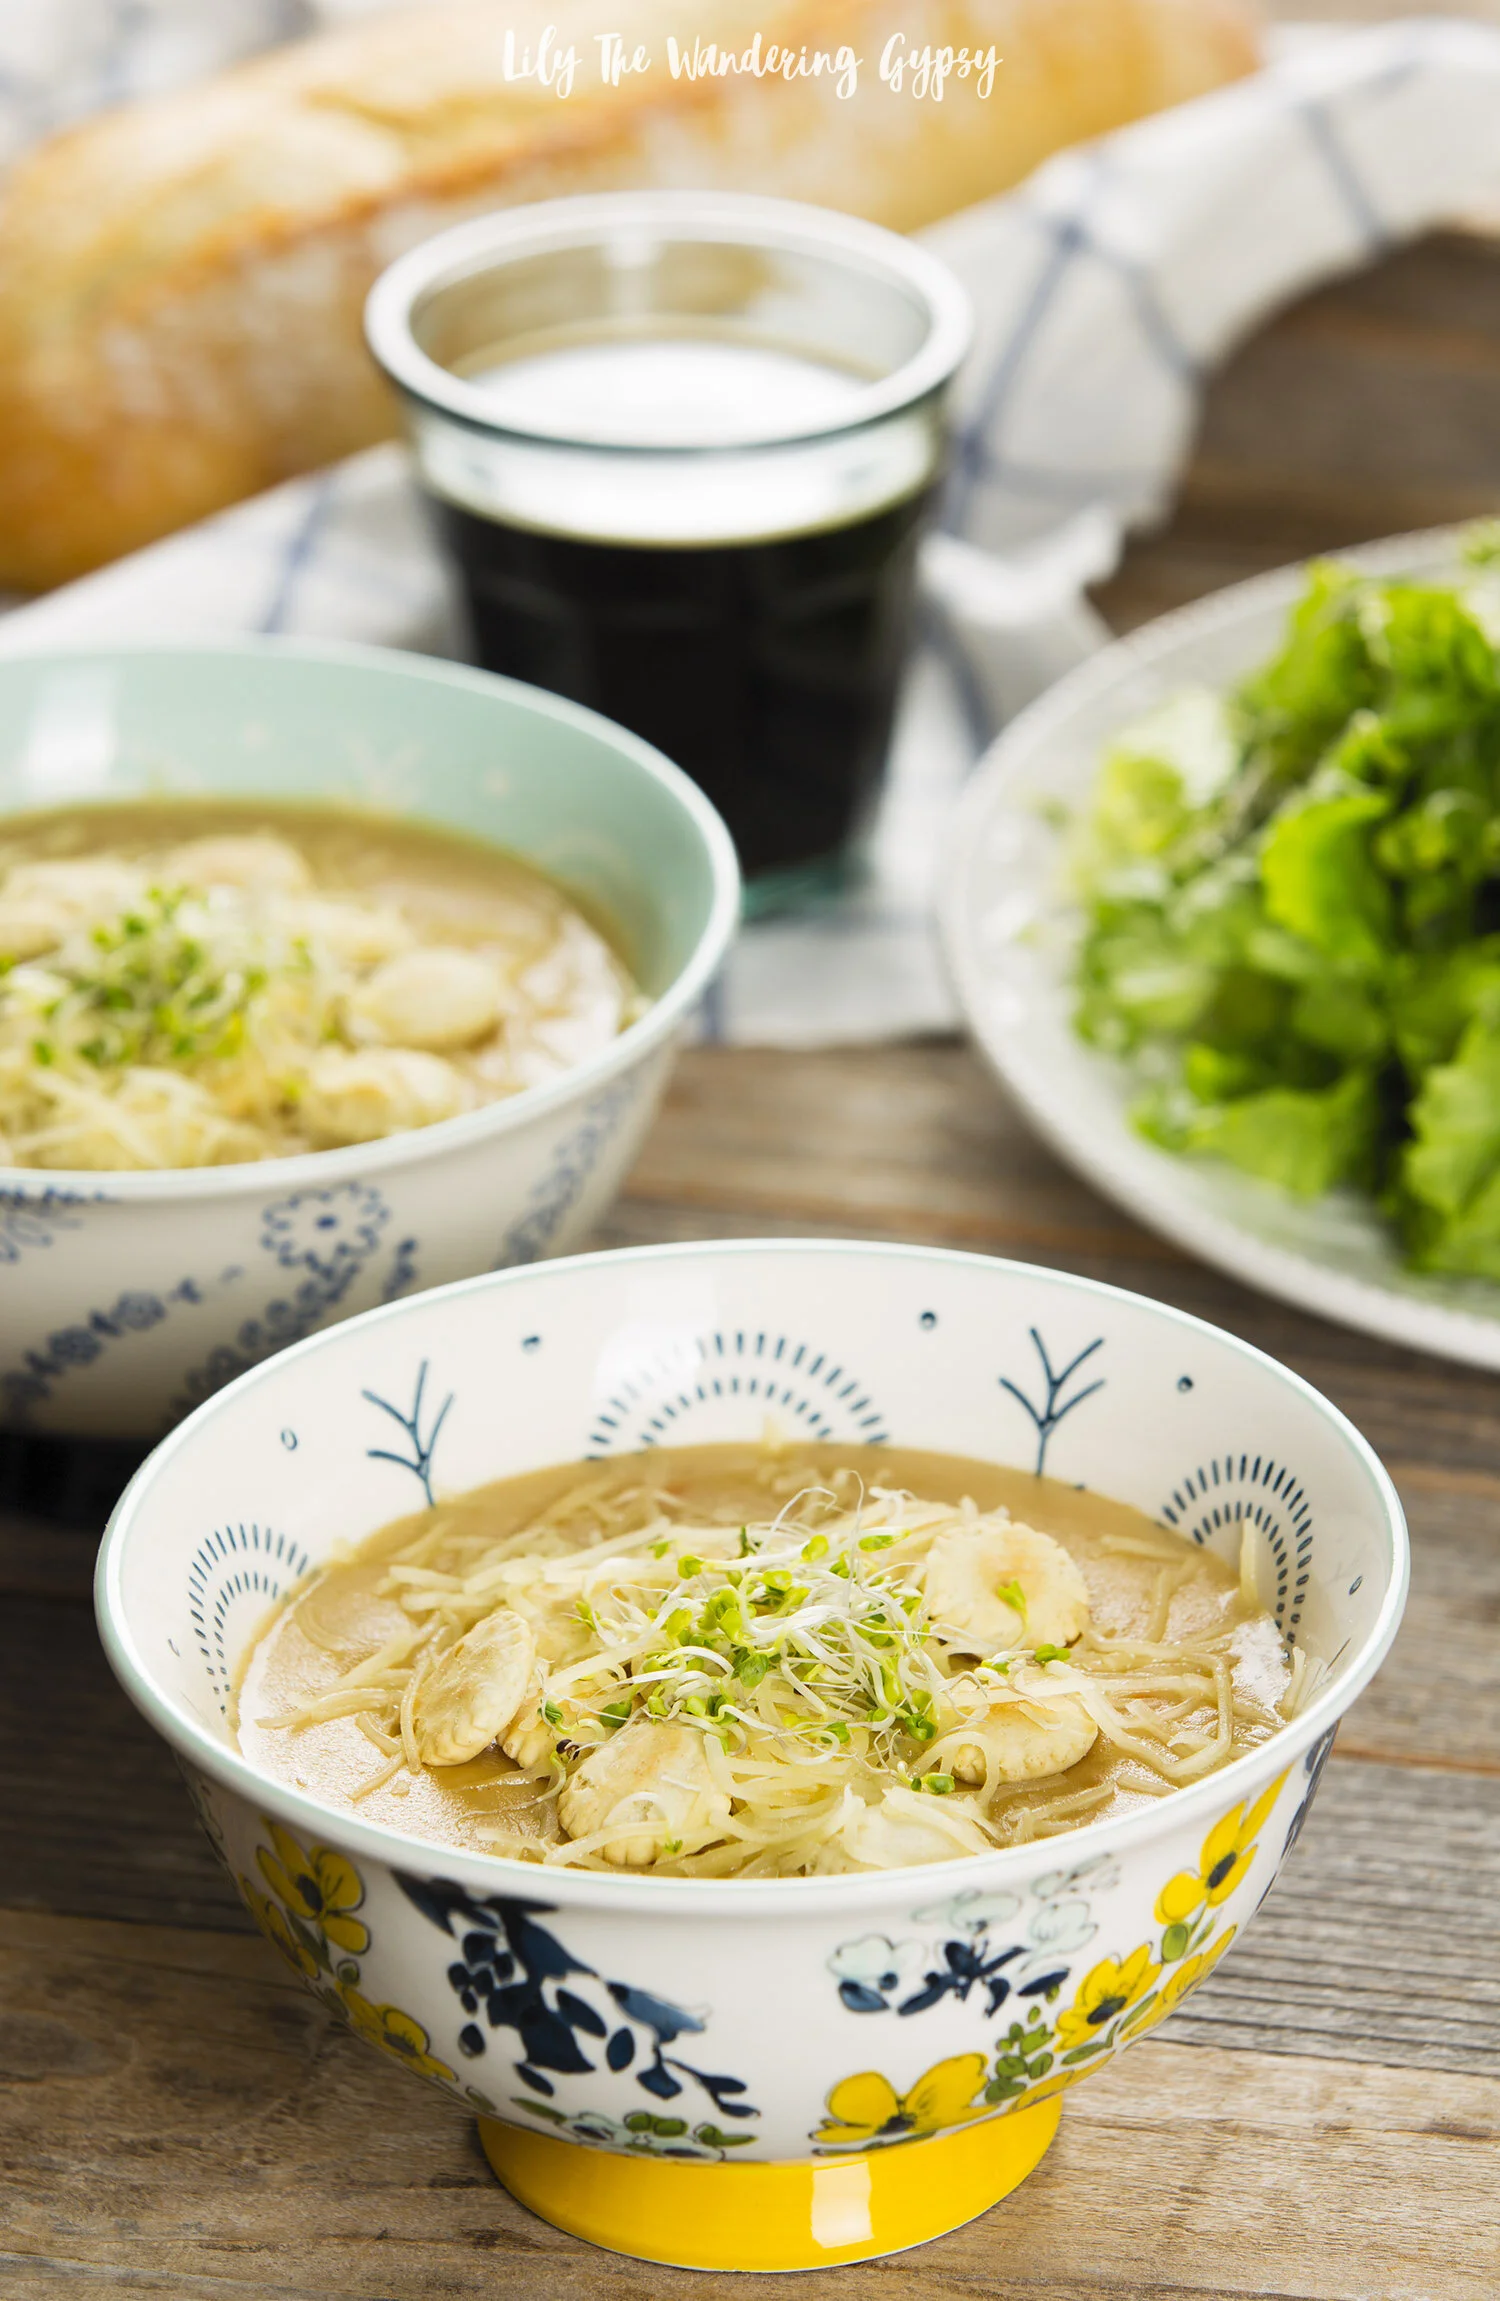
This soup pairs well with a nice, dark, stout beer!

5DB_3445.jpg
Vegan Potato Soup Recipe

Using vegan cheese options is a great way to add flavor and dimension to your dairy-free soups.

Vegan Potato Soup Recipe

INGREDIENTS (found here, via A Virtual Vegan)

  • 2 TBSP vegan butter or olive oil.

  • 2 medium onions , chopped finely

  • 2 ribs celery , diced

  • 2 large carrots , diced

  • 4 cloves garlic , chopped finely

  • 2 teaspoons salt , plus more to taste

  • ½ teaspoon ground black pepper , plus more to taste

  • 4 tablespoons all purpose flour , or gluten-free all purpose flour

  • 2 cups non dairy milk , cashew milk or soy milk are my milks of choice for savory recipes but any other unsweetened creamy non-dairy milk will work too

  • 2½ - 3 cups flavorful vegetable broth/stock , divided

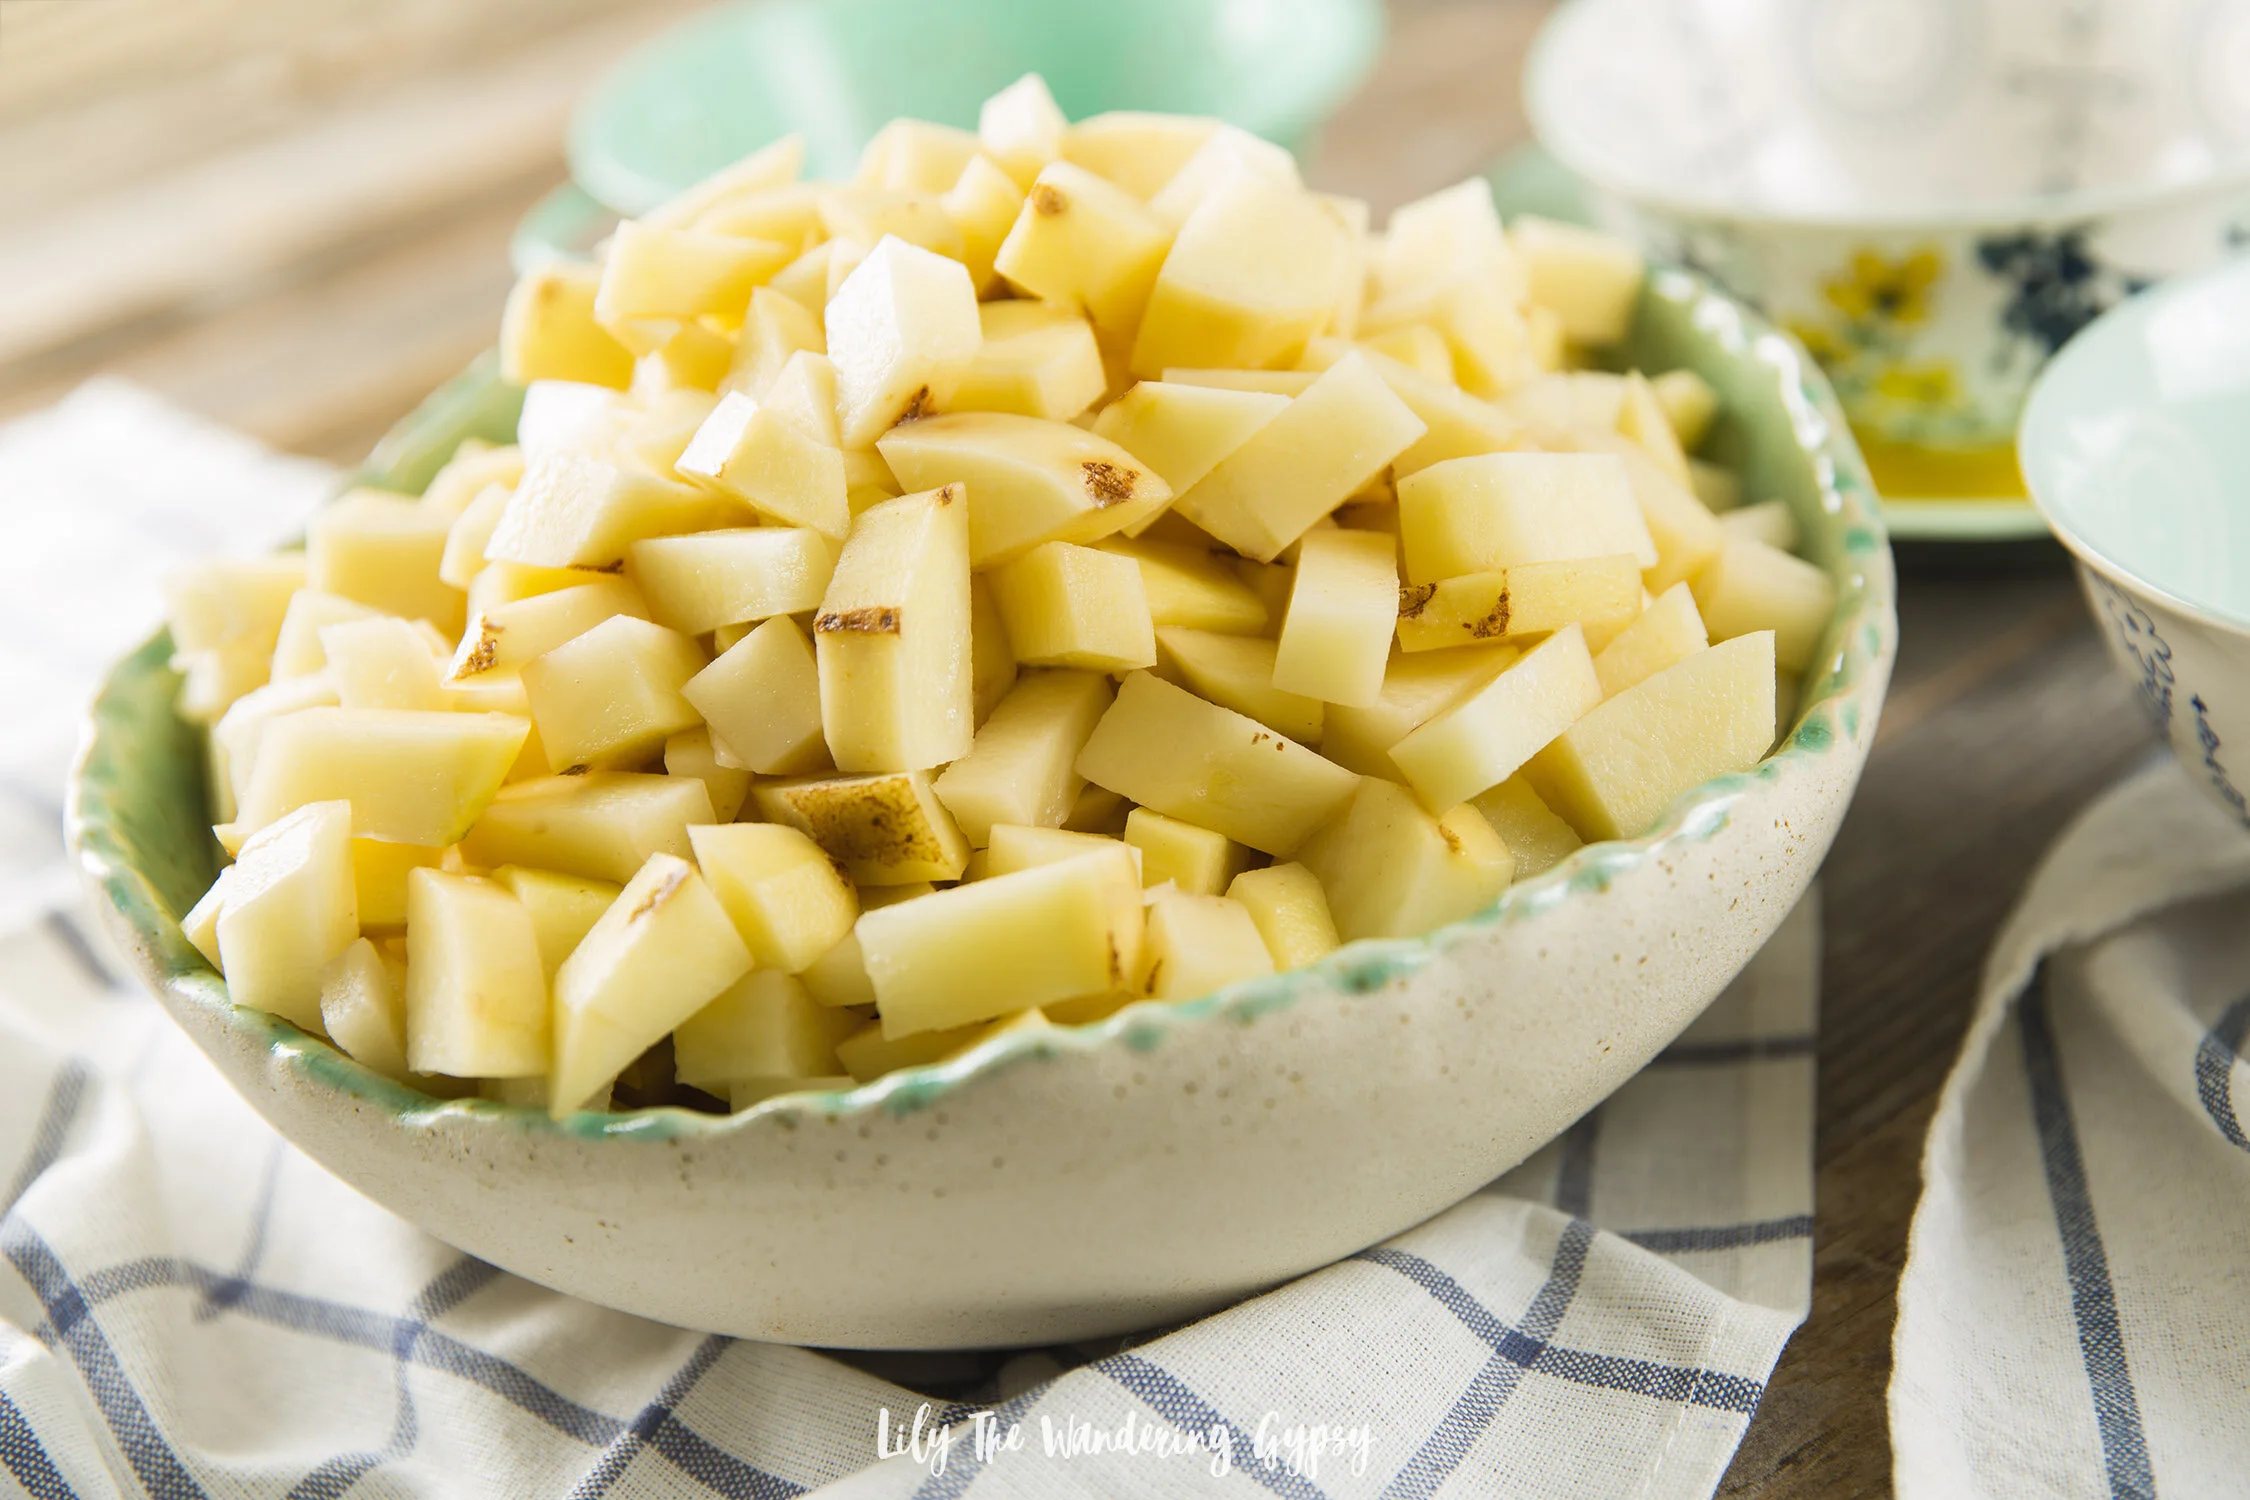
  • 5 medium / about 700 g potatoes , cut into ½ inch cubes

  • ¼ teaspoon ground nutmeg , (optional)

  • 1 bay leaf

INSTRUCTIONS

  • To a large saucepan, add the vegan butter/oil and warm over a medium heat before adding the onions, celery and carrots. Cook, stirring constantly, until the onions are just starting to get a little color, then add the garlic and cook for another 2 minutes.

  • Add the salt and pepper, then the flour to the pan and stir it all around for about a minute to cook the raw flour taste out, then slowly add the soy milk, stirring as you go to work out any lumps. Then add the vegetable broth (reserving about ½ a cup), chopped potatoes, nutmeg and the bay leaf.

  • Stir really well then let it simmer for about 30 minutes, or until the potatoes are soft and just starting to break down. Add all of, or some of, the reserved ½ a cup of broth if you prefer a thinner consistency. Taste and adjust seasoning if necessary.

Vegan Potato Soup Recipe

Loaded Sweet Potatoes - an easy dinner idea!

These sweet potatoes are perfect for warmer weather. Everything can be prepped ahead and the toppings can be completely prepped ahead of time, and these would be exceptional to bring for lunch! I just love how many amazing nutrients come from sweet potatoes too. Hope you enjoy!

INSTRUCTIONS:

1.) Rinse sweet potatoes with water and pat dry. Use a fork to make pricks in the outsides of the potatoes, and bake wrapped in foil for 30-40 minutes. Once soft enough to make a soft impression with your fingers, CAREFULLY unwrap from foil and place on a heat proof cutting surface. Cut in half lengthwise, and arrange on a plate.

2.) Top with items like sour cream, leftover crock pot pork, shredded cheese, cilantro, onions, and black olives, and you have one of THE most delicious entrees you have had in a long time. Enjoy!

Lemon Bar Recipe (With Shortbread Crust)

Hello! Thanks for stopping by to check out my latest recipe. I love lemon bars, and feel like they’re always WAY overpriced at bakeries, and sometimes aren’t tart enough (sometimes they’re way too sweet).

Also, this recipe actually came from a moment where I was baking cutout sugar cookies, but they wound up spreading too much to use. After one sheet pan full of super conjoined cookies, but still a delicious taste, I decided that perhaps, I could use the cookie dough for a crust of sorts. Well, I found a delicious lemon filling to accompany this delicious sugar cookie crust, and WOW, these were amazing!

I even cut them up into small 2” squares and they were a HIT! So fun to keep a little container of these in the fridge for a homemade treat or for an awesome gift, too. Hope you enjoy!

Crust Ingredients (Originally found here)

1 1/2 cups butter salted, softened

1 cup powdered sugar

3 tbsp lemon juice freshly squeezed

1 tbsp lemon zest

3 cups all-purpose flour


Filling Ingredients:

1.5 C. sugar

1/4 C. flour

4 eggs

2 lemons, juiced (feel free to use limes)

Parchment paper

Flour for dusting pan


Instructions:

  1. Preheat oven to 325 F degrees (feel free to bake at 350 if your oven doesn’t run super hot). Prepare 8x8” or 9x9” baking dish with non stick spray. Prepare baking pan by spraying non-stick spray, adding a strip of parchment paper that will help you remove the bars from the pan. Then, feel free to add more non stick spray to the paper, then a light dusting of flour.

  2. Add the butter to the bowl of your mixer and blend until smooth on medium speed. Add the powdered sugar, lemon juice and lemon zest to the mixer bowl and continue mixing on low until fully incorporated. Scrape down the sides of the bowl. Add the flour and mix until well blended. Feel free to gather dough into a ball or round shape to discourage air bubbles while baking.

  3. Press dough into baking pan and smooth out to remove any air bubbles.

  4. Bake crust for 12-15, just until crust is slightly done towards the center.

5. Remove crust from oven, let cool for 5-10 minutes, then pour lemon filing over crust, evening out with a large spoon or spatula. Bake 18-20 minutes longer, until edges begin to get brown. Feel free to cover with foil for last 5-10 minutes of baking time.

6. Let cool completely, then use the overhanging parchment paper to carefully remove the entire baked bar and place it onto a cutting board.

7. Use a knife with a sharp, straight edge to cut the bars in half each way, then two more times on each side (3 cuts per side, 6 cuts total). Feel free to add sifted powdered sugar over the top as well, before cutting.

8. Serve and enjoy!

Easy and Delicious Organic Acapulco Burgers Recipe

This post has been sponsored by Cans Get You Cooking. All thoughts and opinions are my own. #CansGetYouCooking

February is National Canned Food Month, and I am so excited to share unique and simple ways to incorporate canned vegetables into a delicious homemade meal that most everyone will love—even picky eaters! These Acapulco Burgers are similar to a Sloppy Joe Sandwich but with a Latin twist! Filled with seasoned ground beef, canned green chilis, canned black beans, and more, they are then topped with traditional toppings you will love. The flavor combination is out of this world!

From appetizers to sides, main dishes, and even meal prep, canned foods are an essential part of my weekly menu routine. I am so excited to share a very simple, yet fulfilling and delicious recipe that can be prepped ahead of time or made in less than an hour.

If you are looking to make this recipe fully vegetarian, I have tips and suggestions for that below as well. Hope you enjoy!

I used as many organic ingredients as I could; AND many of my favorite vegetables are now widely available canned, in an organic version! Below, you can check out the cans I used in this recipe. 

The Old El Paso Chopped Green Chilis are definitely a pantry or “Cantry” staple! I use them when I am cooking ground beef and chicken or when I am eating all vegetarian! If you’re looking for more recipes using canned goods creatively, you should definitely check out CansGetYouCooking.com and be sure to use hashtag #CansGetYouCooking in any food photos you share

Green Valley Organic Canned Corn is one of my all-time favorite canned corns, available at my local grocery store. I love knowing that fresh fruits and vegetables are harvested at the peak of ripeness and canned within only four hours, sealing in their nutrition and flavor, you know? It's always sweet, fresh, crisp, and perfect for recipes or to enjoy by itself with a bit of melted butter on top, of course!

Next, I am loving Bush’s Beans NEW Organic Black Beans. They are DELICIOUS! I have tried at least 7 different types of black beans over the year, and these ones are my favorite! I simply strained the beans, then rinsed them off. I use canned black beans in 2-3 recipes per week because, to me, beans make a great base for any vegetarian meal. That's why I was so happy to find out how wonderful these were!

Lastly, the Muir Glen Organic Fire Roasted Diced Tomatoes really rounded out the flavor of this dish! I love using canned tomatoes in everything from burrito or taco filling to Italian dishes and soups. I often make sure to have 2-3 cans of tomatoes in my pantry at all times as well.

 Keeping my "Cantry" stocked really helps cut down on time in the kitchen—allowing more time with friends and family! Not to mention, a well-stocked pantry full of fruits and vegetables can help you serve up the recommended 42 cups of fruit and 53 cups of vegetables a family of four needs every week, providing a diet higher in 17 essential nutrients including potassium, calcium, and fiber.

Now that I have explained a bit more about the benefits of these canned goods, feel free to watch this video for full instructions. Grab the recipe and instructions below.

ACAPULCO BURGERS INGREDIENTS:

½ - 1 pound of ground beef

½ cup chopped white onion

1-2 cloves of garlic, minced

1-2 Tbsp olive oil

¼ Cup Mexican seasoning (or more if you desire)

1 can – 4.5 oz. Old El Paso Chopped Green Chilis

1 can – 14.5 oz Green Valley Organic Corn - strained

1 can – 15 oz Muir Glen Organic Diced Fire Roasted Tomatoes

1 can – 14.5 oz Bush’s Best Organic Black Beans - strained and rinsed

4-6 burger buns

TOPPINGS:

Red onions

Cilantro

Sour Cream

Shredded Cheddar Cheese

Shredded lettuce

INSTRUCTIONS:

1.) In a skillet over medium heat, add olive oil, onions, and garlic. Sauté for several minutes until softened. Next, add ground beef and cook until brown. Add Mexican seasoning. Strain and return to skillet. You can see a photo of the ground beef I made, below.

2.) Add canned chilis, corn, tomatoes, and black beans, and stir again until incorporated. Sauté for another 5-7 minutes, until filling has all become completely warm and is to your desired temperature. Turn off heat.

3.) Time to make your Acapulco Burgers! Scoop about 1/3-1/2 cup of filling onto each burger bun, then top with shredded cheese, sour cream, red onions, lettuce, and anything else your heart desires! Enjoy!!

PIN IT FOR LATER…

For a little more fun, watch the video, below!

Merry Christmas! Our Christmas Cookies

Hello! I hope you’re all having a very merry Christmas! It’s pretty warm out today, so it’s not a white Christmas, but I would always prefer to the cold. I got to participate in a fun cookie baking experience this year. The four of us got to take home TONS of cookies and everything turned out so well. The goal was to make enough cookies so we could all bring cookie platters home and also enjoy a few others along the way. I learned SO much about making the perfect cutout sugar cookies too :)

The cookies we created include:

Cutout Sugar Cookies

Shortbread Cookies Dipped in White Chocolate and Dark Chocolate

Chocolate Crinkle Cookies

Oatmeal, White Chocolate Craisin Cookies

Snickerdoodles

(Recipes all coming soon!)

Happy Holidays! I hope you all had a wonderful day!

Winnie The Pooh Mini Bear Sandwiches

These little mini grilled cheese sandwiches are inspired by Disney’s new movie, Christopher Robin. I found these to be incredibly fun and easy to make and can even be partially prepped ahead of time if you will be making a lot of them for a crowd. #WisdomByPooh

INGREDIENTS (makes 10 sandwiches)

  • 20 pieces of sliced bread

  • cookie cutter in your favorite shape

  • up to 2 cups shredded cheddar cheese

  • butter spread or my favorite dairy free option, Earth Balance

  • skillet

INSTRUCTIONS:

1.) Simply use a cookie cutter to cut shapes from your favorite sliced bread. Those can be cut out up to one day in advance, then stored in an air tight bag.

2.) Heat skillet over medium heat, and add butter to each piece of bread, set aside.

3.) When skillet is hot, add as many pieces of bread as you can, butter side down. Sprinkle approximately 1 TBSP of shredded cheese per piece of bread. To avoid a mess, try to make sure the cheese stays on the bread, rather than getting it all over the skillet to burn.

4.) Place other pieces of buttered bread shapes on top, and let the cheese melt. Use a spatula to VERY CAREFULLY flip over the sandwiches to then heat the other side evenly, until cheese has melted.

5.) serve on a cute platter and enjoy!

I styled these in a Thanksgiving theme, but they would be amazing for just about any holiday. I thought they would be amazing for little ones, to tide them over as the full meal is being made. These could be a fun way to get picky eaters to try something new also.

Creamy Tomato, Basil, Parmesan Soup Recipe

A delicious, homemade version of a classic tomato soup recipe. This will be the only tomato soup recipe you will ever need. With lots of tomatoes, a creamy base, and a hint of parmesan, this soup is sure to please! We even doubled the recipe, and finished the soup in a matter of days. Keep reading to get the recipe, below!

Luckily, I used this recipe from Tastes Better From Scratch and I was thrilled with the outcome!

FIND THE ORIGINAL RECIPE HERE

The weather definitely turned to fall/winter today. Last night, it began to get pretty chilly but definitely bearable. This morning, the high was about 45 degrees, and I am super happy to welcome cooler temps with this soup recipe and lots of others. Perhaps loaded baked potato soup will be next!

Ingredients (serves 8)

  • 2 14.5 ounce cans diced tomatoes , with the juice

  • 2 tsp olive oil, if using stovetop method

  • 1 cup carrot , finely diced

  • 1 cup onion , finely diced

  • 1 cup celery , finely diced

  • 2 Tablespoons tomato paste

  • 4 cups low-sodium chicken broth

  • 1 teaspoon dried oregano leaves (Tbs fresh oregano)

  • 1 cup fresh basil leaves or more (or 2-3 Tbsp dry basil)

  • ½ cup butter

  • ½ cup all-purpose flour

  • 1 cup freshly grated parmesan cheese

  • 1½ cups half and half (or whole milk)

  • 1 teaspoon salt

  • ¼ teaspoon freshly ground black pepper

Instructions

For the Stove Top (This is the method I used):

  1. Add diced tomatoes, carrots, onions, celery, tomato paste, chicken broth, oregano, and basil to a large soup pot. Bring to a gently boil and cook for several minutes, until the vegetables are tender. Alternately, I cooked the onions for a few minutes with 2 tsp olive oil, then add carrots, celery, and seasonings to cook until carrots are a bit tender.

  2. In a separate pot, prepare the roux. Add butter to the pot over medium low heat and allow to melt. Stir in the flour and whisk together constantly for about 10 minutes or until the roux is a nice golden brown color. Slowly add 1 cup of the soup from the other pot to the roux--it will start to form a thick paste.  Slowly add another 3 cups of warm soup to the roux. Whisk together until smooth. Add the roux mixture to soup pot and stir to combine. Note - the rue + soup mixture was thick at first, but when added back into the larger soup pot, everything turned out extremely well!

  3. Pour soup into blender (you may need to do this in batches, depending on how big your blender is)

  4. Purée until smooth. Return to soup pot.

  5. Stir in the Parmesan cheese, half and half (or milk), and salt and pepper. Add additional oregano and basil if needed, to taste. Stir well. Cook for a few more minutes until warmed through. Enjoy!

For the Slow Cooker:

  1. Add diced tomatoes, carrots, onions, celery, tomato paste, chicken broth, oregano, and basil to your slow cooker. Cover and cook on low for 5-6 hours until flavors are blended and vegetables are soft.

  2. About 30 minutes before the soup is ready, prepare a roux. Melt the butter over medium low heat in a skillet and add the flour. Whisk together constantly for about 10 minutes or until the roux is a nice golden brown color. Slowly add 1 cup of the soup from the slow cooker to the roux--it will start to form a thick paste.  Slowly add another 3 cups of warm soup to the roux. Whisk together until smooth. Add the roux mixture to the slow cooker and stir to combine.

  3. Pour soup into blender (you may need to do this in batches, depending on how big your blender is)

  4. Purée until smooth. Return to the slow cooker.

  5. Stir in the Parmesan cheese, half and half (or milk), and salt and pepper. Add additional oregano and basil if needed, to taste. Stir well. Cover and cook on low for another 20-30 minutes or until warm. Enjoy!

Fresh Vegan Mushroom Tacos Recipe (Awesome in Cast Iron)

If you're looking for a new way to incorporate those fresh, local, Farmer's Market ingredients into a recipe, here's a good one! These Vegan Mushroom, Onion, and Pepper Tacos are super delicious and you definitely won't even miss the meat! 

Even more special, is the fact that we got to create this recipe for Martha Stewart Essentials available at Macy's. It's been SUCH an honor creating a set of four recipes for Martha! It's definitely a food blogger's dream :)

Keep reading to get the full details on this delicious, vegan recipe (but, feel free to add some cheese or sour cream if you like!!).

We found all of the fresh ingredients at our local Farmer's Market here in Carbondale, IL.

As soon as I learned about this amazing opportunity, I went searching through all of the items and decided upon four very delicious recipes, which I will link you to as soon as they are live! 

I was encouraged to use recipes right from MarthaStewart.com, so I used her basic recipes, then embellished and modernized them to make them extremely appealing for my Pinterest fans. Well, everyone has loved them so far, and now all of the cast iron skillets are SOLD OUT on the MAcy's website! Perhaps my recipes helped, but the fact that they were each around $15.00 might also be the reason these have all sold out. Nonetheless, find your favorite cast iron or other skillet, and let's get started!

Ingredients / Materials: 

- 1-2 lb. Fresh Mushrooms 

- 1 red onion

- 1 medium bell pepper (we used several small ones)

- 2 Tbsp. or more Mexican Seasoning

- 1/2 bunch of cilantro

- Small Flour Tortillas

- Martha Stewart Cast Iron Skillet 

Instructions:

1. Prepare and chop mushrooms, red onions, and bell peppers. 

2. Heat olive oil in a Cast Iron Skillet, add chopped onions, then belle peppers, then lastly, mushrooms.

3.) Season veggies generously with Mexican seasoning, a tiny bit of salt, and any other seasoning you would like. Also, add chopped cilantro at the end and stir everything one last time. 

4.) Warm tortillas, then add the veggie filling, and enjoy! They're so delicious, I hope you love them! 

FLYWAY FAMILY FARM MUSHROOMS (MAKANDA, IL)

As I mentioned, I got to use local ingredients from our Farmer's Market! We loved finally being able to utilize three different varieties of mushrooms from Flyway Family Farm. They have different mushrooms at the market almost every weekend!

Also, I used the red onions and colorful bell peppers from Country Sprout Organics, my other favorite booth at our local market! 

Hopefully, you have enjoyed this recipe! Stay tuned for several more recipes inspired by Martha Stewart! 

Two Amazing Recipes for Summer Get-Togethers with Mission® Tortillas

This is a sponsored post written by me on behalf of Mission®. All opinions are entirely my own.

If summer get-togethers make you giddy with joy and excitement, then you’re not alone! I too love brainstorming recipes with friends, then planning, prepping, and preparing the food, then finally getting everyone together to enjoy the bounty. Food always brings people together, and is great shared with old friends and new ones! This summer, I am going to make it my mission to enjoy the company of others over great food as much as possible!

I love how these Mission® Super Soft Flour Tortillas really made my two recipes even better than I could have ever imagined. I have tried all sorts of tortillas, and these are the softest, tastiest ones yet. They were so versatile, and absolutely perfect for my Vegetarian Southwest-Inspired Pinwheels AND for my Grilled Steak Tacos. I always feel like the tortillas make or break a recipe, and I was so happy to find a new favorite. You can use the store locator on the Mission website to find Mission tortillas at stores near you, and find even more delicious recipes as well.

I’m not sure if you’ve ever experienced this, but I am always let down when tortillas kind of get dried out super quickly, then kind of crack when you roll anything out of them (like the pinwheels). Well, these were perfect. They held together super well, and worked amazingly well for this 4 ingredient appetizer!

And, since I wanted to offer lots of delicious toppings for these Grilled Steak Tacos, my first thought was fresh ingredients of course!

I thought it would be so fun to offer guests some handmade pickled jalapeños as party favors. Every time we serve these to guests or bring them to someone’s house, we always get lots of compliments on them.

PICKLED JALAPENOS

(Making 1 day in advance is recommended)

I think it’s time to start sharing them with people, so I filled mini jars with a mixture of fresh ingredients like jalapeño slices, garlic cloves, and mini red onions. Now, it’s time to pickle!

I heated a solution of 1.5 cups white vinegar plus 1 cup water, and 1-2 tbsp salt until the salt has dissolved. Let it cool a bit, then carefully pour the vinegar solution over the ingredients, leaving a little bit of room at the top of the jar so it does not spill out. Place lids back on, and gift as soon as the next day.  

These turned out SO cute, and you could even tie cute ribbons around the jars for an even more festive look.

In addition to the pickled jalapeños, I offered pickled red onions (get my recipe here), plus a guacamole tomatillo sauce and a traditional red salsa too.

The lettuce even came right out of my own garden! This was my first year to try growing lettuce, and while it may be almost at the end of its season, I love treating friends to things I grew!

GRILLED STEAK TACOS

INGREDIENTS:

1/3 cup olive oil

2-3 tbsp soy sauce

2-3 tbsp or more taco seasoning

Juice from 1 lime

1 tsp salt

1-2 lbs flank steak or similar

INSTRUCTIONS:

Simply marinate each pound of steak in 1/3 cup olive oil, 2-3 tbsp soy sauce, 2-3 tbsp or more taco seasoning + the juice from 1 lime + 1 tsp salt for at least 1-2 hours or overnight. Simply grill for 3 or so minutes per side if your steak is thin like mine was. Slice and serve with fresh sides and warmed Mission Super Soft Flour Tortillas (they taste best warmed).

Slice up the steak and set out the toppings, the tacos are ready to eat!!!

SOUTHWEST INSPIRED VEGETARIAN PINWHEELS

I searched for vegetarian pinwheel recipes and hardly found anything! These are so great tasting, and you will never miss the meat.

Ingredients:

1 package Mission® Super Soft Flour Tortillas

Plus 1-2 bunches of cilantro

1 head of green lettuce

To create the sauce:

1 (8 oz.) box of cream cheese, softened

½ cup (or more) taco sauce or red enchilada sauce

½ - 1 cup cream cheese

¼ - ½ tsp salt, optional

INSTRUCTIONS:

1.    Mix all sauce ingredients together, and stir until smooth. I used a hand mixer

2.    Lay one tortilla out onto your work surface, and spread 1.5 -2 tbsp sauce in an even layer on tortilla.

3.    Add a line of cilantro and a line of small pieces of lettuce towards one side of the tortilla, then roll up into an even roll.

4.    Cut in 2” sections, and display on a cute tray. I used cactus pieces from a local market.

Enjoy!


The bottom line - I would definitely recommend Mission Super Soft Flour Tortillas to anyone who loves superior taste and excellent ingredients!

Happy summer, friends!

Lattice Weave Puff Pastry Wrapped Prosciutto + Brie Recipe

Looking for an elegant and luxurious recipe to bring to that next BBQ or summer party? Perhaps you want a special date night dish that can be enjoyed with a couple of drinks and a movie. This  Lattice Weave Puff Pastry Wrapped Prosciutto + Brieis so delicious, that those who get to enjoy such a treat will likely lick the plate clean. 

I found that by using Wewalka Puff Pastry, it held its shape super well and wasn't overly greasy, which was great. The brie I used, shown below, also worked out great. I found that brie is very affordable, ranging anywhere from $5 to way more expensive options. If you're new to Brie, then start off less expensive or in the middle of the price range.

This is a very rich and indulgent dish, but if you share it with friends, there's definitely no guilt in eating something like this. It's really amazing.

Ingredients:

1 (8 oz) Round of Brie 

1 package Wewalka puff pastry

1 egg, whisked with a fork for egg wash

1 package of Prosciutto, any brand you like

Crackers, pretzels, etc, to dip in cheese

Instructions:

1. Preheat oven to 400 degrees F. Slice puff pastry into 1/2" strips, set aside.

2. Wrap opened brie round with prosciutto, then set on a pan or clean work surface.

3. To create lattice: place two dough strips on top of prosciutto wrapped brie in an X shape. Here is a link to a good tutorial on how to make the rest of the lattice (just make sure dough has no spaces between strips, so it holds in the cheese well. Once the entire top of the brie has been latticed (see below), grab a drinking glass and let's finish this masterpiece!

4. So, the image below is a little strange looking, but I basically put the ingredients on top of a drinking glass to elevate it so I could then finish "weaving" the sides for a more finished look. You may notice that the widest part of the brie / the outer edge has one slice of dough wrapped around it, then I could easily finish wrapping the other pieces under the brie. I also sliced a few inches off of each strip, so there wasn't a huge wad of dough below the brie when it baked.

5. Below, you see the final brie round before baking! You can definitely prep this ahead of time, and bake it right before you need it. Brush with egg wash if desired for an even shinier finish.

And presto chango...Look at THIS BEAUTY, below! It is absolutely gorgeous!

6. Bake for 20-25 minutes or until crust is brown and flaky, cut into the cheese and let the middle just ooze out! Dip crackers, pretzels, green apples, and more into this creation, and enjoy!!

When you slice into this awesome creation, you may hear a little crunch of the flaky layers of dough, and then you will see the cheese just ooze out. Dip crackers, pretzels, and anything your heart desires into this melty cheese. The brie is very rich and creamy and does have a little bit of that funky taste that brie just has, but it pairs so well with the prosciutto and the puff pastry.

What do you think? Does this look like something you would eat or serve at your next gathering? I really hope you've enjoyed!!!

Casual Cookout with Tyson, Ball Park, and Lipton Tea!

This post is sponsored by Lipton, Tyson, and Bimbo but the content and opinions expressed here are my own.

Casual Cookouts are in season!! Bring weeknight (or weekend) dinners outside by making good use of your grill! You can enjoy the long summer nights as you picnic in the yard with your family. From cooking your own Ball Park® Hot Dogs to Tyson® Chicken sandwiches, let everyone join in on the fun and make it a festive family night. Excited to host lots of fun cookouts this year, and here is one to get me started.

BBQ CHICKEN SANDWICHES

Above, the Tyson Frozen Boneless Skinless Chicken Breasts. I used them for chicken sandwiches!

INSTRUCTIONS: Using a grill set to 450-550 degrees, spray non-stick cooking spray and place frozen chicken breasts onto hot grill. Cook for 10 minutes on fist side, season, then flip and grill for another 10-15 minutes, until chicken’s internal temperature is at least 165 degrees F.

Below, the classic Lipton Iced Tea brewed and lightly sweetened.

Condiments can easily be placed in vintage or glass jars or bowls to serve them in a more elegant way – don’t forget to add a spoon into each condiment J

Below, the white chopped onions, pickles, and potato salad, and a cute sign that reads, “Welcome Friends and Family”.

As you might notice, I placed these ingredients onto metal trays at varying heights so they were easier for everyone to reach.

CURBSIDE PICKUP:

 Since summer gets very busy, and I always have a million errands to run at once, I loved being able to use the Walmart Curbside Pickup! I logged in and just placed my order on http://grocery.walmart.com and then stopped by my local store to grab everything!

DÉCOR IDEAS:

For the BBQ party setup, I used a plastic folding table to hold everything, then covered it with a twin white sheet that I ironed. I used a piece of on trend gingham printed cotton in white and grey. I used 1.5 yards and I think that the double layer table covering idea really looked so elegant.


I also really love offering food to guests at different heights, bringing the food and refreshments to eye level. I stuck with more metallic accents like galvanized metal boxes, plus small metal buckets to hold utensils and festive paper napkins. I love the mixture of navy blue and red together, which worked perfectly for this theme.

I also found lots of cute Grilling and BBQ themed signs that were so cute! I am sure that you could simply print some fun quotes off the Internet and frame them if you already have all the supplies on hand.

CONNECT WITH THESE BRANDS ON SOCIAL:

Tyson®

Facebook: @TysonBrand

Twitter: @TysonBrand

Instagram: @TysonBrand

Pinterest: @TysonFoods

Lipton®

Facebook: @LiptonUS

Twitter: @Lipton

Instagram: @Lipton

Ball Park®

Facebook: @BallParkBrand

Instagram: @BallParkBrand

I really hope you’ve enjoyed this post, and I am eager to hear all about what you have planned for summer!

PIN IT FOR LATER...

Festive Chocolate Bark Recipe

A deliciously sweet and festive treat that only takes a few minutes to create! You will absolutely love how great the flavors of the white chocolate and dark chocolate meld together to satisfy your sweet tooth. Customize the colors and decorations to suit your holiday, team colors, or other special occasions!

INGREDENTS:

1 bag of dark chocolate chips (I used a darker chocolate from Ghiradelli)

1 bag of white chocolate chips (I like Ghiradelli white melting wafers) 

Sprinkles of your choice (At least 3 Tablespoons or more)

INSTRUCTIONS:

Melt dark chocolate either in the microwave or a double boiler. Line a baking sheet with parchment paper and pour chocolate on. You can smooth it with a spatula to the thickness you desire. Stick in the freeze for 20 minutes.

Melt while chocolate.  Let it set for 3 full minutes (or at least until it slightly thickens). Remove baking sheet with chocolate from the freezer and immediately pour white chocolate on top. Sprinkle on sprinkles. Freeze for 20 minutes.

Once set, break into pieces with your hands (or rubber gloves). Keep refrigerated.

Peeps Milkshakes

Easter is this Sunday, April 1, and I thought it would be adorable to create a beautiful set of treats for the occasion! Hope you enjoy! 

First, find some cute jars and dip the rims into melted white chocolate. Holding the glass over the sink or a large bowl (to catch the sprinkles), apply sprinkles in festive colors to the chocolate. Cover as much as possible.

RECIPE:

2 cups all natural vanilla ice cream (I prefer Breyer's extra creamy vanilla)

2 cups frozen blueberries

2 cups milk

1 tbsp honey

INSTRUCTIONS:

  1. Put all the ingredients in a blender and blend on high until smooth and creamy.
  2. Pour into decorated glasses and add your garnish - carefully poke a skewer stick through the bunny Peeps, and use a jelly bean to make the end look more finshed off.
  3. Enjoy!

Easy Rustic Fruit Pizza Recipe (Fresh Raspberries and Almond Cream Cheese Icing)

With Spring right around the corner, it's fun to create dishes with fresh fruits! This rustic and simple Fruit Pizza is delicious. The crispy, crunchy sweet crust reminds me of churros, and this homemade almond frosting is divine topped with fresh, tart raspberries!

INGREDIENTS FOR CRUST

1 - 7.8 oz. package of Wewalka Bistro Pizza Crust (I used rectangular but round would work too)

1-2 Tbsp melted butter + brush or silicone spatula to spread onto crust

1/2 - 1 tsp cinnamon

2-3 Tsp sugar

INGREDIENTS FOR FROSTING

1/3 C. Cream Cheese (at room temperature)

3-4 Tbsp powdered confectioners 

1/2 tsp almond extract 

1-2 6 oz. containers of fresh raspberries

INSTRUCTIONS:

1.) Preheat oven to 400* F and roll out your pizza dough onto a floured surface. This is optional, but it really makes the crust look great. 

2.) Apply melted butter to your unbaked crust with a brush or silicone spatula, then sprinkle on your sugar and cinnamon. Bake for 12-14 minutes until crust is crispy and lightly browned. 

3.) During the baking process, create your frosting. simply beat the mixture of softened cream cheese, confectioner's sugar, and almond extract until smooth. Add more powdered sugar if you want a thicker frosting. 

4.) Lastly, apply your frosting, then top with 1-2 containers of fresh raspberries. I spaced them out a little bit, and found the most attractive side of each berry to place upward. 

Valentine's Day - Adorable Heart Shaped Rice Krispy Treats

If you're looking for a stunning yet easy way to create theseAdorable Heart Shaped Rice Krispy Treats, you have come to the right place! I've been envisioning making these for a few weeks now, ever since I started seeing the Valentine's Day baking supplies at stores for the season. They only contain around 6 ingredients/materials, and prep work is also pretty minimal! 

INGREDIENTS/MATERIALS:

Pink colored Wilton or other candy melts (similar here)

Lollipop Sticks (found here)

6 Cups Rice Krispies Cereal

4 Cups mini marshmallows

Red Food Coloring

Colorful Sprinkles

Silicone Heart Shaped Candy mold from Walmart (similar here)

INSTRUCTIONS (MAKES 6):

1.) Begin making Rice Krispy treats. In a no-stick pot or pan, melt butter and marshmallows until smooth. Add 4-5 drops of red food coloring until the marshmallow mixture is desired color (a darker pink). Now add 1/4 -1/2 C. sprinkles and stir again. Lastly, add Rice Krispies and stir until combined!

2.) During the rice krispy treat making process, melt half the bag of pink candy melts in a microwave safe bowl until smooth. 

3.) Using a large tablespoon, spoon equal amounts of melted candy melts into the heart shaped molds, filling them 1/4 full.

4.) Once candy melts have set for 1-2 minutes but before they are completely hardened, fill the rest of the heart molds with ooey gooey Rice Krispy treats. Press down into mold so they are flat on top.

5.) Once everything has hardened, remove from molds. If the pink candy toppings have separated from the Krispies, simply melt 4-5 more candy melts and attach them back together with a spoon full of melted candy.

6.) Lastly, optionally insert lollipop sticks into the heart krispies (they go in VERY easily). Enjoy!

Think of how cute these would be to gift in a big "bouquet" for Valentine's Day! You could wrap them in small celophane treat bags and tie them up with festive ribbons too. 

Pink Hot Cocoa Recipe

I am super excited to share this fun recipe for Pink Hot Cocoa, perfect for the holidays! Think warm white chocolate with other special flavors and a bit of holiday sparkle!

I originally created this recipe and DIY Coffee Mug to help promote A Bad Moms Christmas and helped them promote the movie on Pinterest! It was a LOT of fun, and I am so happy with how everything turned out :) 

If you haven't seen Bad Mom's or Bad Mom's Christmas, I would definitely recommend it!

WATCH THE MOVIE TRAILER HERE!

Santa Mom survives Christmas Morning by dancing with sugar plum fairies, and adding a splash of booze to her hot cocoa.

INSTRUCTIONS:

To make the cutest Pink Hot Cocoa Ever, simply heat 2 cups milk, 4 ounces of white chocolate, and a few drops of pink food coloring in small saucepan. Now for the best part: add 2 ounces of rum or your favorite liquor, and top with whipped topping, light pink shimmering sprinkles, and pink marshmallows. To make the mug, I added little letter stickers and very carefully started with the middle words and worked my way out, so everything would be centered.

Happy Holidays, friends! Check out the hottest holiday movie of the year – Bad Mom’s Christmas, in theaters NOW!! #BadMomsXmas

4 Ingredient Parmesan Chicken Bites + Tailgate Food Ideas

This is a sponsored post written by me on behalf of Tyson Foods, Inc. All opinions are entirely my own.

Looking for a delicious and VERY easy way to spruce up your appetizers? Looking to incorporate more products into your life that are free of antibiotics, preservatives, and contain no added hormones or steroids?

Then you may want to give these 4-Ingredient Chicken Parmesan Bites a try! Tyson Foods has a huge range of No Antibiotics Ever products and they taste absolutely delicious!

Moms can feel great about serving all Tyson chicken no antibiotics ever products to their families. Tyson chicken products are made with long-standing dedication to quality, for the way we want to eat today. The people who make Tyson chicken products have a strong heritage of raisins chickens since 1935, they’re made with 100% natural* ingredients (*no artificial ingredients, minimally processed).

I used just a few ingredients to make these delicious appetizers. In fact, they would even be great for dinner or lunch too. This would also be a fun way to make dinner for the kids a bit more exciting, even if you’re short on time!

For this post, I used my Italian heritage as an inspiration, remembering how my grandmother used to make something like this for us when we visited. I love being able to provide that home cooked taste to my friends and family while not letting prep time get in the way of time with those I love to be around. If you have ever made Chicken Parmesan, you might have realized that it’s quite a long process. Generally, you have to make a big mess with chicken, flour, eggs, bread crumbs, then cooking the chicken, and so many other steps, it’s hard to count them all!

With all of that in mind, I thought it would be a genius idea to use these already delicious Tyson crispy chicken strips from, to save a ton of time! Let’s get started.

GET READY FOR GAME DAY

 If you’re short on time, or if you’re preparing days in advance, then you only need to stock up on a few items at Target to make game day amazing.

I basically love providing a variety of items to my guests, so I thought a well-rounded meal could consist of offerings like: 4-Ingredient Chicken Parmesan Bites, Tyson® Any’tizers® popcorn chicken, a big salad with colorful tomatoes on top, Homemade Garlic Parmesan Bread, cookies, refreshments, and anything else you like to munch on during the game.

Shop at Target for Tyson No Antibiotics Ever chicken products!

I love walking through Target to inspire my get-togethers, and I was able to find tons of awesome food, refreshments, and décor items as inspirations for this Tailgate Party.

(Serves 2-3)

1 Bag Tyson no antibiotics ever crispy chicken strips (feel free to make as many bags as you need)

1 Jar of pizza sauce or your favorite red sauce

1-2 Packages of fresh mozzarella cheese (I used the log shape that was pre-sliced)

Shredded Parmesan Cheese

1.)    Bake Tyson no antibiotics ever crispy chicken strips until fully cooked, as per the bag’s instructions.

2.)    Once cooked, carefully remove from oven, and place sheet pan onto heat proof surface. Top each chicken strip with ½-1 tbsp. marinara sauce and a half of a slice of mozzarella cheese. Try to center the cheese on each chicken strip so the cheese stays centered while baking. See below.


3.)    Bake 5-10 more minutes, until cheese has fully melted. Once out of the oven, feel free to top with shredded parmesan cheese and Italian seasoning.

4.)    Serve with cute DIY football toothpicks (shown below) if desired, and enjoy!

*Note: to make DIY football toothpicks, get a package of puffy football shaped stickers and regular toothpicks. Sandwich two football stickers around the toothpicks and press together to secure.

Don’t they look amazing?! I love how the chicken strips look so festive with those DIY football toothpicks in them, and all that sauce and melty cheese on top.

I also found some cute football-themed drink cozies, so it would be fun to provide guests with these for their drinks!

Another item that would go over super well is Any’tizers® popcorn chicken. Provide lots of dipping sauces for guests like: Cilantro Ranch, BBQ sauce, Buffalo sauce, and anything else you like.

YUM! This Homemade Parmesan Garlic Bread turned out great. Simply toast slices of bread on a sheet pan in the oven, and once almost fully toasted, remove from the oven, top with butter, Italian seasoning, and Parmesan cheese, and return to the oven for 1-2 minutes.

Thanks a million for checking out my post! I hope you find this recipe as delicious as I do, and if you make anything from this post, feel free to comment with a link to the photos below! Happy tailgating!!

PIN IT FOR LATER:

P.F. Chang's Kung Pao Chicken Recipe + Video

Sponsored by P.F. Chang's® Home Menu

Are you craving new flavors that are actually easy to incorporate into your meals? This delicious, Kung Pao Chicken recipe took under an hour to prep and cook, thanks to P.F. Chang’s® Home Menu Sauce! Everything turned out even more delicious than I could have ever expected, and I am so excited to share this wonderful recipe with you today!

This recipe is amazing if you’re short on time, or just prefer to spice up your regular meals a bit more. This Kung Pao sauce is AMAZING, I am so happy it’s available at Kroger stores (I found mine at Kroger near the soy sauces). This recipe is packed with so many vegetables and white chicken as your protein, and is a great way to add more variety to your meals.

If you’re trying to eat vegetarian, simply omit the chicken, and double up on the peppers and feel free to add even more garlic and ginger.

This recipe is amazing! Great for 1-2 people, or great for a larger group!

Make this for your friends, they’ll never forget how good of a cook you are!

Shop Kroger and Kroger Banner Stores!

Featured Product: P.F. Chang's Home Menu Kung Pao Sauce

“Spicy yet balanced, our Kung Pao Sauce is anything but ordinary thanks to bold ingredients like fermented chili bean sauce, chili flakes which are complimented with sweet and tangy flavors from apple juice concentrate and vinegar.”

Kung Pao Stir Fry (Originally Found Here)

Chicken stir fried with colorful red and yellow bell peppers, crisp celery, crunchy peanuts and P.F. Chang's® Home Menu bold and spicy Kung Pao Sauce, topped with scallions

Hands On: 30 | Total: 30 | Makes: 4 servings (about 1-1/4 cups each)

Ingredients:

2 tablespoons vegetable oil

1 pound boneless skinless chicken breast, cut into bite-sized pieces

1/4 teaspoon kosher salt

1/8 teaspoon freshly cracked black pepper

2 teaspoons minced fresh garlic, divided

2 teaspoons minced fresh ginger, divided

1 cup chopped red bell pepper

1 cup chopped yellow bell pepper

1 cup sliced celery

3/4 cup P.F. Chang's Home Menu Kung Pao Sauce

1/2 cup dry roasted peanuts, half crushed

2 sliced green onions

1.) Heat 1 tablespoon vegetable oil in large skillet over medium high heat. Add chicken to skillet, season with salt, and cook until no longer pink, about 4 minutes. Add 1 tsp garlic and ginger during last 30 seconds of cooking. Transfer to a clean bowl.

2.) Add celery and peppers to skillet, plus additional garlic and ginger. Cook for 3-5 minutes. Season if desired.

3.) Add chicken back to skillet and stir into peppers and celery mixture. Add P.F. Chang's Home Menu Kung Pao Sauce and peanuts to skillet and allow to cook 1-3 minutes, and sauce will thicken. Turn off heat, stir in green onions, and combine everything. Serve and enjoy!

Cook's Tips

For extra heat, add 1 teaspoon crushed red chili flakes when cooking the vegetables.

Connect with P.F. Chang’s® on social!

Facebook: @pfchomemenu

Pinterest: @pfchangshomemenu

Instagram: @pfchangshomemenu

Twitter: @pfchangshomemenu

Head to Kroger or your local Kroger Banner store to find my new favorite ingredient: P.F. Chang’s® Kung Pao Home Menu Sauce!

FIND P.F. CHANG'S SAUCES AT THE RETAILERS BELOW:

KrogerKing SoopersDillonsCity MarketQFCFry'sRalphsSmiths, and Fred Meyer

PIN IT FOR LATER:

Organic Rustic Grilled Salsa & Hand-Cut Tortilla Chips

A Rustic Grilled Tomato Salsa is a great way to use 100% fresh and organic ingredients in a recipe that is just perfect for summer! Mission Organic Tortillas were the perfect ingredient to use and compliment my salsa oh so well. I am beyond happy with how these cute little hand-cut tortilla chips turned out, and I hope you enjoy them!

Choosing organic ingredients is of top priority when it comes to preparing and serving any recipe. I have been watching a few very inspiring cooking shows lately, and they’re showing me the possibilities of creating everything from scratch, from fresh, local, and organic ingredients, and I just love it! So happy to be partnering with a brand I have loved for years, and I am so glad they have a delicious line of organic products!

This post was not sponsored, it was actually one of two ideas I had for the brand. See which post they chose instead. 

SALSA (Makes 3-4 Servings):

Choose Organic Ingredients When Possible

1 container of colorful or red mini tomatoes

2-3 Jalapeno Peppers, cut in half lengthwise

2 Larger Red Slicing Tomatoes, cut into slices

1 Lime, cut into wedges for the juice

Cilantro, chopped

Garlic (1-2 cloves, chopped)

HAND CUT TORTILLA CHIPS

Mission Organics® Tortillas

Cookie Cutters

Spray Butter, Spray Coconut Oil, or similar

Large Grain Sea Salt (Regular will do)

OTHER MATERIALS:

Toaster Oven or Regular Oven

Grill

Skewer Sticks

Food Processor

Knife

1.)  (For The Salsa) Prep your veggies! Cut jalapenos in half lengthwise, and remove any seeds and interior material. Next, add mini heirloom tomatoes (in various colors or in all red) to skewer sticks. Lastly, slice larger tomatoes into slices that are thick enough to handle.

2.)  (For The Chips) Simply use any shape cookie cutter and use your palms to press the cookie cutters into the Mission Organic Tortillas. Coat them with butter spray, and toast them in a toaster oven on 300 degrees for about 2 minutes, until edges are browned. Lastly, sprinkle with salt and enjoy, with a side of homemade salsa, guacamole, cheese dip, and sour cream!

3.) (To Make The Salsa) Once your veggies are all ready, turn on your grill to a higher heat, and spray with non-stick cooking spray. Add all veggies to your grill (carefully – I use a pair of tongs to do this step). The sliced tomatoes cannot be on for long, so make sure to keep them on for a minute or so each side. Below, you can see all of the grilled veggies, ready to be blended with the other ingredients.

After you have processed all of your ingredients, your salsa should look like the photo, below. What a cute pairing for my little hand-cut tortilla chips!

I also just love how everything in this recipe is organic! I am not sure if the salt I used would be, but everything else is a yes J I hope this post helps you see just how easy it is to use 100% natural and organic ingredients in your upcoming recipes.

How To Add A Recipe Card To Squarespace Blog Posts

Are you a food blogger who is currently looking to add a Recipe Card into your blog posts? I've done lots of research and after finding only WordPress plugins and widgets, I have finally found a Squarespace-friendly way to incorporate printable, Pinterest-friendly recipe and instructions to your posts! This means your recipes will finally show the ingredients and instructions into a Rich Pin on Pinterest. 

This amazing Bread Pudding recipe can be found here!

SO excited to have finally found a way to create a Recipe Card that is optimized for Squarespace! I have been searching for months to find some way to code in a recipe card of my own, or even use a plugin. Every single one I've seen is for Wordpress, and I love Squarespace so much that I didn't want to have to switch over. I love the sleek design of my Squarespace template, and while a large portion of food bloggers do use Wordpress, I knew there was some way to stick with it! I am thrilled to share the Recipe Whiz! 

The Recipe Whiz is a no-frills form that you input your title, description, yield, prep and cook times, ingredients, and instructions! You are also able to put the Image link to one image of the food too. YAY! 

I originally found out about Recipe Whiz here, on the My Life As A Mummy blog, where she explained how it was perfect for Blogger Blogs, which it definitely is!

I would also recommend simply testing this out on one of your already-created recipe posts, since the info is already there for you, to copy and paste into the Recipe Card!

YOUR BLOG POSTS WILL FINALLY CONTAIN A PRINTABLE RECIPE CARD! (SEE BELOW)

YOUR POSTS LOOK GREAT ON PINTEREST - THEY FINALLY APPEAR AS A RICH PINS! (SEE BELOW)

1.) INPUT YOUR RECIPE INFORMATION

When you first visit The Recipe Whiz, the form below will be blank. Simply fill in the details of your recipe below, such as recipe title, cook and prep time, ingredients, and instructions.

At the very bottom of the form below, you will notice a box that says image. To get the direct image link, right click on any photo on your blog and select, Open Image In New Tab. It will open a new tab, and copy and paste that window's website address into this box.

After that, click "Get Microdata" and it will create some code for your Recipe Card.

ADD THE RECIPE CARD CODE TO YOUR BLOG POST

Grab that "Microdata" Coding in its entirety, and in a new or existing blog post, choose Add Code. Simply add this to a coding box on your squarespace post. Save and Publish, and you're done! In addition to the recipe card, I would still include all of this information in plain text, as well as lots of beautiful images. But, this definitely opens up a whole new world for use food and lifestyle bloggers who love using Squarespace! 

If you have any questions at all, please comment below and I'll get right back to you! Thank you SO much for reading through this tutorial, and feel free to drop a link to your blog posts that utilize this Recipe Card, below.

Organic Dessert Tortillas