How To Add A Recipe Card To Squarespace Blog Posts

Are you a food blogger who is currently looking to add a Recipe Card into your blog posts? I've done lots of research and after finding only WordPress plugins and widgets, I have finally found a Squarespace-friendly way to incorporate printable, Pinterest-friendly recipe and instructions to your posts! This means your recipes will finally show the ingredients and instructions into a Rich Pin on Pinterest. 

This amazing Bread Pudding recipe can be found here!

SO excited to have finally found a way to create a Recipe Card that is optimized for Squarespace! I have been searching for months to find some way to code in a recipe card of my own, or even use a plugin. Every single one I've seen is for Wordpress, and I love Squarespace so much that I didn't want to have to switch over. I love the sleek design of my Squarespace template, and while a large portion of food bloggers do use Wordpress, I knew there was some way to stick with it! I am thrilled to share the Recipe Whiz! 

The Recipe Whiz is a no-frills form that you input your title, description, yield, prep and cook times, ingredients, and instructions! You are also able to put the Image link to one image of the food too. YAY! 

I originally found out about Recipe Whiz here, on the My Life As A Mummy blog, where she explained how it was perfect for Blogger Blogs, which it definitely is!

I would also recommend simply testing this out on one of your already-created recipe posts, since the info is already there for you, to copy and paste into the Recipe Card!

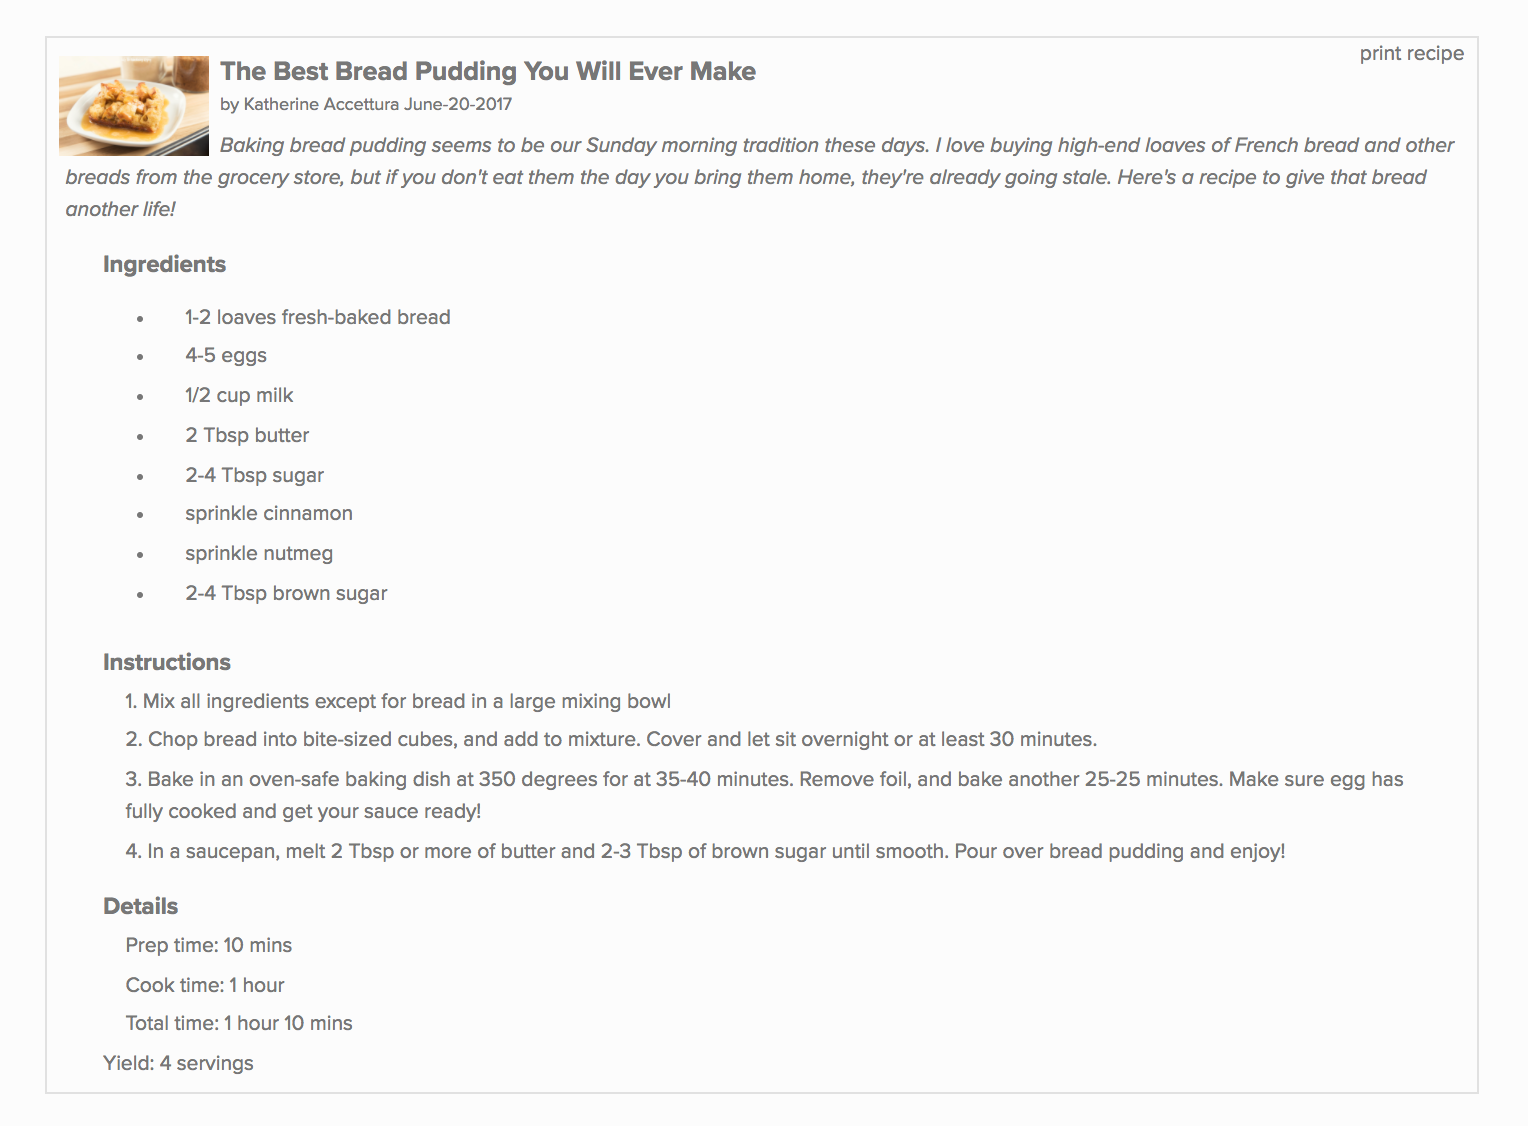
YOUR BLOG POSTS WILL FINALLY CONTAIN A PRINTABLE RECIPE CARD! (SEE BELOW)

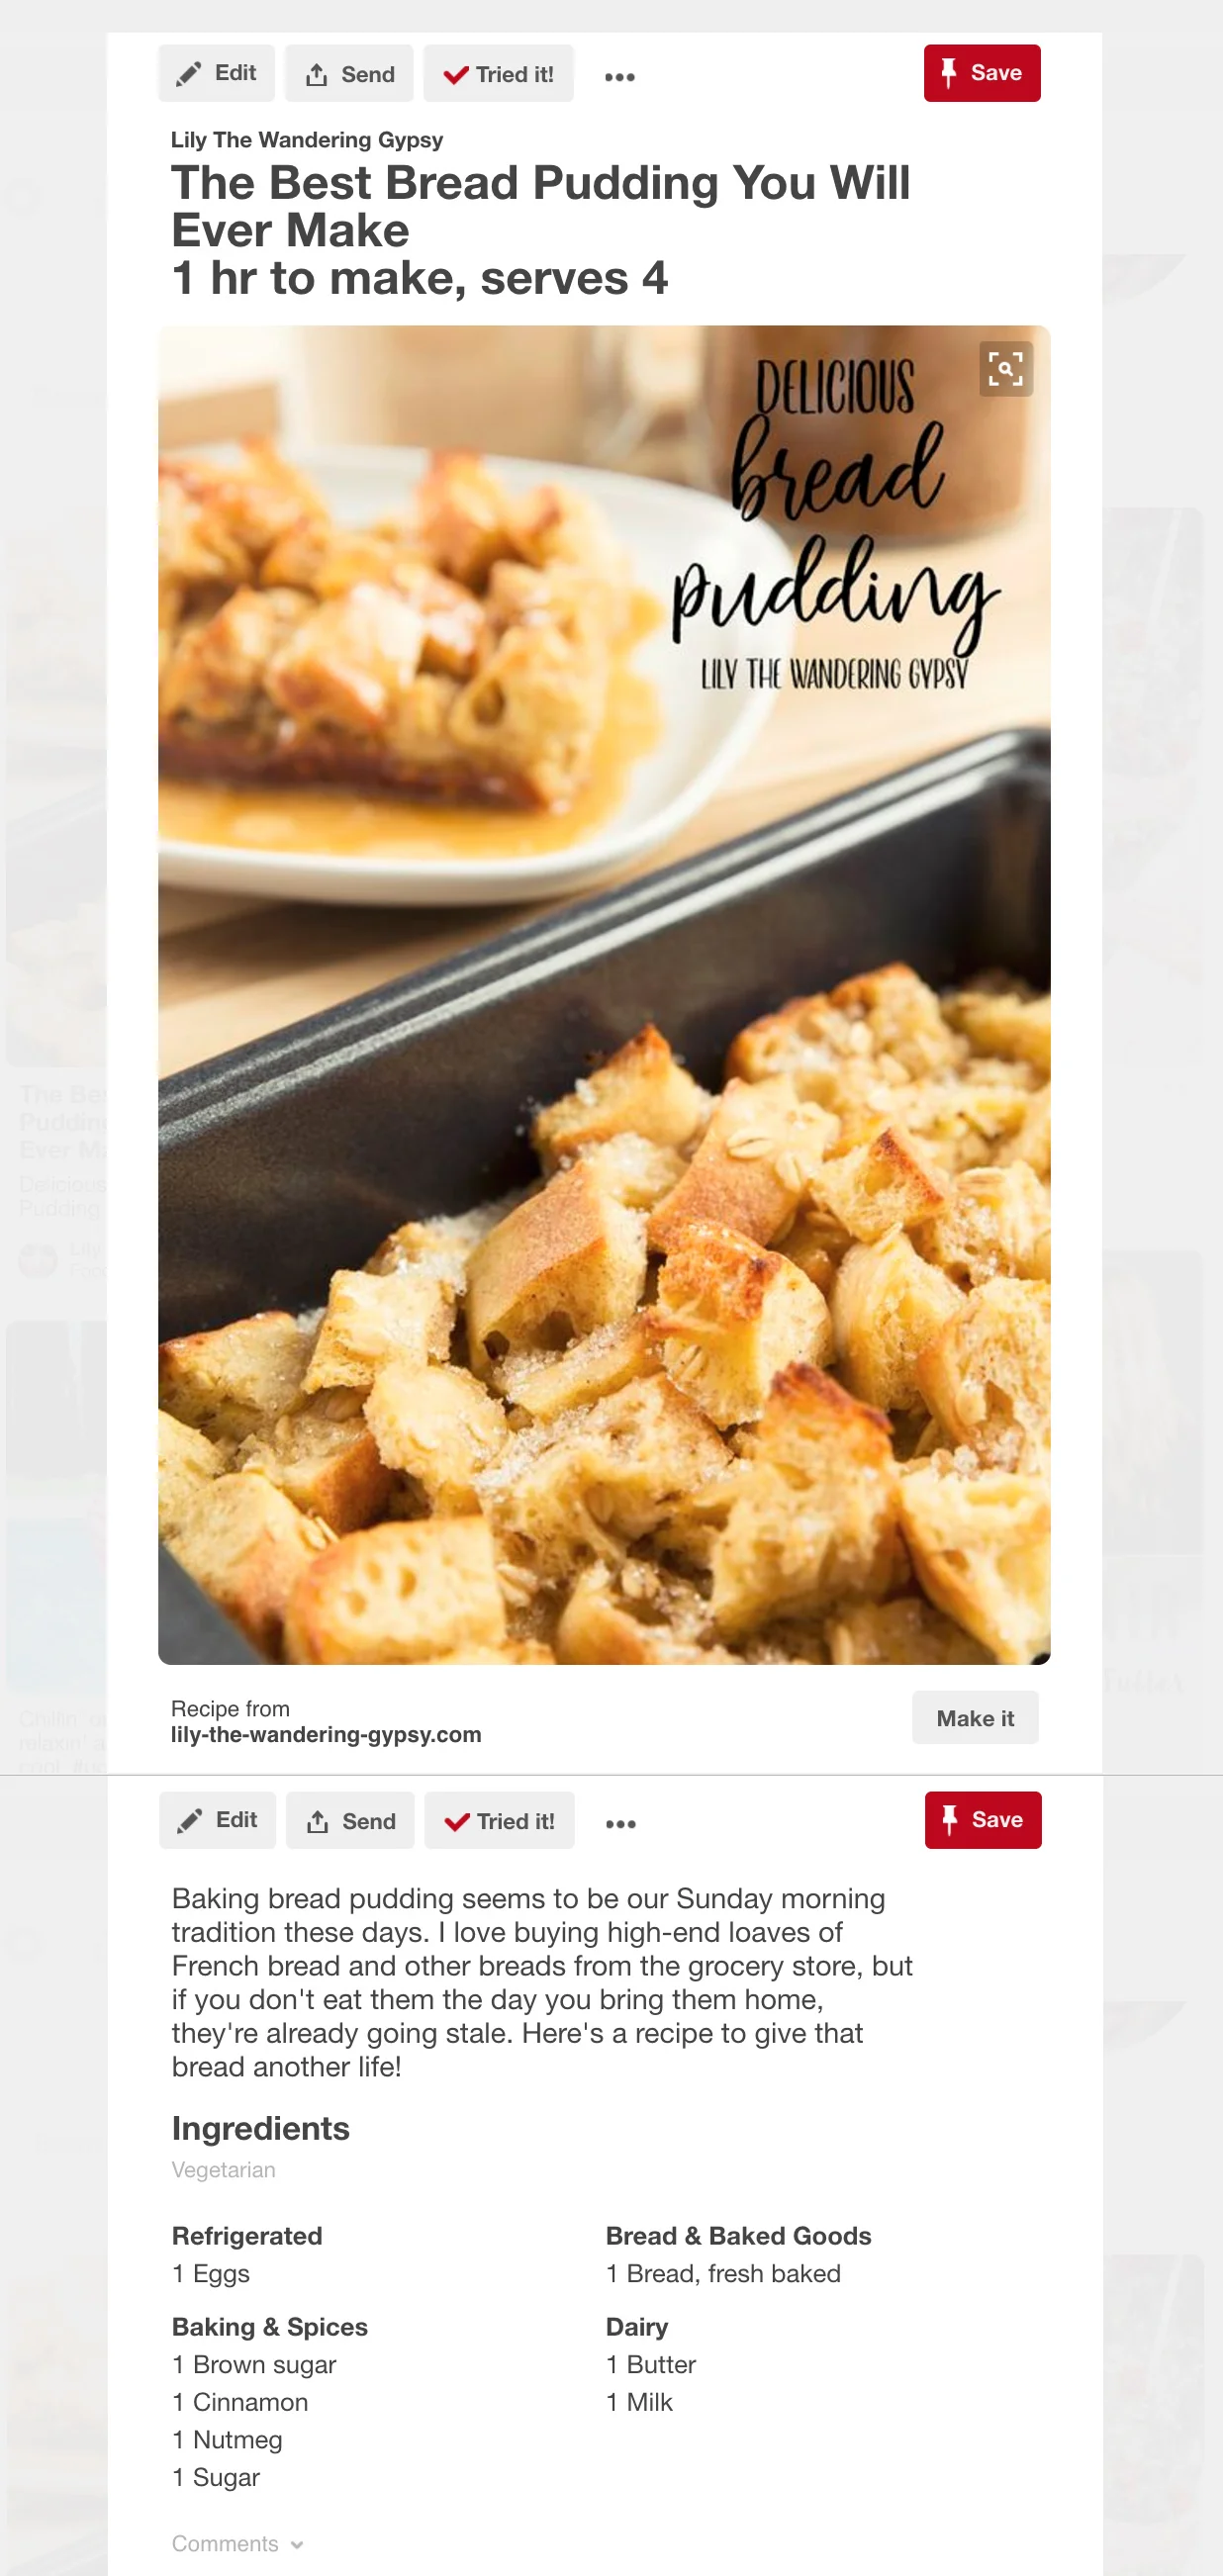
YOUR POSTS LOOK GREAT ON PINTEREST - THEY FINALLY APPEAR AS A RICH PINS! (SEE BELOW)

1.) INPUT YOUR RECIPE INFORMATION

When you first visit The Recipe Whiz, the form below will be blank. Simply fill in the details of your recipe below, such as recipe title, cook and prep time, ingredients, and instructions.

At the very bottom of the form below, you will notice a box that says image. To get the direct image link, right click on any photo on your blog and select, Open Image In New Tab. It will open a new tab, and copy and paste that window's website address into this box.

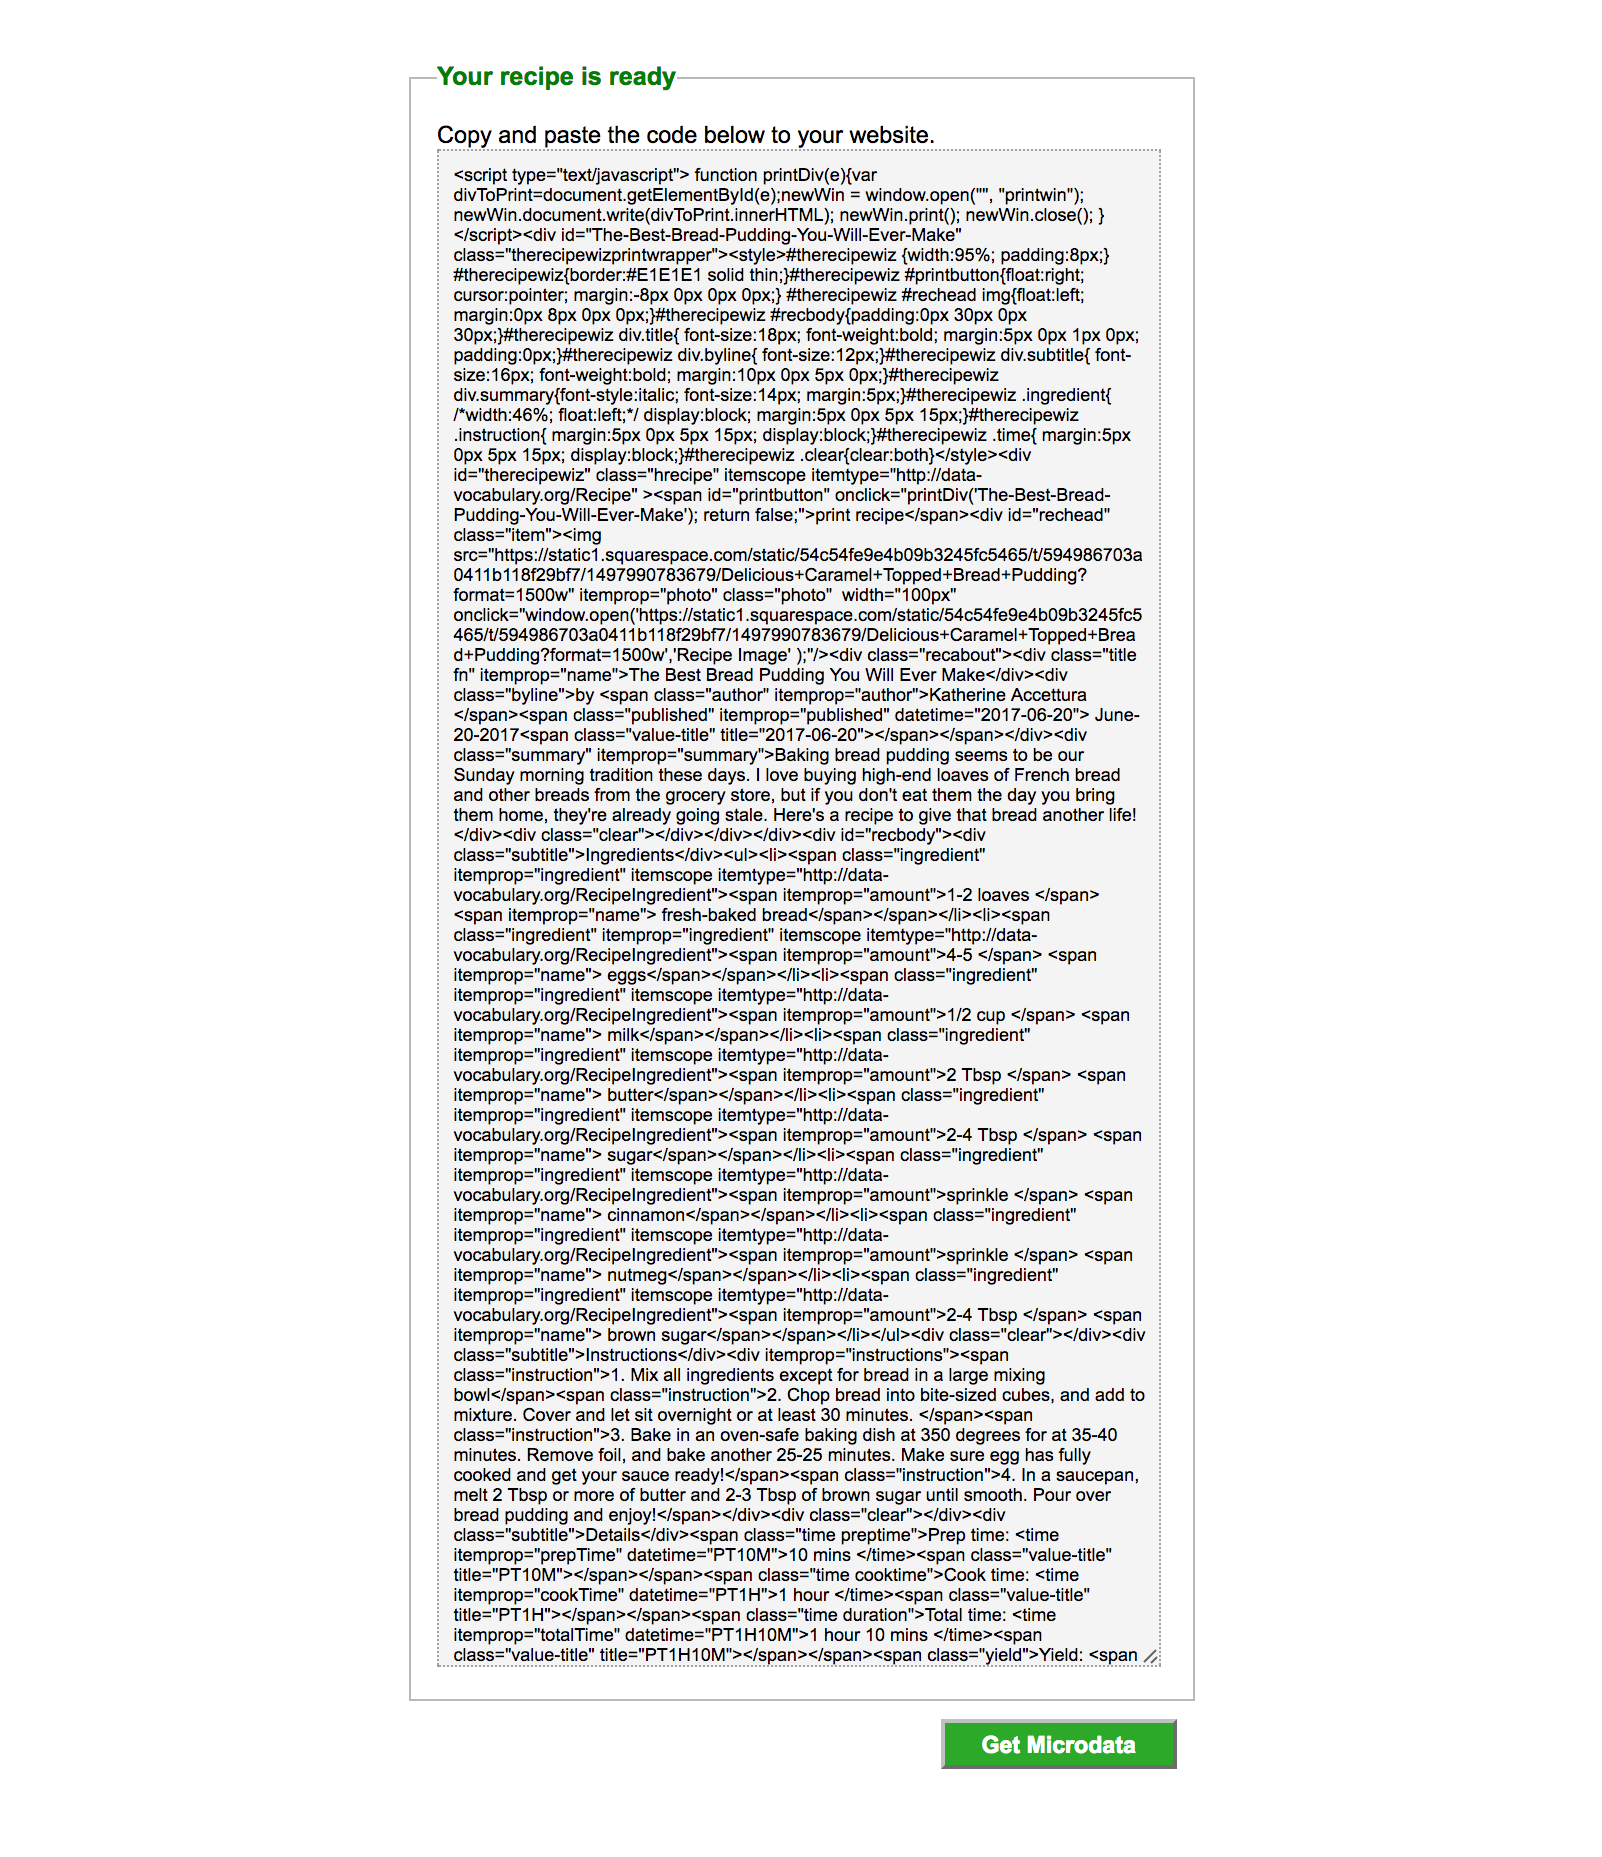
After that, click "Get Microdata" and it will create some code for your Recipe Card.

ADD THE RECIPE CARD CODE TO YOUR BLOG POST

Grab that "Microdata" Coding in its entirety, and in a new or existing blog post, choose Add Code. Simply add this to a coding box on your squarespace post. Save and Publish, and you're done! In addition to the recipe card, I would still include all of this information in plain text, as well as lots of beautiful images. But, this definitely opens up a whole new world for use food and lifestyle bloggers who love using Squarespace! 

If you have any questions at all, please comment below and I'll get right back to you! Thank you SO much for reading through this tutorial, and feel free to drop a link to your blog posts that utilize this Recipe Card, below.

Organic Dessert Tortillas

Olympics Inspired - Candy Flavored Vodkas!

I had a blast creating these 5 flavored vodkas, inspired by the 2016 Olympics! With 5 different types of candy, I created 5 festive flavors of infused vodka, and then created a cute label for the Vodka I used. 

Here is how I got the 5 flavors/colors. Note, I did use a teeny bit of food coloring in the black and green flavors, but the other colors turned out so vibrant. All you have to do is to divide 1-2 bottles of unflavored vodka into 5 jars with lids. In order to really infuse the alcohol, keep these in the fridge overnight, if you can. The longer you wait, the better! I also recommend using as much candy in the jar as you can.

BLUE: Blue Jolly Ranchers - BLACK: Black Licorice + Black Food Dye - RED: Cherry Jolly Ranchers - YELLOW: Lemon Heads - GREEN: Green Apple Jolly Ranchers + Lime Green Food Coloring

You could of course customize these fun flavors and colors for college or pro sports teams, holidays, and more! Let me know if you wind up making these, I'd love to see what you create. 

Also, I grabbed this amazingly tasty Sugar Saucer Cookie from Longbranch Cafe, my favorite restaurant in Carbondale! 

And, if you were wondering how I created the label on the bottle, I found 8.5" x 11" sticker paper at a local print shop, and printed a label I created in InDesign. I found the fonts on dafont.com - love that site! Go Team!!!

Cactus Pillow DIY

This is an amazingly awesome DIY project! Perfect to make for yourself, or to give to someone else. In this tutorial, I used a pillow form from an existing pillow (which was cheaper than buying a pillow insert by itself! I got a pillow that was on super sale at Hobby Lobby - I thought that was pretty great! 

My Step Mom was kind enough to take photos of a similar pillow, that I sent to my dad for Father's Day

MATERIALS NEEDED:

Right click this image to save it, then print at 100%.

- Pillow Form

- Solid Tan Canvas (or similar) material That will cover your pillow 1.5 times (I will explain below)

- Green Cotton Fabric (for cactus) - Note - Only 100% Cotton Material works, because you will be ironing it. 

- Fusible Webbing (the only kind I would EVER suggest would be Heat N Bond Lite Iron-On Adhesive. It's hard to see, but it's the paper-like material in the top right of the image, right. 

- Iron + Ironong Board

- Sewing Machine, Thread, Scissors

- Printed out image of cactus, right. 


INSTRUCTIONS:

1.) Iron canvas material if needed. Remove pillow case from pillow form, and lay it down onto the canvas fabric. Cut one piece the exact same shape as the pillow case - this will be the front of your pillow. Alternately, measure your pillow form, and use those measurements instead. 

- Next, to cut the back part of the pillow, you need two pieces to create the envelope flaps. 

- Using the same width as the front piece, cut a second piece of fabric about 1.5 times the length of the front piece. For instance - if my front piece measured 10" x 10", my second fabric piece would measure 10" x 15".

- Cut the long piece into two pieces, a bit off center, so one piece is longer then the other by a few inches. 

2.) Next, you will create a nice hem line for the two back pieces. With an iron, fold down one edge of each piece (going horizontally), over twice. This will create a nice finished edge. Sew the hem line down a couple of times to secure it. Iron again, if you want. 

3.) Now, let's make an applique!! 

- Trace the cactus shape onto the paper/smooth side of the fusible webbing material with a permanent marker.

- Cut out the cactus shape you drew, and iron it onto the green fabric. Like I mentioned before, only 100% cotton can be used for this! The green material I chose wound up being 10% polyester and got stuck to my iron, and melted! No fun!

- Cut out the cactus shape you ironed onto the green fabric, and peel the paper backing off of the shape. One trick I use, is to slightly score the paper backing, to start the "peeling" process :) 


4.) Time to iron on the cactus. Fold the front piece of tan material in half and then half again, to find the center. Use this to line up your cactus shape. Then, iron the shape onto the front of the fabric. Iron the whole piece of fabric, and get ready to sew on the applique!

5.) Using a zig zag stitch or a straight stitch, sew all around the cactus shape. Tie any loose thread ends on the back side of the fabric. 

6.) Time to sew and construct the pillow case! This is such a great way to make a pillow case - it's removable and washable, too! 

- Pin the shorter back piece with the hem line going horizontally in the middle. Pin the front panel and the first back section together - right sides together. Pin, and sew around the edges. Clip loose threads.

7.) Now, pin the longer back piece up to the ones you just sewed. Line raw edges up, and again, pin and sew around the edges

8.) Trim any excess fabric around the edges, and turn your pillow right side out. Iron, if you want, and you're DONE!!!

I hope you enjoyed this tutorial! If you wind up making one of your own, please link to it in the comments below! Happy Sewing, friends!!

DIY Summer Clutch Purse - 20 Minutes Or Less "Give Extra, Get Extra"

I have an absolutely incredible DIY project for you today! Here is a fun way to spruce up your summer wardrobe. This shop has been compensated by CollectiveBias, Inc. on behalf of its advertiser. All opinions and ideas are my own. #GIVEEXTRAGETEXTRA #Walgreens #CollectiveBias

I always have this problem - I have a great outfit picked out to wear to visit friends or family, and am happy with my jewelry, then I have NO purse to match my outfit! Sure, I have my every day purse, that would work, but I always want something a bit more suited for the occasion. 

It's always a good idea to bring along a pack of gum with you for a night out, so your breath is fresh! Fun Fact - these new Extra® 35-stick packs have lots of gum to supply your friends as well. You never know what conversation or new friend you could make by sharing a stick of gum with someone!! By simply giving Extra, you may get Extra! 

So, here is one way to solve the problem. Sew yourself a quick and easy clutch purse, that takes less than 20 minutes! If you have never, ever sewn before, it could of course take you a tiny bit longer. But, I am very happy with how quickly this project came together!


The Flavors Featured In This Post Include:

Extra® Gum Spearmint

Extra® Gum Polar Ice®


MATERIALS:

- 1/3 yard of vinyl (found in the home decor area of the JoAnn's)

- 1/3 yard of flannel or felt

- Scissors

- 2 small binder clips

- Sewing Machine with Needle and Thread

- Glue Stick

- Hand Sewing Needle and Thread

- Button For Closure


INSTRUCTIONS:

1.) Cut 1 piece of vinyl and 1 piece of flannel. 

* Each piece should be roughly 12" across, and 30" tall.

* To round the top pieces, I folded them each in half lengthwise, and created a rounded edge. 


2.) Using a glue stick, carefully glue both pieces together so they line up as well as possible. 


3.) Measure roughly 10" from the straight edge of the pieces, and sew a straight line across, to create a crease, where the bottom of the clutch will fold up. 


4.) Fold up the flat edge to create an envelope shape, and sew all the way around the outside edges of the materials. I keep the edge of the presser foot right against the right edge of the fabrics. Double stitch where the pieces meet, see below. 


5.) Sew along the open edge of the clutch to add yet another crease, on the flap part of the material. 


6.) To mark where your button should go, place it onto the flap, and push sewing pins through the layers. This will transfer 4 dots to the layer beneath, which will tell you where to sew your button. Mark the 4 holes with a permanent marker, and sew the button onto the purse. 


7.) Sew on your button very securely!


8.) Make your button hole. Here's a tip - fold the flap over the button you just sewed on. Mark how long the button is, and then clip a hole the proper length. Test this out, to make sure the button fits through the button hole without any resistance, but is not too large where it won't hold.

* Sew around the button hole a couple of times, and snip any loose threads. 


9.) That's it! Get ready to fill your new clutch purse with some essentials like gum, lipstick, lotion, and other goodies, and you're ready to go! 


To learn more, and to see what other people created, check out the Social Hub Here. Visit the Wrigley Extra® Gum Page, Here.
 photo moments grn.png

Extra® Gum 35-stick packages at Walgreens have more gum than you may be used to seeing! The case is super durable, and can actually be reused or recycled after you are done with the gum (see the image below). These larger stick packages ensure that you will run out of gum less often, and there is more gum to go around! 

Another Adorable Gift Basket With Erin Pelicano Jewelry

I hope you enjoyed my previous gift basket post, here. I had so much fun putting that basket together, that I created yet a second gift basket. These are so perfect for Mother's Day (and for gifting at just about any time of the year). The reason why I like the style of this gift basket so much, is because after you gift this beautiful creation, someone can then use the basket as store in a closet, bathroom, pantry, and more. 

Adorable Gift Basket DIY Tutorial
Check out this cute gift basket DIY project!

MATERIALS:

1 Wicker Basket

1 Roll of ribbon to wrap around the basket (not wired)

Hot Glue Gun + Glue (I used about 12 sticks, so it takes a lot)

2-3 Silk Flower Heads 

Tissue Paper

Paper Crinkles

Fun Goodies To Fill Basket


INSTRUCTIONS:

1.) Cut a piece of ribbon, long enough to wrap around the basket and overlap about 3" in back. 

Check out this cute gift basket DIY project!

2.) Glue the ribbon to the basket. I was pleasantly surprised at how easy it was to work with this burlap ribbon roll. It just seemed to mold to the shape of the basket so well. Starting at the back of the basket, glue the top of the ribbon and the cut end of the ribbon to the basket. Continue to wrap the ribbon around, and glue it/secure it every few inches. I glued up the basket where the vertical basket pieces were. 

Check out this cute gift basket DIY project!

Gotta love that glue gun :)

Check out this cute gift basket DIY project!

3.) When you have glued the ribbon all the way around the basket, make sure the ribbon is attached well throughout the entire basket. Feel free to touch up any spots that may be loose. Fold the remaining cut end of ribbon over, to make sure loose edges are not showing. Then, glue that in place. Yay! The "hard part" is done. 

Check out this cute gift basket DIY project!

Here is what your gift basket should look like...(below)

Check out this cute gift basket DIY project!

4.) Now, fill the bottom half of the basket with tissue paper.

Check out this cute gift basket DIY project!

5.) Then, add your paper crinkles. They should mold to the shape of the basket pretty well. These were from Target for $1.00 - I just love the color combo!

Check out this cute gift basket DIY project!

I wanted to make this cute gift basket like a floral arrangement of sorts, and I found these adorable berries (below), that really were the absolute perfect colors. So, it made me really happy to find these at JoAnn's during their recent Daffodil Dash sales :)

Check out this cute gift basket DIY project!

Mother's Day Gift Basket with Erin Pelicano Necklaces

I am so honored to be able to share another gorgeous necklace by Erin Pelicano. She has an incredibly wonderful sense of style, and I just love everything she creates! A few (or more) of her pieces are absolutely perfect for Mother's Day! In fact, they say Mother & Daughter right on them :) 

Erin Pelicano Jewelry + Lily The Wandering Gypsy

I thought a fun way to show off her beautiful necklaces would be in a cute, Mother's Day Gift Basket. Indulge Mom this Mother's Day (or any other time of the year), and give her thoughtful gifts, elegantly arranged in a gift basket. Stay tuned for a second blog post with another idea, coming soon!!

The items featured in this gift basket were partially provided by my goodie bag that I received at Create + Cultivate Dallas! Both the Seaweed Bath Co. Detox Cellulite Soap and the Black and White Striped Nora Socks from Richer Poorer Inc. were from C+C! The Poco Dolce Olive Oil Chocolate Bar was purchased in Santa Fe at Chocolate + Cashmere (which I will soon post photos of), and of course, the main attraction is this gorgeous necklace from Erin Pelicano! 

Erin Pelicano + Lily The Wandering Gypsy


Let's Make A Gift Basket! 

I found this shallow basket to be perfect for a gift basket, featuring Erin's beautiful Mother & Daughter Necklace. 

MATERIALS:

- Shallow Wicker Basket

- Tissue Paper

- Moss

- Gerber Daisy Heads

- Various Items To Fill Basket That Mom Will Love

Lightly crumple up a piece of tissue paper and form it to the basket. This will ensure that the moss won't fall out. 

Lightly crumple up a piece of tissue paper and form it to the basket. This will ensure that the moss won't fall out. 

Add some moss to your gift basket for a rustic and Earthy look. 

Add some moss to your gift basket for a rustic and Earthy look. 

Use wire cutters to easily remove flower heads from their stems. 

Use wire cutters to easily remove flower heads from their stems. 

Now, gather your gifts, and begin to place them in the basket in a cute way. I first added the striped socks in back, and the chocolate next to them. Next, I centered the necklace, and placed the detox soap behind it. Lastly, I added the flowers in front left, and the center back. Just play around with the placement to ensure everything can be seen well.

Erin Pelicano + Lily The Wandering Gypsy

A Gift Basket Tip: You can use Shrink Plastic (found at Dollar Tree) around this gift basket to hold everything in place. Stay tuned, as I will likely shrink wrap this basket, to keep it safe so I can send it to my mom! 

Erin Pelicano Jewelry + Lily The Wandering Gypsy

Summer On-The-Go & Entertaining With Black Box Wines! - Plus 2 DIY Wine Party Tutorials

This shop has been compensated by Collective Bias, Inc. and its advertiser. All opinions are mine alone. #BlackBoxSummer #CollectiveBias The following content is intended for readers who are 21 or older.

I would like to share some adorable DIY party ideas for a cute summer party on-the-go with you today! Black Box Wines are the perfect summer party pal, because they are extremely portable. Black Box Wines are amazing for a camping party, that is a little bit more upscale. Why not add a little wine-tasting to your camp out!

Be sure to visit the Simple Entertaining Social Hub for more details about ways to entertain this summer.

These wines are eco-friendly, because the bag and box are recyclable! Black Box Wines taste good, and they are about half the price of bottled wines. Also, they can stay fresh up to 6 weeks, and contain 750 ml - the equivalent of 4 bottles. Imagine trying to carry 4 bottles of wine, which is way more to juggle than this one awesome box of tasty goodness! 50 gold Metals for quality can't be wrong!

A SUMMER PARTY RECIPE - WINE & CHEESE PAIRING SKEWERS

I love the idea of a wine and cheese party, but if guests can carry the appetizers around, it prevents anyone from being left out, or everyone having to hover over one plate of food. Instead, offer guests skewers, and a plentiful plate of meats and cheeses, and let them decide what they want! I also like the idea of having grapes and as many fresh fruits and veggies as possible. I liked using these cardboard food containers I got at a craft store. They hold so much, and are coated to avoid any messes. 

Cut up salami, summer sausage, and various cheeses and let guests use skewers to create their own Wine & Cheese Pairing Skewers!! 

Cut up salami, summer sausage, and various cheeses and let guests use skewers to create their own Wine & Cheese Pairing Skewers!! 

Let your guests choose their own adventure, and add whatever type of meats and cheeses they want! Less food will be wasted with this method, which saves money.

Let your guests choose their own adventure, and add whatever type of meats and cheeses they want! Less food will be wasted with this method, which saves money.

 photo SOCIAL HUB graphic.png Be sure to visit the Simple Entertaining Social Hub for more details about ways to entertain this summer.

FABRIC WINE GLASS MARKERS

DIY Fabric Wine Glass Markers #BlackBoxSummer #CollectiveBias (Msg4 21+)

INSTRUCTIONS:

1.) These are super simple and can be made for FREE! Just cut your fabric strips that are 12" long x 1" wide. I just freehanded these, but a rotary cutter could always be used.

2.) Now, to get the rough edges on the fabric pieces, pull them and stretch them as much as possible. Keep pulling from both ends until you get a more frayed look. 

3.) Tie the distressed fabric strips around the top of the wine glass stem, and double knot. 

4.) I found that cutting about 1" off of each of the long ends at a diagonal was best. That's it! 

DIY Fabric Wine Glass Markers #BlackBoxSummer #CollectiveBias (Msg4 21+)

WINE PARTY TIP! 

To ensure guests can reach the boxes of wine, elevate them onto something like a glass vase or metal box. This also adds visual interest to your party table. 

Cute Summer Party Ideas! #BlackBoxSummer #CollectiveBias (Msg4 21+)

DIY WINE SIGN TUTORIAL

Cute Summer Party Ideas! #BlackBoxSummer #CollectiveBias (Msg4 21+)

This little project came together so well! It was one of the easiest party decor projects ever. 

WHAT YOU NEED:

All you need is a few materials and about 15 minutes, and you can make this cute DIY Wine Sign! Perfect for summer parties On-The-Go!

All you need is a few materials and about 15 minutes, and you can make this cute DIY Wine Sign! Perfect for summer parties On-The-Go!

4 Galvanized letters - found at a fabric store, Birch Round (or Rectangle) - found at that same fabric store, and a hot glue gun with glue. Super Glue / Krazy glue did NOT work at all, just a warning :) 

1.) Plug in your glue gun, and begin to do a sample placement of your letters onto the birch round. This birch round actually has a twine hanger attached, but you can cut it off. 

2.) I found that the best way to securely attach the letters was to mark where each letter went with a dot of pencil, then apply hot glue and quickly re-attach your letters. 

3.) Glue all letters in place and you are DONE! This project only took about 15 minutes!

DIY Wine Sign! #BlackBoxSummer #CollectiveBias (Msg4 21+)
For a wonderful Summer On-The-Go party, consider providing your guests with Black Box Wines! Enjoy!
Cute Summer Party Ideas! #BlackBoxSummer #CollectiveBias (Msg4 21+)

#LOVE Candles DIY Tutorial

Happy Valentine's Day! I have this adorable project idea that will last you long after the holiday is over. These #LOVE candles make such an adorable gift idea, and I can't believe how cute these are! 

DIY Candles

MATERIALS:

- 5 glass votive candles with wax in them

- various colors of festive tissue paper

- Mod Podge

- Paint Brushes & A Pencil

DIY Candles
DIY Candles

Paint a bit of the Mod Podge onto your first votive candle, and begin alternating paper pieces. 

DIY Candles

Brush more Mod Podge over top of the tissue paper for a smooth finish. 

Repeat this with each votive candle, covering every side of the candles. Let these dry for a few hours, or overnight on a piece of white scrap paper. These may stick a little bit, so white paper worked best. 

DIY Candles

Now, you can stop here, or you can customize the candles with your message of #LOVE :) 

*** Draw your letters onto the votives with pencil first!!!

And then paint over the pencil with black puffy paint. Carefully go back over the edges so they are smooth. 

DIY Candles
DIY Candles
DIY Candles

How To Make A Cowl Scarf - Fun & Easy!

Let's face it, it is COLD as heck out there and having warm layers make it a little bit easier to endure. When I created this Cowl Scarf tutorial, I envisioned someone riding their bike to and from work or school, without any protection from the cold on their face. Well, this double layer fleece cowl scarf is lightweight but still blocks that wind pretty well, and looks super stylish! You can just keep wearing it to work or school, and even looks cute a little bit more dressed up! Enjoy :) 

Cute Cowl Scarf DIY

MATERIALS

2 Pieces of Fleece (10" x 30"), Sewing Pins, Sharp Scissors, Sewing Machine, Thread.

Choose your fleece fabrics! Hobby Lobby had some lovely fleece prints, and I know JoAnn's does too. 

Choose your fleece fabrics! Hobby Lobby had some lovely fleece prints, and I know JoAnn's does too. 

Pin up both long sides.

Pin up both long sides.

Cute Cowl Scarf DIY
Sew up the sides, leaving a hole in one of the longer sides to turn the cowl right side out. 

Sew up the sides, leaving a hole in one of the longer sides to turn the cowl right side out. 

Trim off excess seam allowance. 

Trim off excess seam allowance. 

Put your arm through the tube, and pull both short sides together, inside out. 

Put your arm through the tube, and pull both short sides together, inside out. 

Pin the short sides together in a tubular shape. 

Pin the short sides together in a tubular shape. 

Cowl Scarf DIY
Sew up the short sides, in a tube shape. I was able to remove a part of my sewing machine that allowed me to slide the tube onto the machine easier. 

Sew up the short sides, in a tube shape. I was able to remove a part of my sewing machine that allowed me to slide the tube onto the machine easier. 

Here is the tube, sewn up on the short sides. 

Here is the tube, sewn up on the short sides. 

Flip the scarf right sides out, through the hole on the long sides, and pin the hole up. You're getting ready to sew the final stitches! 

Flip the scarf right sides out, through the hole on the long sides, and pin the hole up. You're getting ready to sew the final stitches! 

Here is what the final stitches look like! Trim extra threads, and you're DONE!

Here is what the final stitches look like! Trim extra threads, and you're DONE!

Cowl Scarf DIY

DIY Bloggers Who Are Rocking The Holidays

I am constantly inspired by those bloggers who are always making new things, on a daily basis! I do hope to become one of those women some day soon, I am working on it as a major New Year's Resolution. None of these images are mine, but they are some of my current inspirations! If I have missed any super amazing bloggers, please comment below with a link. Thanks! 

Fall For DIY - Star Tree Topper

Fall For DIY - Star Tree Topper

DesignLoveFest - Wooden Beaded Garland

DesignLoveFest - Wooden Beaded Garland

West Elm Blog - Beet Dyed Name Tags

West Elm Blog - Beet Dyed Name Tags

West Elm Blog - Gold Leaf Trees

West Elm Blog - Gold Leaf Trees

Paper N Stitch - Gift Wrap Tutorial 

Paper N Stitch - Gift Wrap Tutorial 

Inspired By This - Gift Wrap Ideas 

Inspired By This - Gift Wrap Ideas 

 Subtle Revelry - Confetti Gift Wrap Party 

 Subtle Revelry - Confetti Gift Wrap Party 

Minted - DIY Serving Tray 

Minted - DIY Serving Tray 

DIY Cotton Gift Bags

Check out my cute tutorial, to learn how to make some pretty adorable little gift bags. You can personalize any gift in minutes with these gift bags. 

Check out these adorable gift bags!

MATERIALS: 

Cotton Gift Bags, Rubber Stamps, Ink Pad, Glue (Either Tacky Glue or Fabric Glue), Sequins

Cute DIY Gift Bags

First, I recommend stamping onto a piece of paper before you stamp onto your gift bag, to make sure the design looks good. But, basically just figure out where you want your stamp to go, and carefully apply the inked stamp to your cotton bag. Press pretty hard, and make sure to not double over your design. 

Cute DIY Gift Bags
Cute DIY Gift Bags

Now, gather your glue and sequins, and make dots of glue all over the front of the gift bag. 

Cute DIY Gift Bags

And, make sure to let the gift bag dry for a few hours, before giving this to anyone. 

Cute DIY Gift Bags
Adorable DIY Gift Bag

4 DIY Christmas Gift Tutorials - By Lily The Wandering Gypsy

Check out my Pinterest Board here - https://www.pinterest.com/happysolez/a-hankering-to-be-making-this/

This DIY Planner is one of my most popular blog posts! Check out how easy it would be to make one, and give as a gift. 

This DIY Planner is one of my most popular blog posts! Check out how easy it would be to make one, and give as a gift. 

Also, check out my pin board, A Hankering To Be Making This for TONS of ideas! 

Also, check out my pin board, A Hankering To Be Making This for TONS of ideas! 

These amazing No-Bake Cheesecakes are made with animal crackers instead of traditional graham crackers. These would make amazing gifts for the holidays, since they are individually packaged. 

These amazing No-Bake Cheesecakes are made with animal crackers instead of traditional graham crackers. These would make amazing gifts for the holidays, since they are individually packaged. 

All you need is 3 materials for these super easy, Tassel Earrings, and they make a thoughtful gift.

All you need is 3 materials for these super easy, Tassel Earrings, and they make a thoughtful gift.

These Glitzy Tree Earrings are also a cute and festive gift idea you could make for a friend, and then make yourself a matching pair! These turned out really great! 

These Glitzy Tree Earrings are also a cute and festive gift idea you could make for a friend, and then make yourself a matching pair! These turned out really great! 

Pinterest  //  Facebook  //  Instagram  //  She's So Chic Blog  //  Twitter  //  Polyvore

Halloween Party Invites + A Free Printable

I really love how these adorable invites turned out! I love the fact that you can fill these gift boxes with spooky treats, and include the invite in a really unique way! I included two printables, 

Halloween Invites

MATERIALS NEEDED

5" x 6" Black Jewelry Boxes - I used the type you would put jewelry into, with the cotton inside. 

2 Free Printables - found below this image

Red Paper Crinkles (from Hobby Lobby) - But, I found mine at the Dollar Tree

Plastic Halloween Toys / Rings (small enough to fit into the boxes) - Also found at the Dollar Tree

Halloween Candy that fits into the boxes

Halloween Confetti (found at Hobby Lobby)

Scissors

Plastic Packing Tape and a Glue Stick 

Halloween Invites

Right Click and Save the two images below. You can print them off for this tutorial! 

Spooky Halloween Invites

Print and then cut out the invites below, and insert them into the boxes at the end. 

Spooky Invites - Free Printable

Let's Get Started! Lay out all of your materials for the project. 

Halloween Invites
Halloween Invites
Halloween Invites

Cut out the skull design from the first printable. This will be glued to the front of the boxes. Also, cut out the address labels, which are also on that same page. 

Halloween Invite
Halloween Invites

Next, glue the skull cutouts onto the boxes with a glue stick. When you mail these, you will be covering them with clear tape, so they will stay put during shipping. 

Halloween Invite

Add Red Paper Crinkles to emulate "blood" that is oozing out of the invite...

Halloween Invites

Next, place as many pieces of candy and Halloween toys as will possibly fit into the boxes while allowing the lid to still close. I also added spider confetti here, too. 

Halloween Invites
Halloween Invites
Halloween Invites

Cut out your Get Spooky Invites, fill out the blanks, and add them to the box, on top of the candy! 

Spooky Halloween Invites - Free Printable
Halloween Invites

Add the recipient's address to the back of the invite, and wrap everything up tight with clear packing tape! 

Halloween Party Invites

Aren't they adorable??!!

Halloween Invites
Halloween Invites