Squish Honey!

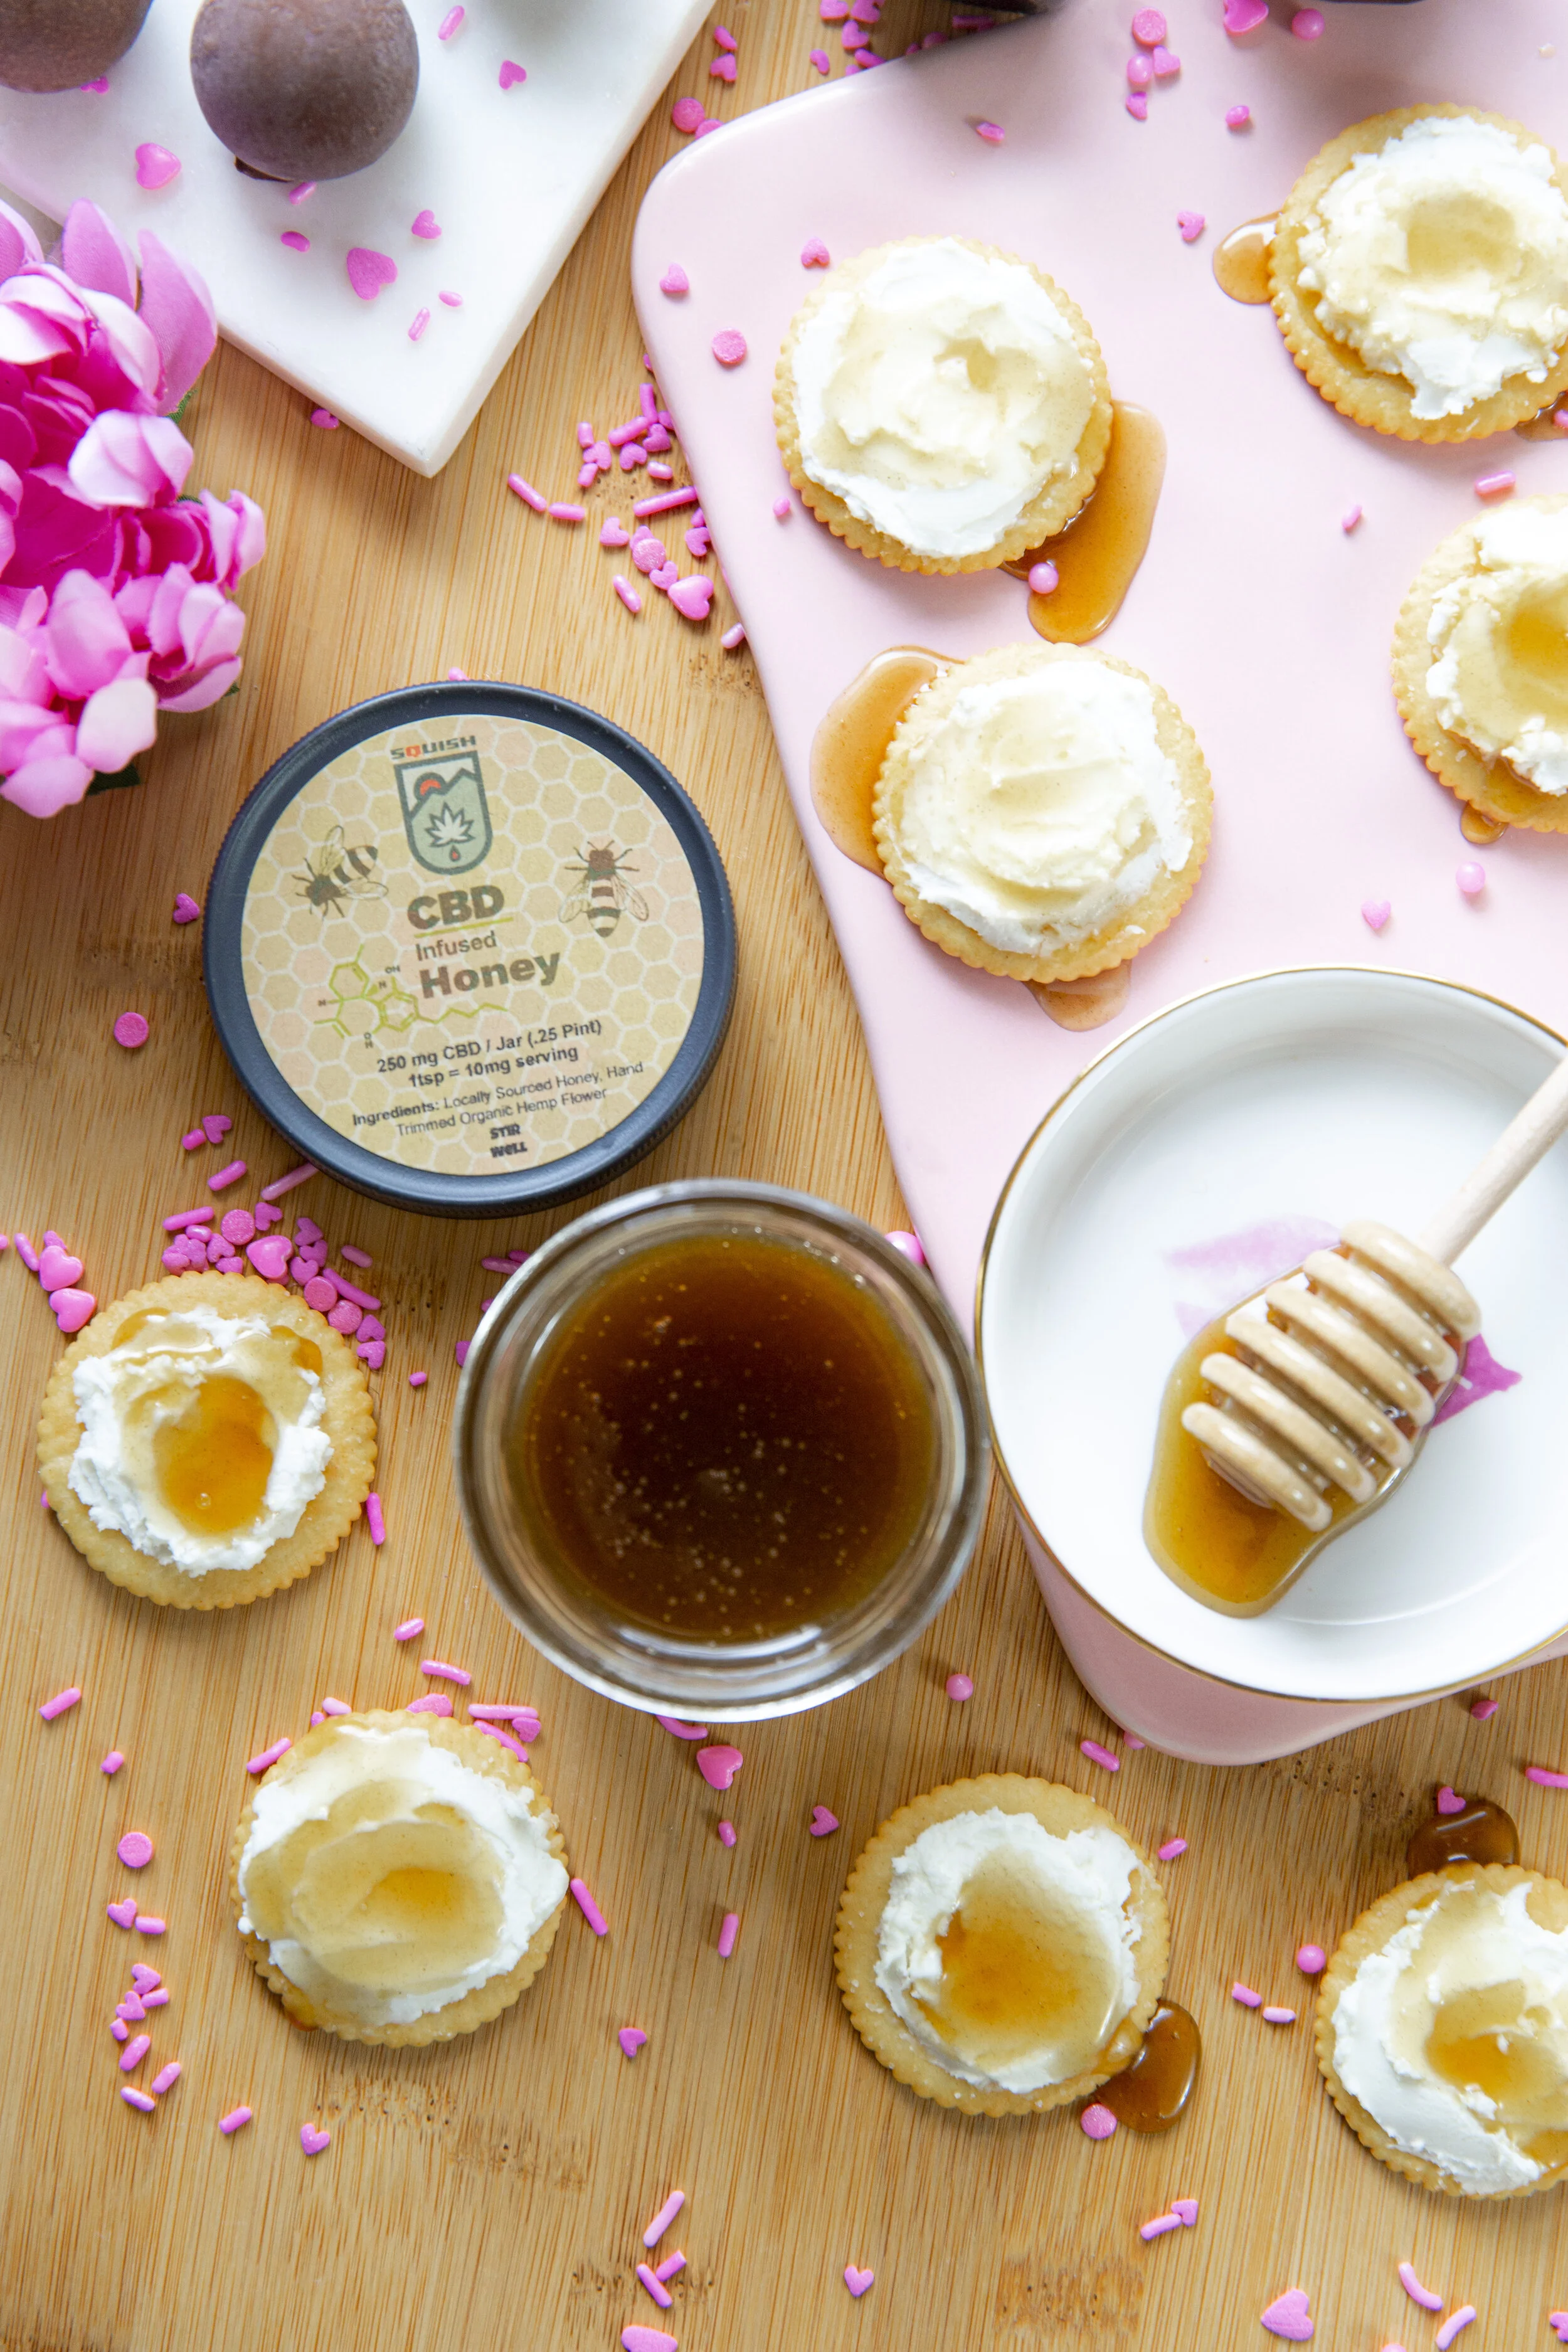
Elevate up your life with Squish CBD-infused, local honey! Our friends at Peace, Love, and Bees offer a beautifully floral clover honey, then Squish botanically infuses it with their organic CBD flower.

This is the MOST unique honey experience I have ever had, and if you’re looking to get some of this honey, it’s one of the newest products on their website, and can be found online, or at their storefront in Marion, IL.

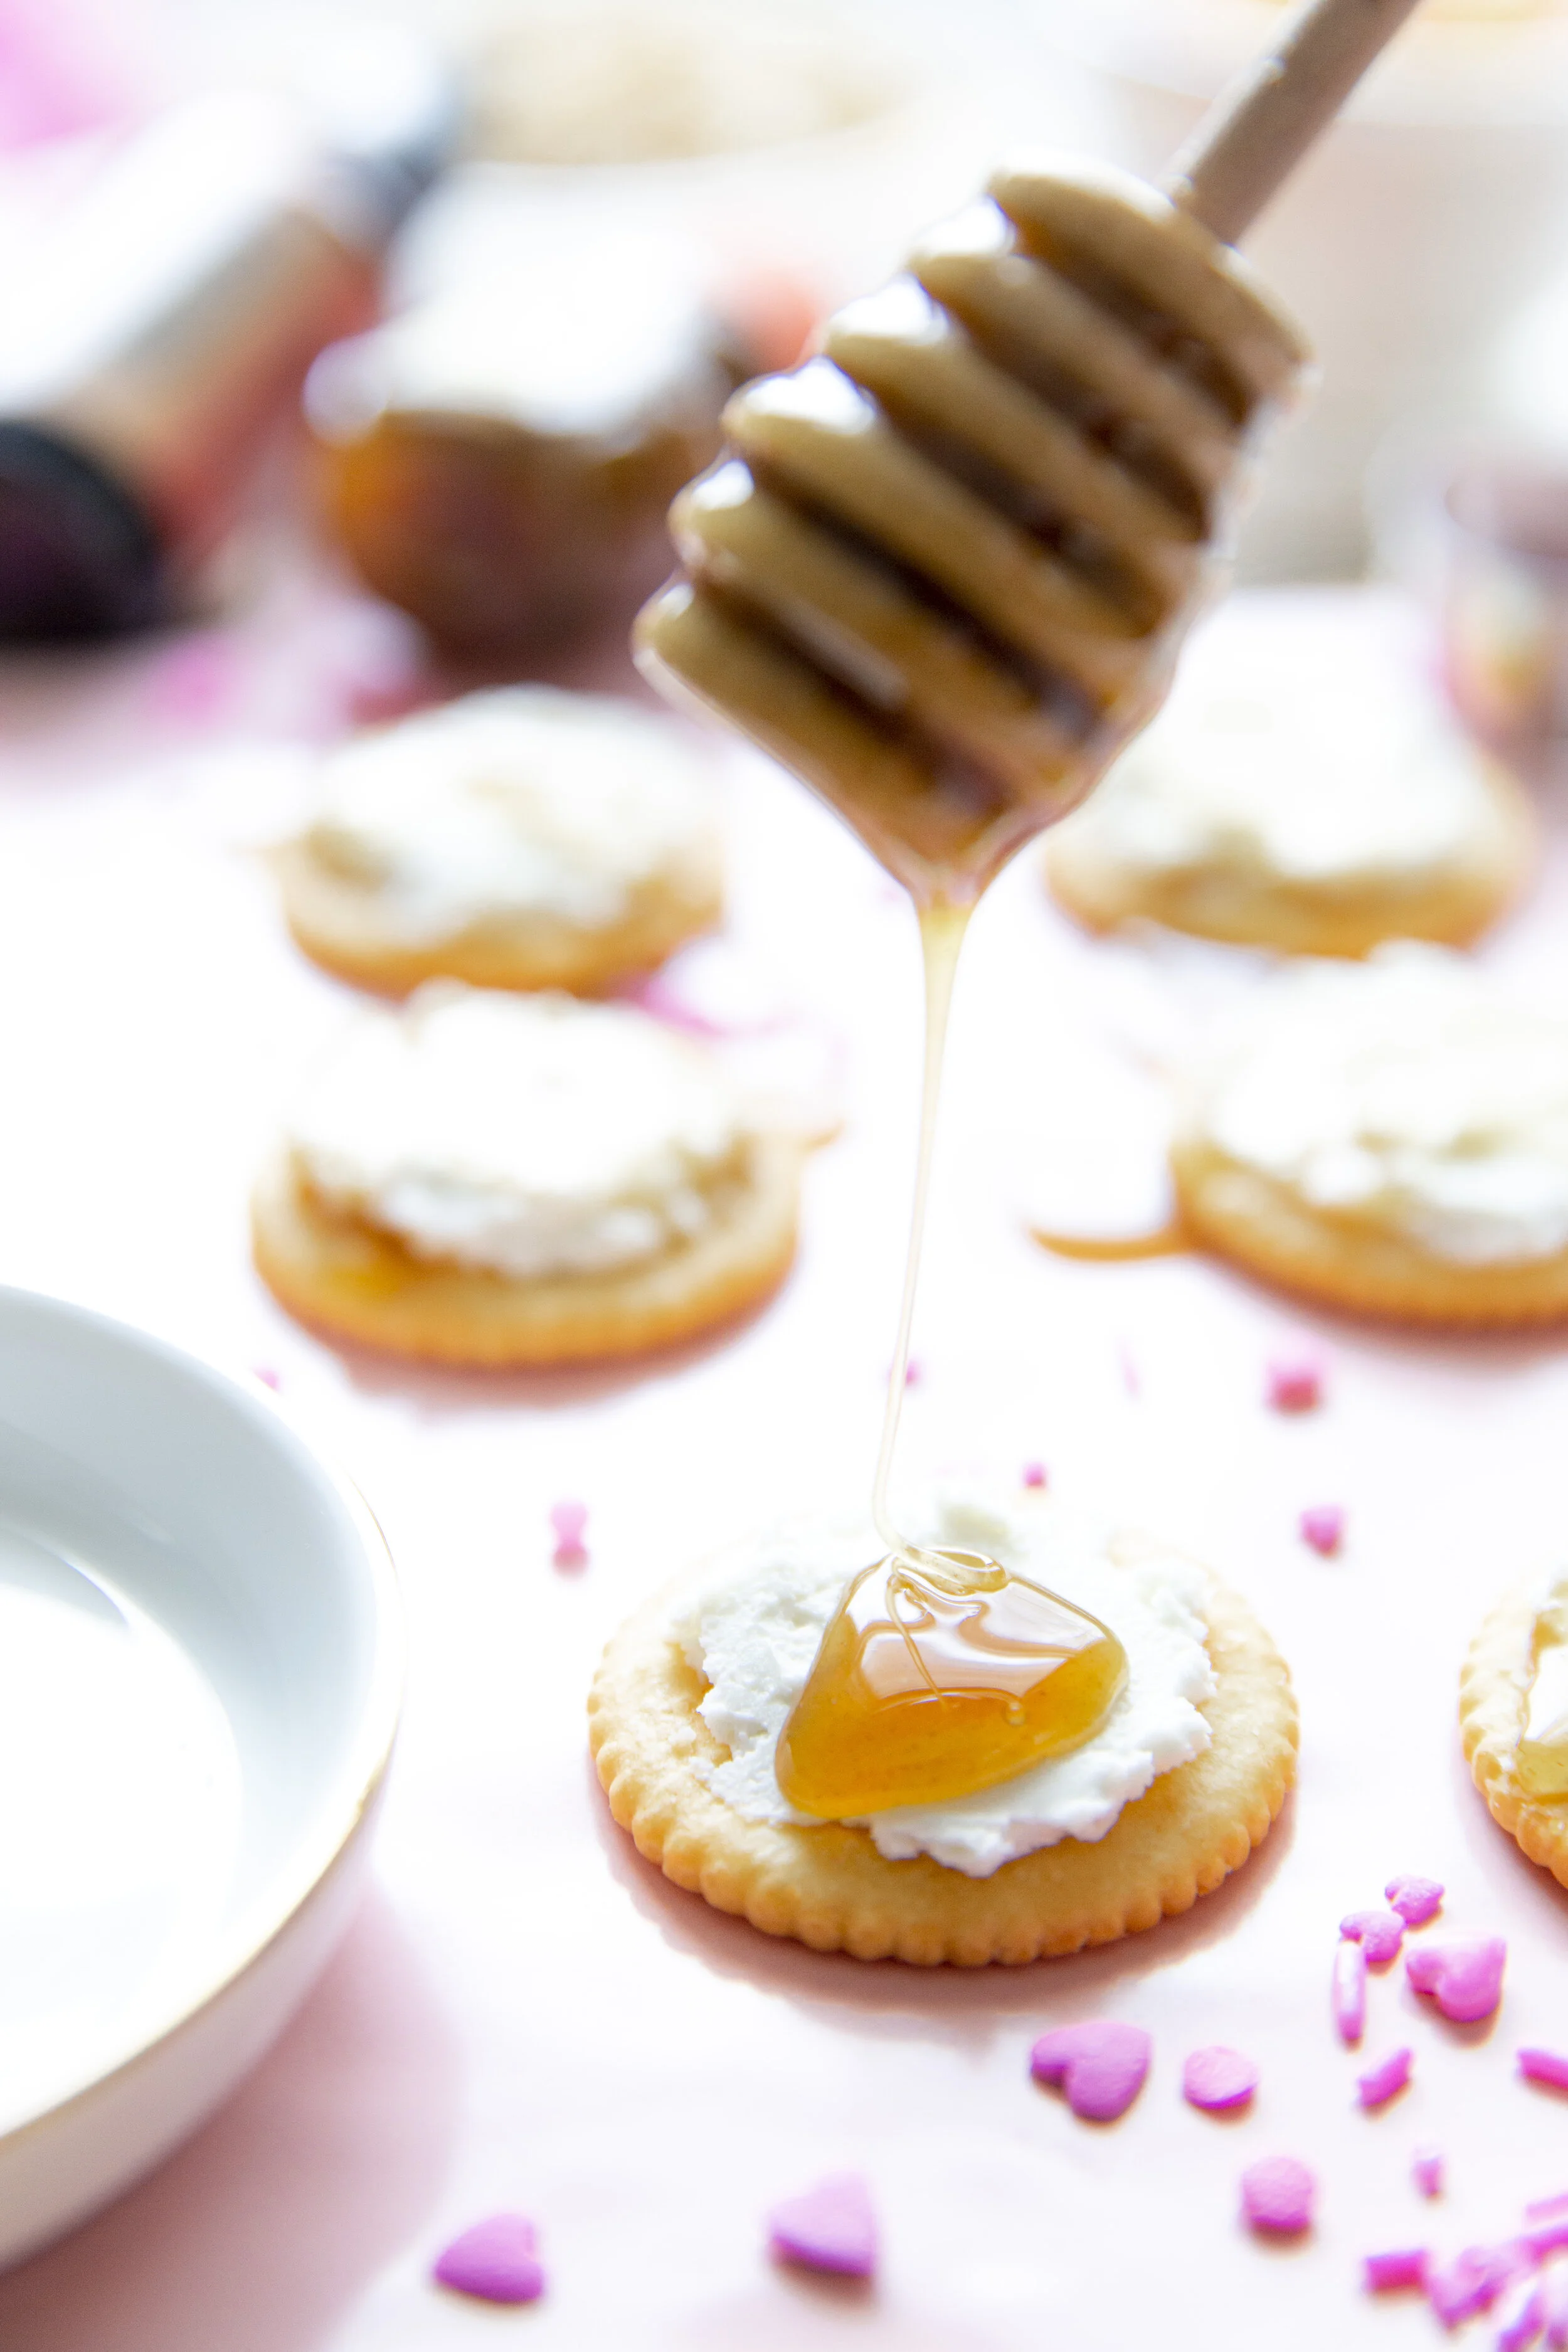
I simply spread goat cheese onto some crackers, placed them onto an adorable platter, then worked the magic. A honey dabber was the perfect tool to apply honey to each cracker! This honey contains 10mg CBD per 1 tsp, and I didn’t have to use very much to make the perfect snack for Valentine’s Day!

“The taste of honey…much sweeter…than wine…” as sung by The Beatles has been in my head since yesterday! What a fun way to share the love.

Squish Global grows organic hemp flower in Marion, IL. Southern Illinois soil to oil!

Learn more about Squish on their Website!

Spinach and Sausage Stuffed Mushrooms Recipe

These delicious stuffed mushrooms are not only delicious, they are very easy to make, and really make an impressive dish. Bring a platter of these stuffed mushrooms to your next party or potluck, or make them for dinner.

I was surprised by how easy these stuffed mushrooms were to make! Sure, I have enjoyed stuffed mushrooms in the past, but I have always been under the impression that they were hard to make because they looked so fancy and upscale. While there are several steps to this recipe, the finished product is well worth the time spent making a deliciously creamy spinach and sausage filling, which tasted incredible baked inside of these organic mushrooms.

INGREDIENTS (MAKES ABOUT 20 mushrooms)

1 lb. ground sausage or chorizo

2 (8-10 oz.) packages of button mushrooms (organic when possible)

1.5 - 2 cups chopped fresh spinach (chopped into very small pieces with scissors or a knife)

6-8 oz. cream cheese

1.5 cups shredded mozzarella cheese

1/4 cup parmesan cheese (to sprinkle on top of mushrooms)

1/3 - 1/2 cup breadcrumbs

1/2 - 1 cup red pepper - chopped into small pieces

Salt

Italian Seasoning

1/2 - 1 cup onion - chopped into small pieces

Baking sheet

Parchment paper - optional

INSTRUCTIONS:

1.) In a skillet, sauté onions and 2 tsp Italian seasoning 4-5 minutes. Add entire package of ground sausage, and then cook until brown (10-12 minutes). Use strainer in sink to remove as much grease as possible. Return to skillet, and add red pepper. Cook about 4 minutes, see mine above.

2.) Next, add cream cheese and shredded cheese and heat over medium low heat until everything has melted and is well combined. Add in your spinach and cover to steam for about 2 minutes. Lastly, stir in breadcrumbs and mix until combined. Remove from heat and grab a kitchen teaspoon.

3.) Begin to fill mushrooms with filling. I found that for these smaller button mushrooms, it doesn’t even take much to fill them, but you get a great 2-3 bite treat.

4.) Place mushrooms on a baking sheet, optionally lined with parchment paper and bake 12-18 minutes, until mushrooms are tender and you see some liquid leaking out. That means they’re ready!

My boyfriend said this was one of the best dishes I have ever made, and that really meant a lot to me! I hope you all enjoy these stuffed mushrooms as much as we did. Enjoy!!

Mummy Wrapped Jalapeño Poppers

Looking for an eye-catching appetizer that people will love for Halloween? These Mummy Wrapped Jalapeño Poppers are delightfully spooky and you’re going to love them. And, bonus points because these can be made vegetarian or with bacon in the filling - it’s up to YOU!

INGREDIENTS (MAKES ABOUT 20-24 poppers)

1 (8oz.) block of cream cheese

1-1.5 cups shredded cheddar cheese

2-3 Tbsp seasoning - I like Ranch or Mexican seasoning for these

1-2 packages of pizza crust (the thinner the better - I used Wewalka Bistro Crust)

Candy eyes at least 40 pieces (I like these ones)

Baking sheet (I love these Air Bake ones)

Parchment paper - (only suggested if you are not using a baking rack)

Baking rack - optional (similar here and here)

INSTRUCTIONS:

1.) Slice top 1/3 of each pepper off, lengthwise. Carefully remove seeds and other inside material with the back of a kitchen spoon or similar tool. I tend to use rubber gloves when making these, so my hands do not catch any of the spiciness of the peppers.

2.) Using a small spoon to add filling to peppers, or place your filling ingredients into a plastic bag and cut the end off to use to pipe the filling into the peppers for a more polished look. Wipe off excess filling that may have gotten on the edges or the tops.

3.) Cut pizza dough into the thinnest strips you can. I use the dough as cold as possible, or almost frozen so it cuts well and also holds the shape of the strips well. Next, wrap small strips of dough around filled peppers in a “mummy sort of way”. I left room for the eye area, and after they baked I placed candy eyes to give them a good personality + spooky look.

4.) Bake at 350-375 degrees F for 10-15+ minutes on a metal baking sheet, covered in parchment paper. These baked pretty quickly and I just LOVE how they turned out!

Add the candy eyes to the mummy poppers! While poppers are still warm, take two candy eyes in your fingers, and place them on the “mummy face” both nest to each other at once, so they are both looking/pointing in the right direction. You can have a lot of fun with these, and I would love them to be a part of your Halloween celebrations and festivities! Enjoy! Happy Haunting!

Antipasta Flatbread / Breadsticks with Nudo Olive Oil

Did you know that you can actually adopt an olive tree? I am so honored to share such an intriguing company with you, especially because my grandfather raised me to love Italian food and Italian culture! Today, I am excited to share this very easy yet very delicious recipe with you for this Antipasta flatbread. It only took a few minutes to create and a few minutes to bake, and I wound up with a quick meal that tastes better than something from a restaurant! 

Adopt an olive tree from a traditional Italian grove, and receive some fo the best Italian Cold Pressed Olive Oil, straight from your own little piece of Italy!

Nudo is a collaboration of provincial Italian groves which use traditional, sustainable practices. They produce some of the best olive oil in Italy: premium, authentic, and on a small scale. Our adoption program supports these groves and farmers by connecting them with food lovers around the world, and by providing this economic security it helps protect the land from the increasing intensive farming practices.

The base flavor for this recipe is definitely the high quality Nudo olive oil. The flavor was mild but wow so smooth and delicious.

ANTIPASTA FLATBREAD / BREADSTICKS RECIPE:

Ingredients:

2 Tbsp Nudo Olive Oil

1 Package of Garlic Naan Flatbread

1/2-1 lb. Antipasta from salad bar at grocery store or elsewhere (I chose artichoke hearts, an assortment of different olives, and pepperoni)

1/4-1/2 C. Shredded Parmesan Cheese

Salt, Italian Seasoning

Instructions:

1. Brush Naan flatbread with a generous amount of Nudo Olive Oil.

2. Slice olives into thin slices, and cut artichoke hearts into small pieces. Also chop or prep any other toppings. Arrange toppings onto flatbread.

3. Sprinkle with salt, parmesan cheese, and optional Italian seasoning, and bake for 5-8 minutes at 350 degrees F.

4. Cut into slices and enjoy!

FOR THE HOLIDAYS...

For Thanksgiving, Nudo Adopt has created a selection of thoughtful giftsets to thank the food loving host in your life. Choose from a choice of three gitfsets; Aperitivo set, Olio set & A Tavola set.

Aperitivo set with handcrafted olive ramekin and Taggiasche olives from the glamourous Ligurian coast.

Olio set with a handmade, stoneware cruet paired with premium artisan Extra Virgin Olive Oil from Le Marche; one of the oldest regions in Italy to produce olives

Can’t choose? Pair up both, A Tavola set, for an extra special Thanksgiving treat.

For Christmas, Nudo Adopt have collaborated with Yorkshire based artist Michelle Freemantle , to create limited edition, handmade oil cruets especially for the festive season.

Exclusive gift with our Olive Tree Gift Adoptions; a beautiful and long-lasting gift.

Michelle’s visionary ceramic bottles take inspiration from her environment; the colours for the cruet are a reflection of Nudo’s brand & Italy; yellow sunshine, green countryside and blue midnight sea.

A wonderful sentiment that lasts longer, looks after the environment, supports provincial farmers and is good for you.

Lattice Weave Puff Pastry Wrapped Prosciutto + Brie Recipe

Looking for an elegant and luxurious recipe to bring to that next BBQ or summer party? Perhaps you want a special date night dish that can be enjoyed with a couple of drinks and a movie. This  Lattice Weave Puff Pastry Wrapped Prosciutto + Brieis so delicious, that those who get to enjoy such a treat will likely lick the plate clean. 

I found that by using Wewalka Puff Pastry, it held its shape super well and wasn't overly greasy, which was great. The brie I used, shown below, also worked out great. I found that brie is very affordable, ranging anywhere from $5 to way more expensive options. If you're new to Brie, then start off less expensive or in the middle of the price range.

This is a very rich and indulgent dish, but if you share it with friends, there's definitely no guilt in eating something like this. It's really amazing.

Ingredients:

1 (8 oz) Round of Brie 

1 package Wewalka puff pastry

1 egg, whisked with a fork for egg wash

1 package of Prosciutto, any brand you like

Crackers, pretzels, etc, to dip in cheese

Instructions:

1. Preheat oven to 400 degrees F. Slice puff pastry into 1/2" strips, set aside.

2. Wrap opened brie round with prosciutto, then set on a pan or clean work surface.

3. To create lattice: place two dough strips on top of prosciutto wrapped brie in an X shape. Here is a link to a good tutorial on how to make the rest of the lattice (just make sure dough has no spaces between strips, so it holds in the cheese well. Once the entire top of the brie has been latticed (see below), grab a drinking glass and let's finish this masterpiece!

4. So, the image below is a little strange looking, but I basically put the ingredients on top of a drinking glass to elevate it so I could then finish "weaving" the sides for a more finished look. You may notice that the widest part of the brie / the outer edge has one slice of dough wrapped around it, then I could easily finish wrapping the other pieces under the brie. I also sliced a few inches off of each strip, so there wasn't a huge wad of dough below the brie when it baked.

5. Below, you see the final brie round before baking! You can definitely prep this ahead of time, and bake it right before you need it. Brush with egg wash if desired for an even shinier finish.

And presto chango...Look at THIS BEAUTY, below! It is absolutely gorgeous!

6. Bake for 20-25 minutes or until crust is brown and flaky, cut into the cheese and let the middle just ooze out! Dip crackers, pretzels, green apples, and more into this creation, and enjoy!!

When you slice into this awesome creation, you may hear a little crunch of the flaky layers of dough, and then you will see the cheese just ooze out. Dip crackers, pretzels, and anything your heart desires into this melty cheese. The brie is very rich and creamy and does have a little bit of that funky taste that brie just has, but it pairs so well with the prosciutto and the puff pastry.

What do you think? Does this look like something you would eat or serve at your next gathering? I really hope you've enjoyed!!!

Parmesan Garlic Knots Recipe - Easy and Delicious

These deliciously easy and impressive parmesan Garlic Knots are sure to please just about anyone! I used only a few ingredients to create these high end appetizers, perfect for so many occasions!

Prep Time 5 minutes // Cook Time 20 minutes // Total Time 25 minutes // Servings 12

Ingredients

1 11 ounce can breadsticks found in the refrigerated section

5 tablespoons butter melted

1/2 teaspoon garlic powder

1/2 teaspoon dried oregano

1 tablespoon finely chopped fresh parsley can also use 1 teaspoon dried parsley

3 tablespoons finely grated parmesan cheese

cooking spray

Instructions

  1. Preheat the oven to 400 degrees F. Coat a sheet pan with cooking spray.

  2. Open the can and place it onto a floured cutting board. Use a rolling pin to even out the dough, and use a pizza cutter to cut the dough into 12 even slices. Tie each breadstick into a knot shape, tucking the ends underneath each roll. This techniques makes the knots look way better!

  3. In a small bowl, mix together the butter, garlic powder, oregano, and parsley. Reserve 1 1/2 tablespoons of the butter mixture for later use.

  4. Brush the remaining butter mixture over the rolls. Then, sprinkle parmesan cheese on top.

  5. Bake for 10-12 minutes or until golden brown. Optionally, brush with reserved butter mixture, then serve. I did not do the second butter part, which did reduce the mess. 

Recipe Notes

1. You can use biscuit dough instead of breadstick dough if you prefer.
2. If you're a big garlic fan, you can increase the amount of garlic powder to 3/4 teaspoon or substitute 1 teaspoon of fresh minced garlic.
3. I like to serve my garlic knots with a side of marinara sauce for dipping.

Adapted from this post, from Dinner At The Zoo, found here.

Big Game Celebrations with French's® @ Kroger (Jalapeño Pretzel Dogs Recipe)

This is a sponsored conversation written by me on behalf of McCormick & Company. The opinions and text are mine. #RealFlavorsHaveCrunch #Frenchs

Looking to make Game Day even more special? Offer guests these French’s® Jalapeño Pretzel Dogs, and everyone will be asking for the recipe! Your home may just become the new entertaining spot for football games this season.

I had a blast creating this recipe, which I found on the French’s website, here. Better yet, there is a recipe video that made this recipe extremely easy to follow. I love when things work out like that, especially when I am prepping to host people for football games or any other occasion.

Below, I served the French’s Ketchup and Classic Yellow Mustard in mini red cups, which I thought was so appropriate for a football party.

I was also able to shop at my local Kroger for everything, which made for a one-stop shopping trip – also a win! Starting on January 21, 2018 there will be coupon inserts in your local newspaper for the French’s products.

I love the taste that the French's Crispy Fried Jalapeños, French's Classic Yellow Mustard, and the French's Ketchup added to this recipe. This was my third time using these crispy fried jalapeños, and WOW, they were so perfect for this (and great for so many other meals too).

They added a crunchy, spicy kick because they’re made with real jalapeños! Be sure to let guests know that they are a tad bit on the spicy side, and possibly even use the French’s Crispy Fried Onions if you are not partial to spicy foods.

Jalapeño Pretzel Dogs

INGREDIENTS (Makes 12 Servings):

USER RATING:

❉ ❉ ❉ ❉ ❉

Prep Time: 15 Minutes  Cook Time: 10 Minutes

1 Can Refrigerated Pizza Dough (11 oz.)

12 Hot Dogs (I used the ones with cheddar inside)

3 Tbsp. baking soda
water
5 oz. French's Crispy Fried Jalapeños , crushed (I used almost one whole container)
 

DIRECTIONS:

1.) PREHEAT oven to 400°F. Spray a baking sheet with nonstick spray.


2.) BRING a large pot of water to a boil. Add hot dogs and boil for 3 minutes. Once hot dogs are cooked, allow to cool enough to handle.


3.) WHILE cooking hot dogs, roll out pizza dough and cut into 12 - 1/2 inch strips lengthwise. (There may be dough leftover; twist into bread sticks and bake – I coated these breadsticks with butter when they came out of the oven and they were great). Spread the crushed jalapeños in a pie dish.


4.) LADLE one cup of the boiling water from the hot dogs into a bowl big enough to fit hot dogs. Add baking soda and stir until dissolved.


5.) WRAP each hot dog with one strip of dough, twisting it around and back. Leave a 1/2 inch space at each end. When hot dogs are wrapped, carefully dip each into water mixture being sure to cover. I rolled the hot dogs around in the baking soda water and it worked great.


6.) GENTLY roll each hot dog in crushed jalapeños and place on baking sheet. Bake for 10-13 minutes. Bake until browned on top. Serve with French’s Ketchup and Classic Yellow Mustard.


I loved how these Jalapeño Pretzel Dogs turned out and I hope you do as well! I consider them the more interesting version of pigs in a blanket, and they made for a wonderful solution for a unique and tasty game day recipe. With French’s Ketchup offering qualities like non-GMO, no high-fructose corn syrup, no gluten and no artificial flavors and preservatives, you can actually feel good about your condiments and what you are offering guests.

PLUS leftovers are always delicious! French’s Classic Yellow Mustard is considered America’s best loved mustard, and is made with #1 grade mustard seeds – perfect to pair with these Jalapeño Pretzel Dogs and so many other delicious game day treats.

So many people have asked me for this recipe, and I was more than happy to share it with them.

Enjoy this recipe for game day, after school, other occasions, and more!

PIN IT FOR LATER...

Delicious Slow Cooker Honey Ginger Chicken Drumsticks Recipe with NAKANO Rice Vinegar

This post was sponsored by NAKANO® Rice Vinegars as part of an Influencer Activation for Influence Central and all opinions expressed in my post are my own. #NAKANONewYear, #NewYearSwaps, #IC

I am thrilled with how these chicken drumsticks turned out. My family is STILL raving about them, and I cannot wait to make them again soon. Perhaps for Sunday football this weekend?! The Big Game is near :) I am really excited to be able to utilize Rice Vinegar in more recipes lately. It really enhances the flavors of the other ingredients. I was able to incorporate a delicious ingredient into this recipe, which I know really made a huge difference in depth of flavor, NAKANO® Rice Vinegar. 

Visit the NAKANO Swaps website here, and get the NAKANO coupon here!

INGREDIENTS:

3 Tbsp soy sauce (low sodium or regular)

2-3 pounds chicken drumsticks

3 Tbsp honey

1 Tbsp sesame oil

1-2 Tablespoons NAKANO rice vinegar

1/4-1/2 tsp black pepper

3 cloves garlic, minced

1 (2" piece) minced fresh ginger (I peeled an actual piece of ginger and then minced it)

1-2 teaspoons black pepper

3-4 teaspoons toasted sesame seeds (I found mine already toasted in the baking aisle)

2-3 chopped green onions

Other materials: slow cooker, non stick cooking spray, serving dish for final recipe

INSTRUCTIONS:

1.) Mix NAKANO rice vinegar, soy sauce, honey, sesame oil, and black pepper in a small bowl, and set aside.

2.) Spray non stick cooking spray into slow cooker, and heat to low. 

3.) Place chicken into slow cooker (I used tongs), and pour sauce evenly over the drumsticks, and make sure the chicken is covered completely. 

4.) Cook on low for 4-8 hours, or overnight on the lowest setting on your slow cooker. Feel free to flip the drumsticks every couple of hours with a pair of tongs. When the chicken begins to fall apart, it's almost ready! 

5.) 30 minutes before you are ready to serve, turn slow cooker up to high, and let the sauce thicken. It will be thin before this step. Sautee the drumsticks in their sauce for 30 or so more minutes, and then to serve, place the drumsticks onto a cute serving platter, spoon the sauce over top, and then top with toasted sesame seeds and chopped green onions. Enjoy! 

NAKANO Rice Vinegar is available nationwide in seven clean-label varieties and two organic offerings, NAKANO is a flavorful ingredient to have on hand in the kitchen and to use as a healthy substitute following the indulgent holiday season., and help you find healthier ways to incorporate good ingredients into your meals.

The Roasted Garlic variety has real minced garlic in the bottle - yum!

MORE BENEFITS OF USING RICE VINEGAR

+ WHERE TO FIND

When preparing winter meals, splash on any of the NAKANO Seasoned Rice Vinegars as a savory, low-calorie alternative to high-fat dressings, marinades, oils or butter.  

Available nationwide in seven delicious and tangy varieties, you can purchase any of the NAKANO Rice Vinegars clean-label and organic offerings at Kroger, Publix and Walmart.  

Crudité Vegetable Wreath + Delicious Dip Recipe

Looking to offer more veggies and healthy options at your next party? This Crudité wreath is an excellent way to entice guests to snack on healthier ingredients compared to offering fried foods, chips, or something higher in fat. I made this fun appetizer during the holidays and would definitely make it again! I had so much fun shopping for all of the fresh ingredients.

Although this particular post is styled in more of a holiday theme, it can definitely be served in any setting, during any season! I was so happy to find all of these fresh ingredients in season during the winter. 

Ingredients (serves 10-15) 

FOR THE CRUDITE:

8 cups broccoli florets

3 cups Brussels sprouts, trimmed

2 cups green beans, trimmed

1 cup sugar snap peas, strings removed

Greek Yogurt

Cream cheese (8 oz.)

½ bunch curly kale, washed

2 cups cauliflower florets

9 cherry tomatoes

FOR THE DIP:

1 cup plain nonfat Greek yogurt

½ cup mayonnaise

2 tablespoons finely chopped shallot

1/2 C. shredded cheddar cheese, optional

2 tablespoons chopped fresh dill or 1 teaspoon dried

4 teaspoons white-wine vinegar

1 teaspoon garlic powder

1 teaspoon sugar

½ teaspoon salt

½ teaspoon ground white pepper

INSTRUCTIONS:

  1. To prepare crudité: Put a large pot of water on to boil. Set a large bowl of ice water by the stove. Blanch broccoli for 1 to 2 minutes in the boiling water. Using a slotted spoon, transfer the broccoli to the ice bath to chill. Drain well. Blanch Brussels sprouts, green beans and snap peas in the same way.
  2. To prepare dip: Whisk yogurt, mayonnaise, cream cheese, shallot, dill, vinegar, garlic powder, sugar, salt and pepper in a medium bowl. Transfer to a serving bowl; set it in the center of a large circular platter or decorative serving board.
  3. Arrange kale around the bowl, with the frilly edges on the outside. Top with the broccoli, Brussels sprouts, green beans, snap peas and cauliflower. Garnish with cherry tomatoes and serve. Enjoy!

Rosemary + Jalapeño Spicy Kettle Chip Nachos

These "nachos" of sorts came together exceptionally well. If you're a fan of spicy foods, then this recipe will surely delight your tastebuds. Since these turned out pretty spicy, I also served some sour cream with them, and that balanced out the heat perfectly. 

INGREDIENTS:

1 Bag of Chips (I used Spicy Chicken Kettle Chips from Kroger, but any flavor of kettle cooked chips will do)

1/2 - 1 Jalapeño sliced into thin strips

1/2 - 1 C. Shredded Cheddar Cheese

1-2 Sprigs of Fresh Rosemary, stems removed, chopped up finely (or dried rosemary)

Sour Cream - optional

INSTRUCTIONS:

1.) Preheat oven to 350* F. Place 1 bag of chips onto a baking sheet, trying not to overlap too many chips. 

2.) Simply sprinkle an even layer of shredded cheese over the chips, then sprinkle your rosemary over that.

3.) Place sliced Jalapeños on top and bake for 5-10 minutes, depending on oven and altitude.

Baked Chicken & Tomato Taquitos Recipe

This shop has been compensated by Collective Bias, Inc. and its advertiser. All opinions are mine alone. #YesYouCAN #CollectiveBias

This recipe turned out extremely well! These taquitos are absolutely delicious, and would be the perfect way to incorporate Hunt's Canned Tomatoes into a Mexican-Inspired dish for dinner or even a party. 

Amazing Recipe Idea - Mexican Food - #YesYouCAN #CollectiveBias

First, I will start off with a kitchen hack! Read the instructions below the photo. This was such a great way to make shredded chicken. 

Amazing Recipe Idea - Mexican Food - #YesYouCAN #CollectiveBias

A BONUS KITCHEN HACK

Using a roaster chicken for shredded chicken is genius! I absolutely loved using this method, compared to spending literally hours waiting for chicken breasts to slowly boil, then become soft enough to shred. This seriously saved me many hours of prep work, and tasted incredible! 

Check out more Mexican inspired recipes here

Amazing Recipe Idea - Mexican Food - #YesYouCAN #CollectiveBias

INGREDIENTS:

3/4 Can Hunt's Tomatoes

1 Roaster Chicken 

1/2C. - 1 C. Cream Cheese

1/4 - 1/2 Onion

2 Cloves Garlic 

Olive Oil 

Mexican Seasonings and Salt

1/4 - 1/2 Bunch Cilantro

1 C. Shredded Mexican Cheese or Cheddar.

Tiny Bit of a Jalapeno (Optional)

Small sized corn or flour tortillas (I used corn)

Sour Cream For Dipping

Amazing Recipe Idea - Mexican Food - #YesYouCAN #CollectiveBias

INSTRUCTIONS:

1.) To shred the chicken - (make sure chicken has cooled, and use your hands (I used rubber gloves), to begin to tear apart all of the meat on the roaster chicken. Set aside, and discard bones and anything you can't use.

2.) Chop onions and garlic, and set aside.

3.) Simmer a tablespoon or so of olive oil, in a medium saucepan (I used one with sides). Once warm, add chopped garlic and onion. Also add about 1/4 tbsp or more of the Mexican seasoning. and a pinch of salt if desired. Stir. Optionally, add a tiny bit of the jalapeno pepper - this added SO much flavor and wasn't even really spicy. 

4.) Add shredded chicken to the onions and garlic mixture.

5.) Strain some of the excess juices out of the Hunt's Tomatoes, and add 3/4 or 1 whole can to the chicken mixture. Stir until combined, and again, season the chicken tomato mixture.

6.) Turn off heat, and add the cream cheese and shredded cheddar, and a little bit more seasoning if you like. Stir until combined well. 

7.) Chop leaves off cilantro, and add that to the rest of the ingredients.

8.) Preheat oven at 350-375 degrees, use PAM on Pyrex dish or baking dish.

9.) Warm corn tortillas in the microwave or on a warm stove. 

10.) Spread a small amount of the chicken mixture onto the centers of each tortilla. Wrap the tortillas around the mixture. Practice first, because the corn tortillas can easily split and break.

11.) Bake at 350-375 Degrees for about 25 minutes, and serve with a side of sour cream. These taste amazing!! Enjoy!

Look how beautiful this filling turned out! You can use this as dip with chips. or fill any type of burrito quesadilla, or taquitos with this. 

Look how beautiful this filling turned out! You can use this as dip with chips. or fill any type of burrito quesadilla, or taquitos with this. 

This is a good amount of filling to use! Roll these up and bake them in a glass dish at 350 Degrees for about 25 minutes. 

This is a good amount of filling to use! Roll these up and bake them in a glass dish at 350 Degrees for about 25 minutes. 

Serve with a side of sour cream, they are incredibly tasty!!!

Serve with a side of sour cream, they are incredibly tasty!!!

WHERE TO FIND THESE INGREDIENTS...

The great thing about this recipe, is that most of the ingredients were easy to find at Walmart. They have great prices on these ingredients, which is great if you're serving these to a crowd, or just making them for family. The Hunt's Tomatoes were found in the Tomato Sauce aisle. The organic yellow onions and garlic were found right in the front of the store by the fresh produce, too! 

Amazing Recipe Idea - Mexican Food - #YesYouCAN #CollectiveBias

And, here is that DIY project I promised you :) Check out the Cactus DIY below. 

Amazing Baked Chicken Drumsticks Recipe

Wow, these turned out SO well! This was our first time cooking any bone-in chicken, and it went really well. I looked up various recipes, and once I realized you could just bread them (duh!), and then bake them, I would just do that!

Amazing Chicken Recipe

INGREDIENTS:

12 Chicken Drumsticks

4 Eggs

Flour

Bread Crumbs

Parmesan Cheese

Seasoning To Taste

Olive Oil

Great Chicken Recipe!
Amazing Chicken Recipe

INSTRUCTIONS:

- Preheat oven to 425* F. Gather your ingredients. Cover a baking sheet in foil, then place a baking grid on top, and spray with non-stick spray. I guess this is also called a Cooling Grid, but I use it in the oven al the time! 

- Find 3 separate dishes (shallow pyrex work well). In one each, place flour with salt and other seasonings, in the next one put your eggs with seasoning, and then in the last dish, mix up 1 1/2 C. breadcrumbs, and 1/2 C. freshly grated parmesan cheese. 

- Now, get your drumsticks onto one plate, and et ready to coat them. Coat your drumstick in flour, then in egg, then into the breadcrumbs. Place it on the grid, and make sure to place it towards the edge. These 12 drumsticks will fill the whole tray.

- Repeat this for each drumstick, flour, egg, and then breadcrumbs. 

- Bake for about 15 minutes and enjoy1 These are amazing by themselves, or dipped in BBQ sauce or honey mustard. These reheat extremely well in my toaster oven, leave then in for about 10+ minutes at 350* F. 

Great Chicken Recipe

YOU MAY ALSO LIKE...

Bacon-Wrapped Pineapple Rings

I have a real treat for you! The perfect mid-afternoon snack to eat on a snowy Sunday... Bacon-Wrapped Pineapple Rings! They taste super good and are actually fun to create. It took a little bit of time, but they were easy none the less. 

Bacon Wrapped Pineapple Rings

WHAT YOU NEED:

* 4 - 5 Pineapple Rings (We bought a fresh pineapple that was packaged near the fruit coolers, and cut them into super thick slices). A Can of pineapple also works. 

* 10 slices (1 Package) of Thinly Sliced Bacon (I like Applegate Organic)

* Toothpicks or short skewer sticks.

* Metal Baking Rack - place into baking dish

*Shallow 9x13 Baking Dish

INSTRUCTIONS:

* Preheat oven to 350 Degrees. Open the package of bacon, and prepare/cut/or drain your pineapples. Set out a decent amount of toothpicks into a shallow dish so they are easy to use.

*To construct: Set one pineapple ring onto a cutting board or clean surface. Take the first slice of bacon, begin to wrap it around the pineapple, and continue with 1-2 more pieces of bacon per ring. Secure with toothpicks. Now, place each Bacon Pineapple Ring onto the Baking Rack.

* Bake for 15-20 minutes, on the top rack of the oven. You may need up to ten minutes more, depending on your oven. Make sure you do not burn them, and enjoy!