Elegant Halloween Party Recipes with 7 Moons Wine

This shop has been compensated by Collective Bias, Inc. and its advertiser. All opinions are mine alone. The following content is intended for readers who are 21 or older. #7MoonsWine #MadeForTheMoonlight #CollectiveBias

Each phase of the moon invites you to slow down, relax, and reflect with a glass of 7 Moons Wine in hand. Today, I am so excited to share a delicious wine I tried recently and a few ideas on making your Halloween gatherings or even a Halloween date night a bit more elegant and delicious! Uncork a bottle, pour a glass, and find connection in the moonlight.

In this post, I am featuring the 7 Moons Red Blend, which “opens with aromas of chocolate-covered cherries, baking spices, and vanilla bean. Flavors of strawberry preserves, cherry cola, and milk chocolate follow through a smooth, fruit-forward, lingering finish”. I found everything at my local grocery story, which is often my experience there! I rarely have to go to another grocery store for anything, making my shopping trips very pleasant.

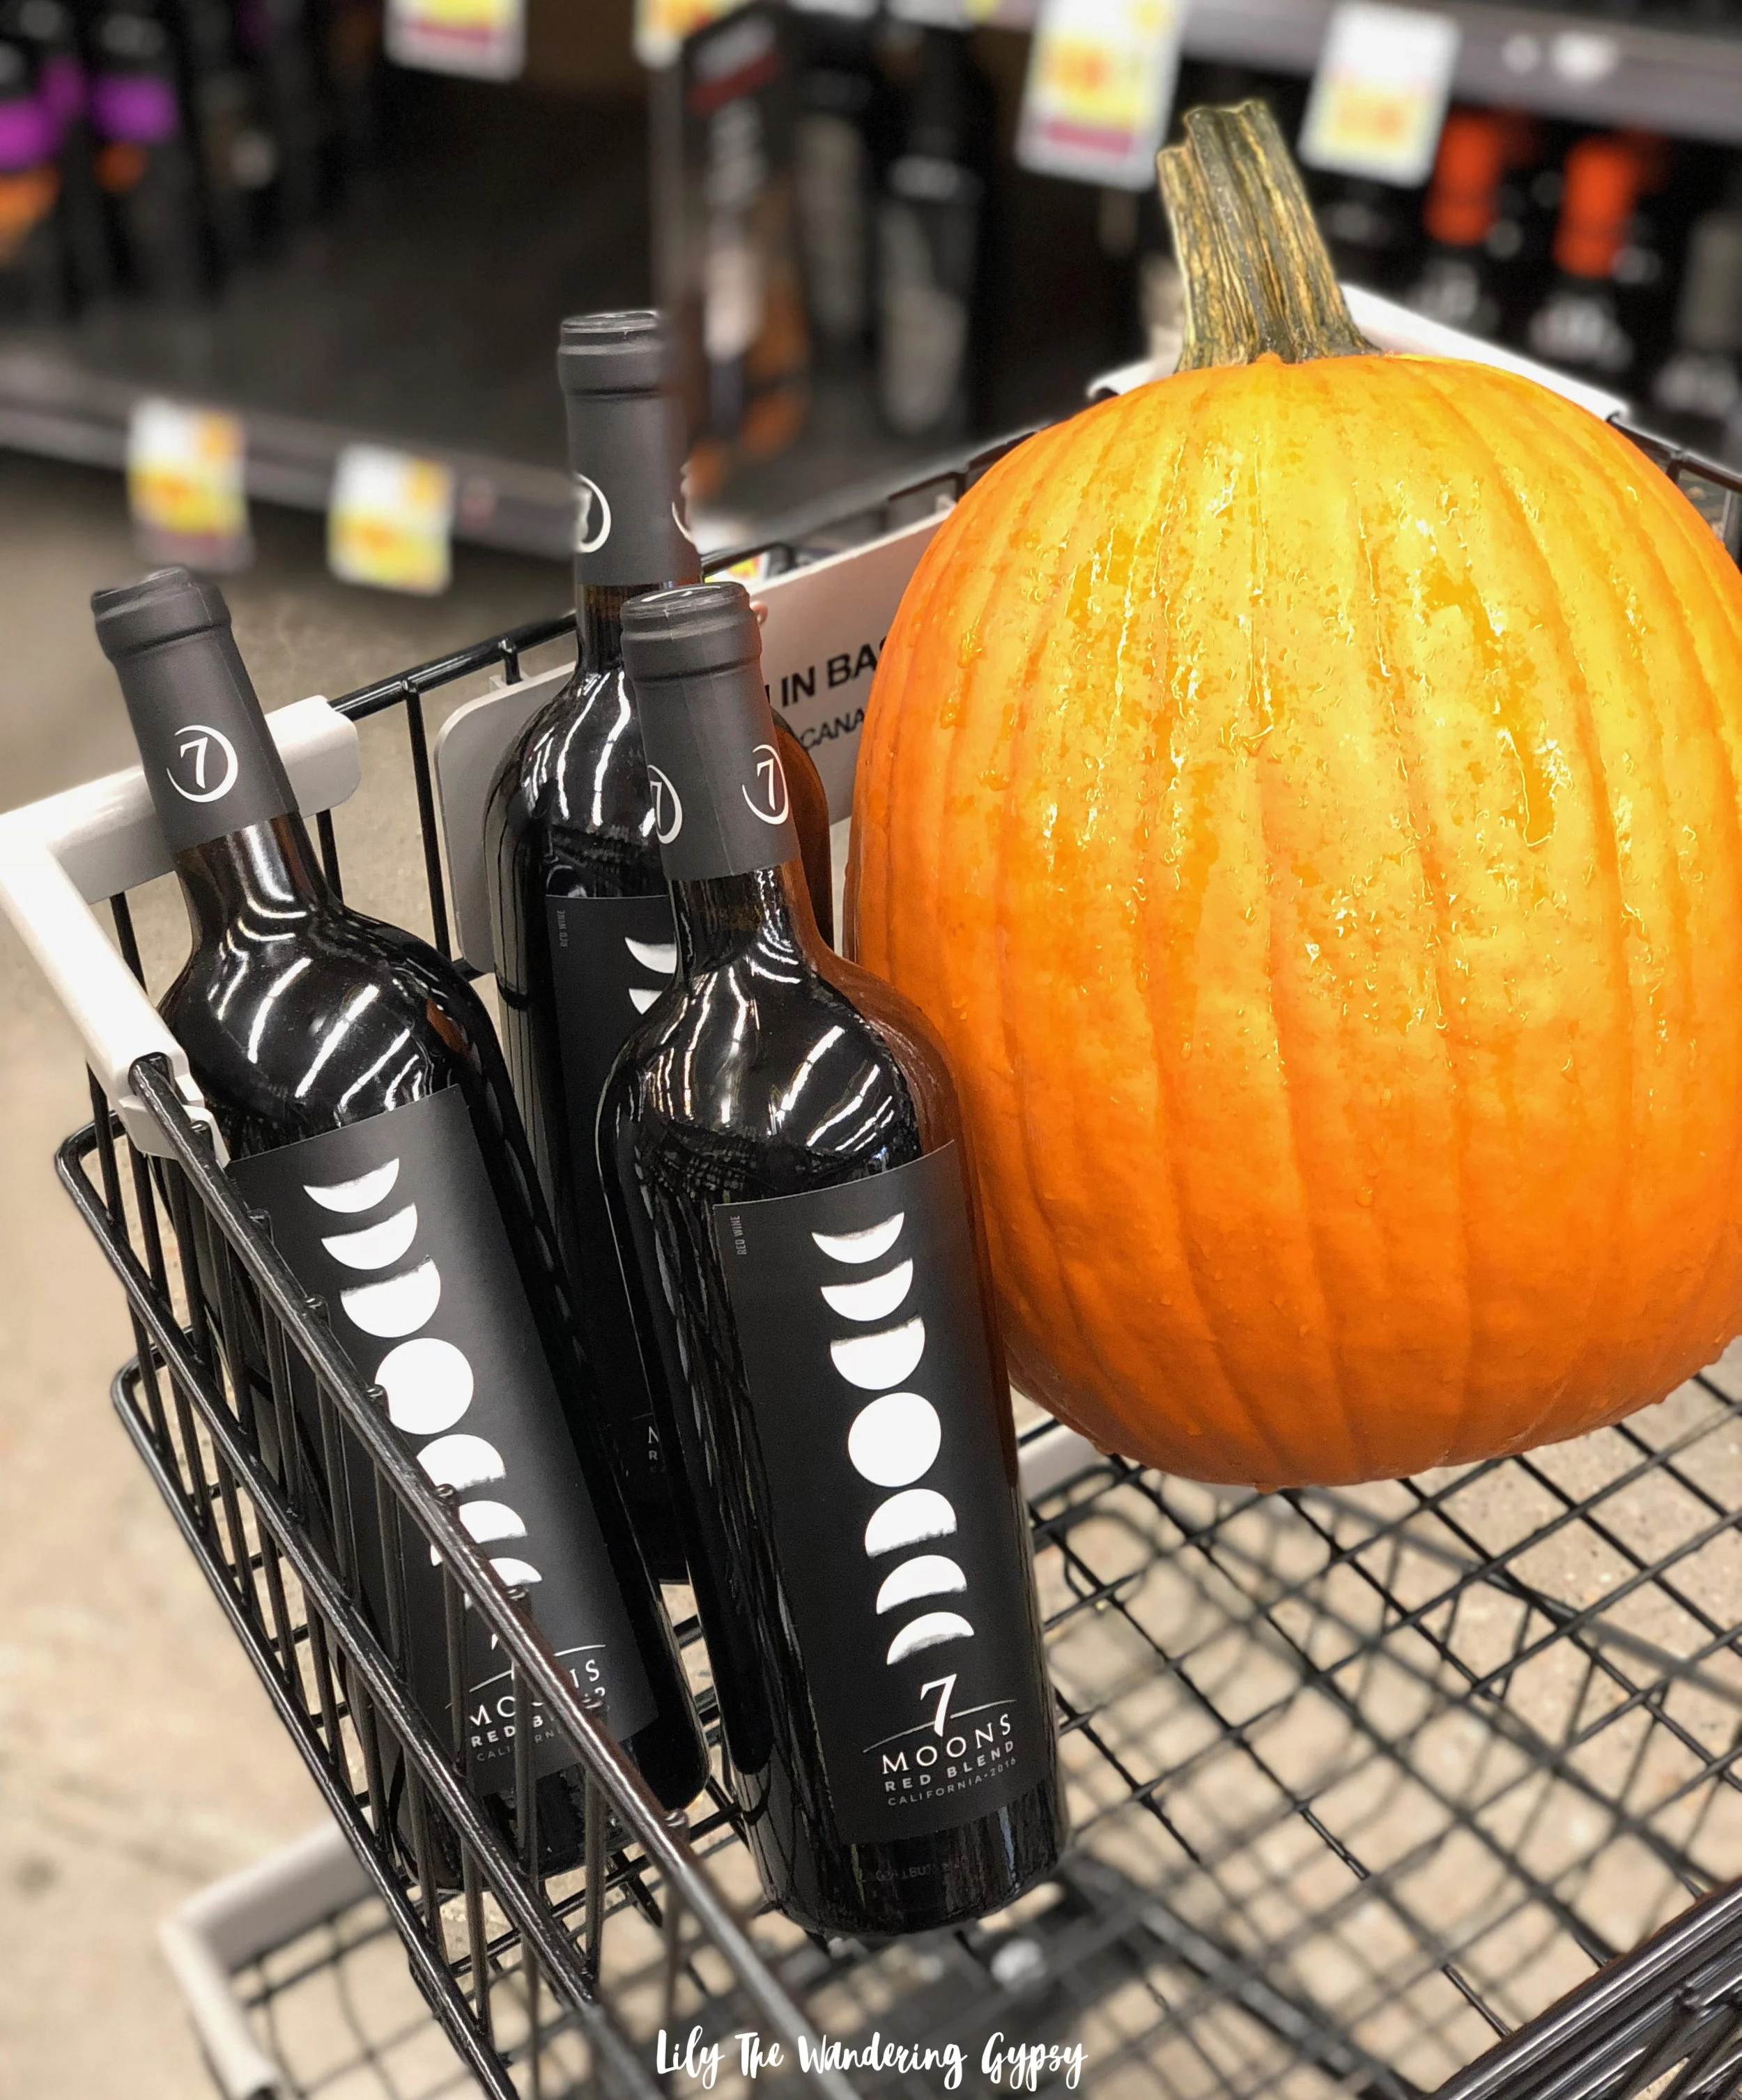
People were definitely admiring my cart on the store!!!! Let me tell you,I was VERY excited to be shopping for Halloween. Connect with the brand on Instagram and Facebook!

7 grape varietals of grapes are combined into a smooth, fruity, easy to drink wine.

Enjoy a blend of 7 different grape varietals sourced from prime vineyards up and down California’s Central Coast and Lodi regions. A mix of Syrah, Merlot, Petite Sirah, Zinfandel, Cabernet Sauvignon, Malbec, and Grenache! Smooth and easy to drink, simple with a little embellishment.

The brand explains that their Red Blend wine is “delicious paired with a broad range of foods from barbequed chicken and caprese salad to take-out Chinese” - a very versatile drink in my eyes! It’s fun to keep a bottle of this 7 Moons Red Blend for enjoyment throughout the week, or for special occasions!

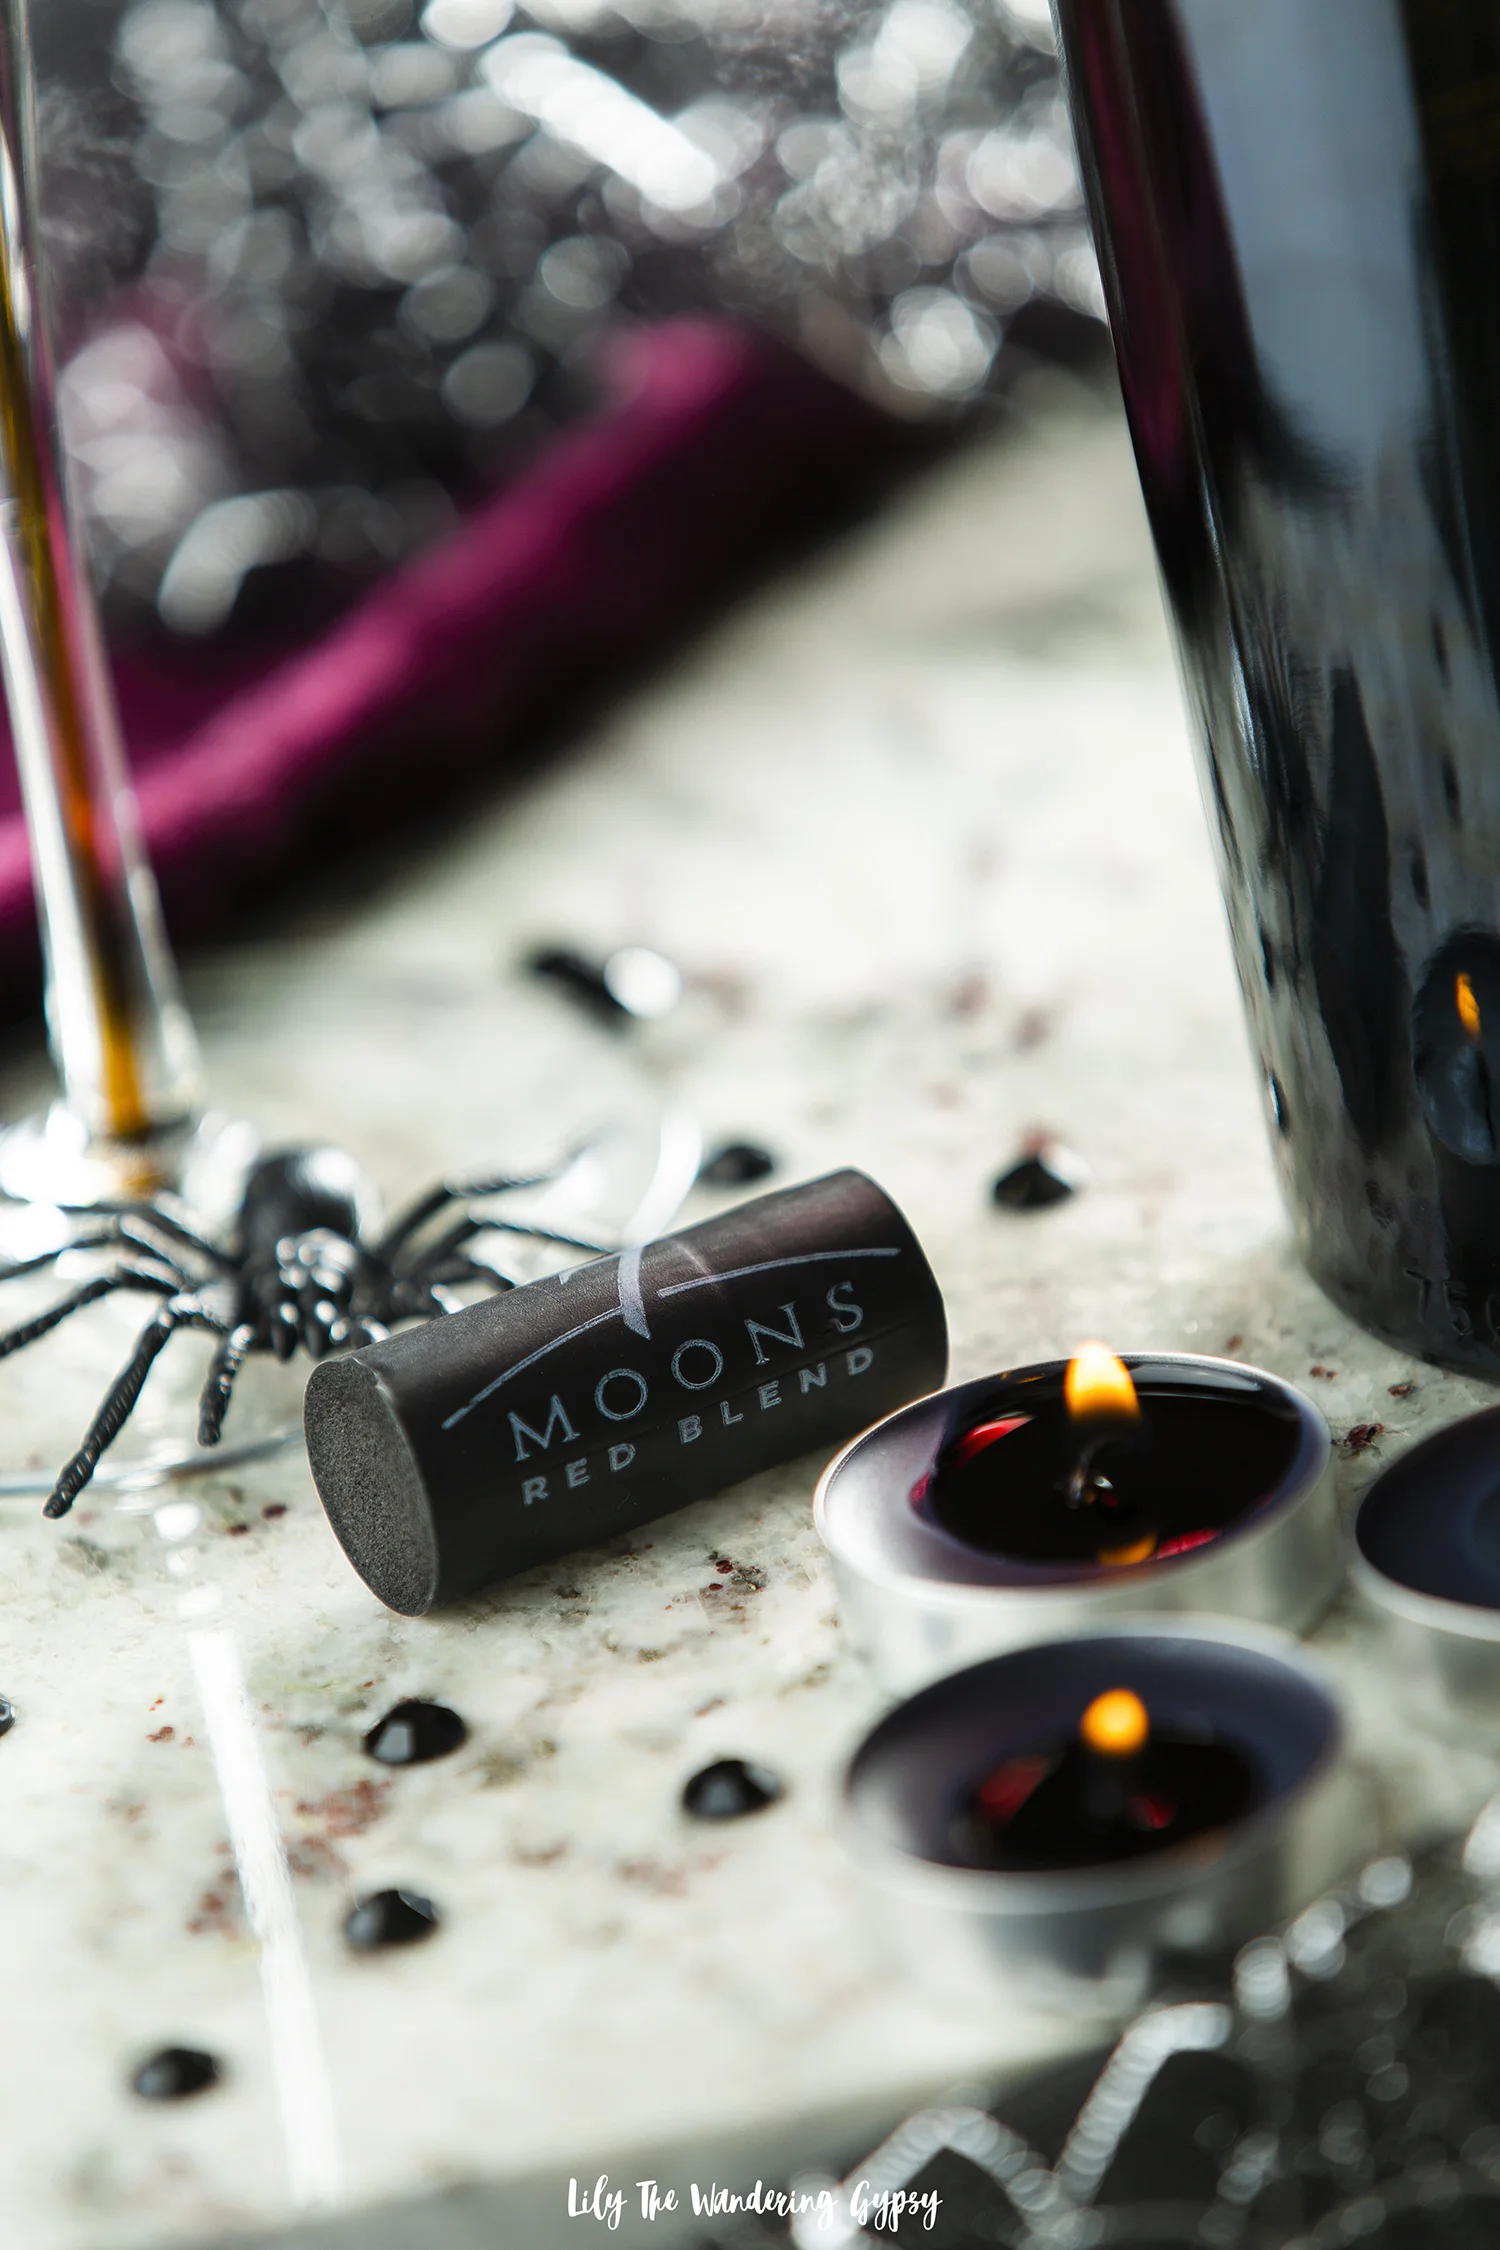
With those tasting notes in mind, I tried the wine by itself, then paired with the food featured in this post, and I was very pleased with how everything tasted together! The goat cheese plate and the dark chocolate cupcakes were a huge hit! A few black candles also set the mood perfectly.

Offering guests a red blend is perfect because it’s right in the middle between dry and sweet, which seems to allow people who don’t drink red wine often to be introduced into a mild, smooth red wine, compared to one with more of the dry characteristics, which can sometimes be hard for someone to get used to, if they rarely drink red wines. Sampling a few red blends has definitely made me more of a red wine drinker because these are such complex flavors that I love to explore.

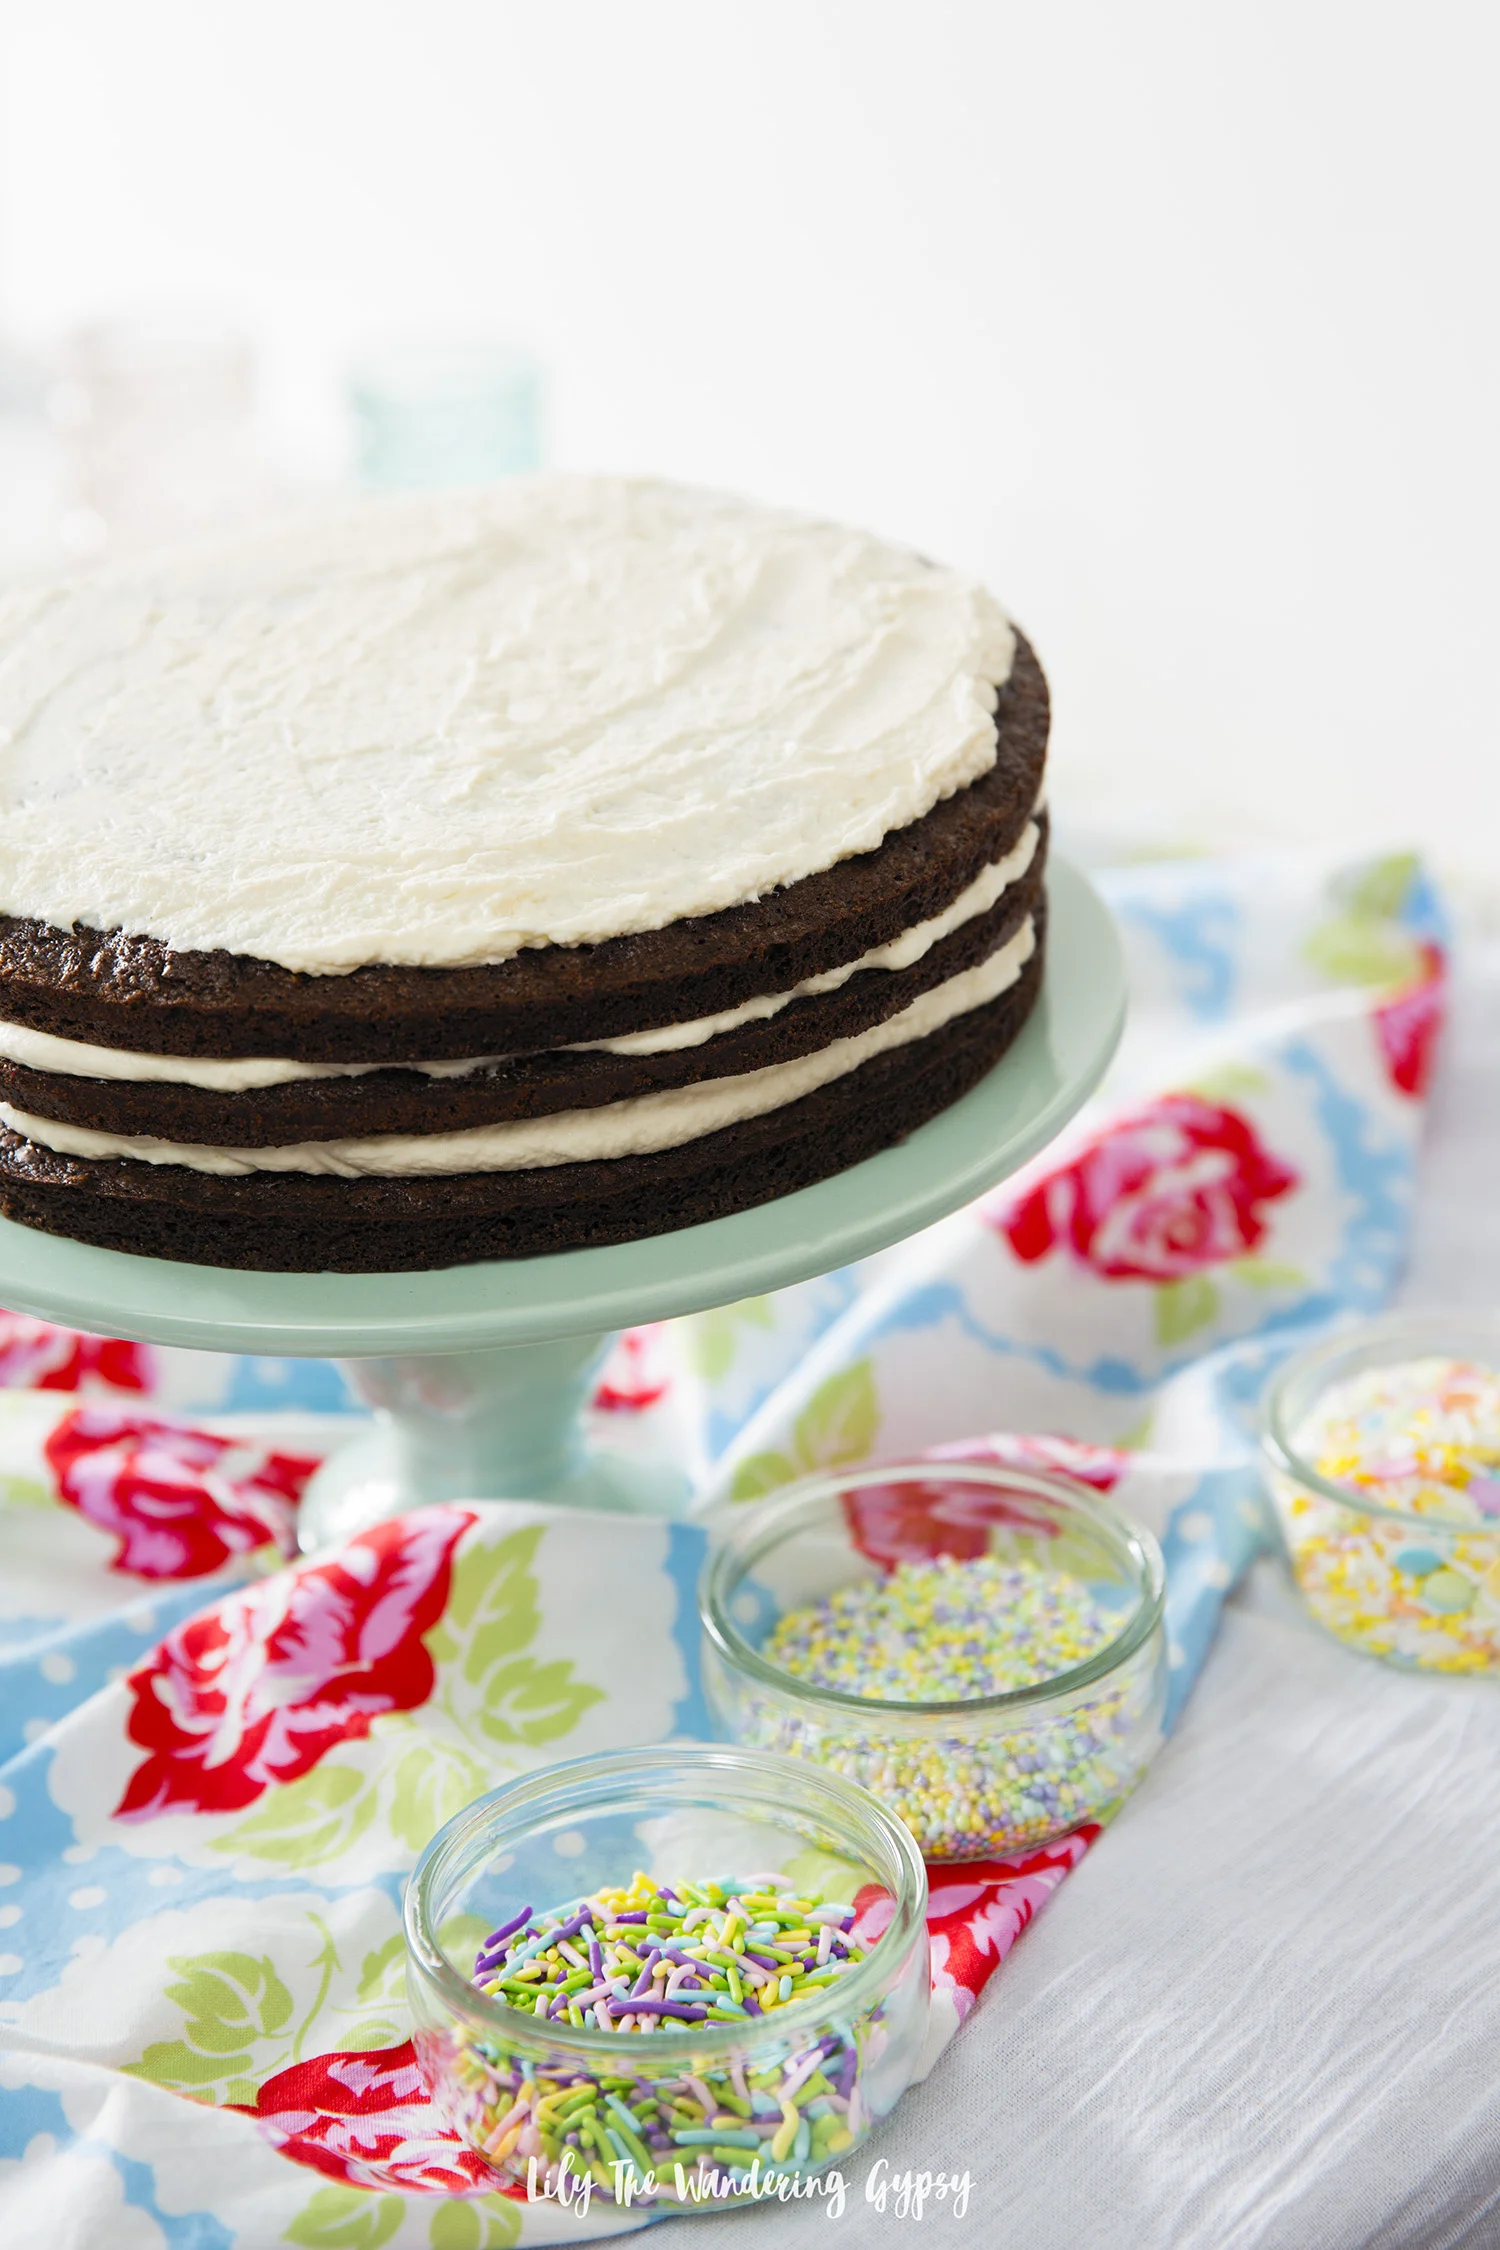
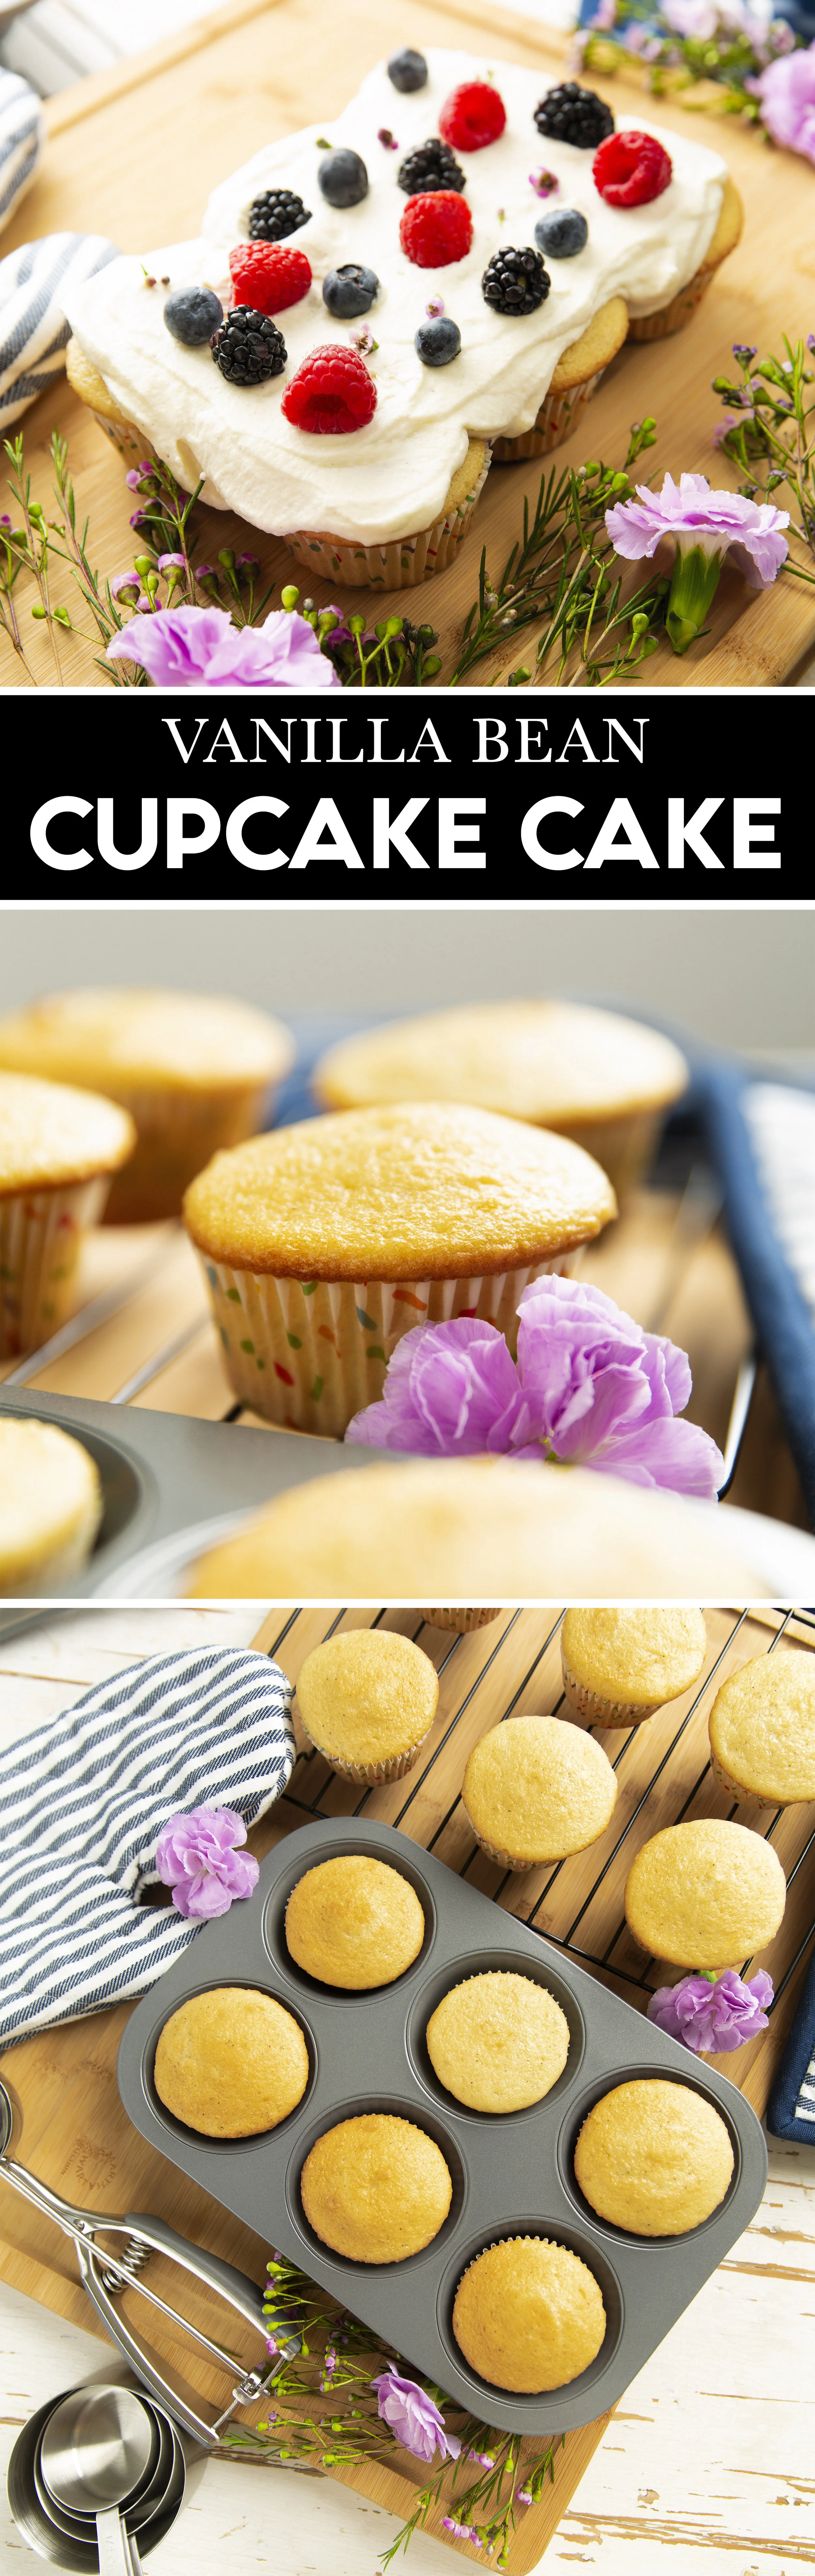
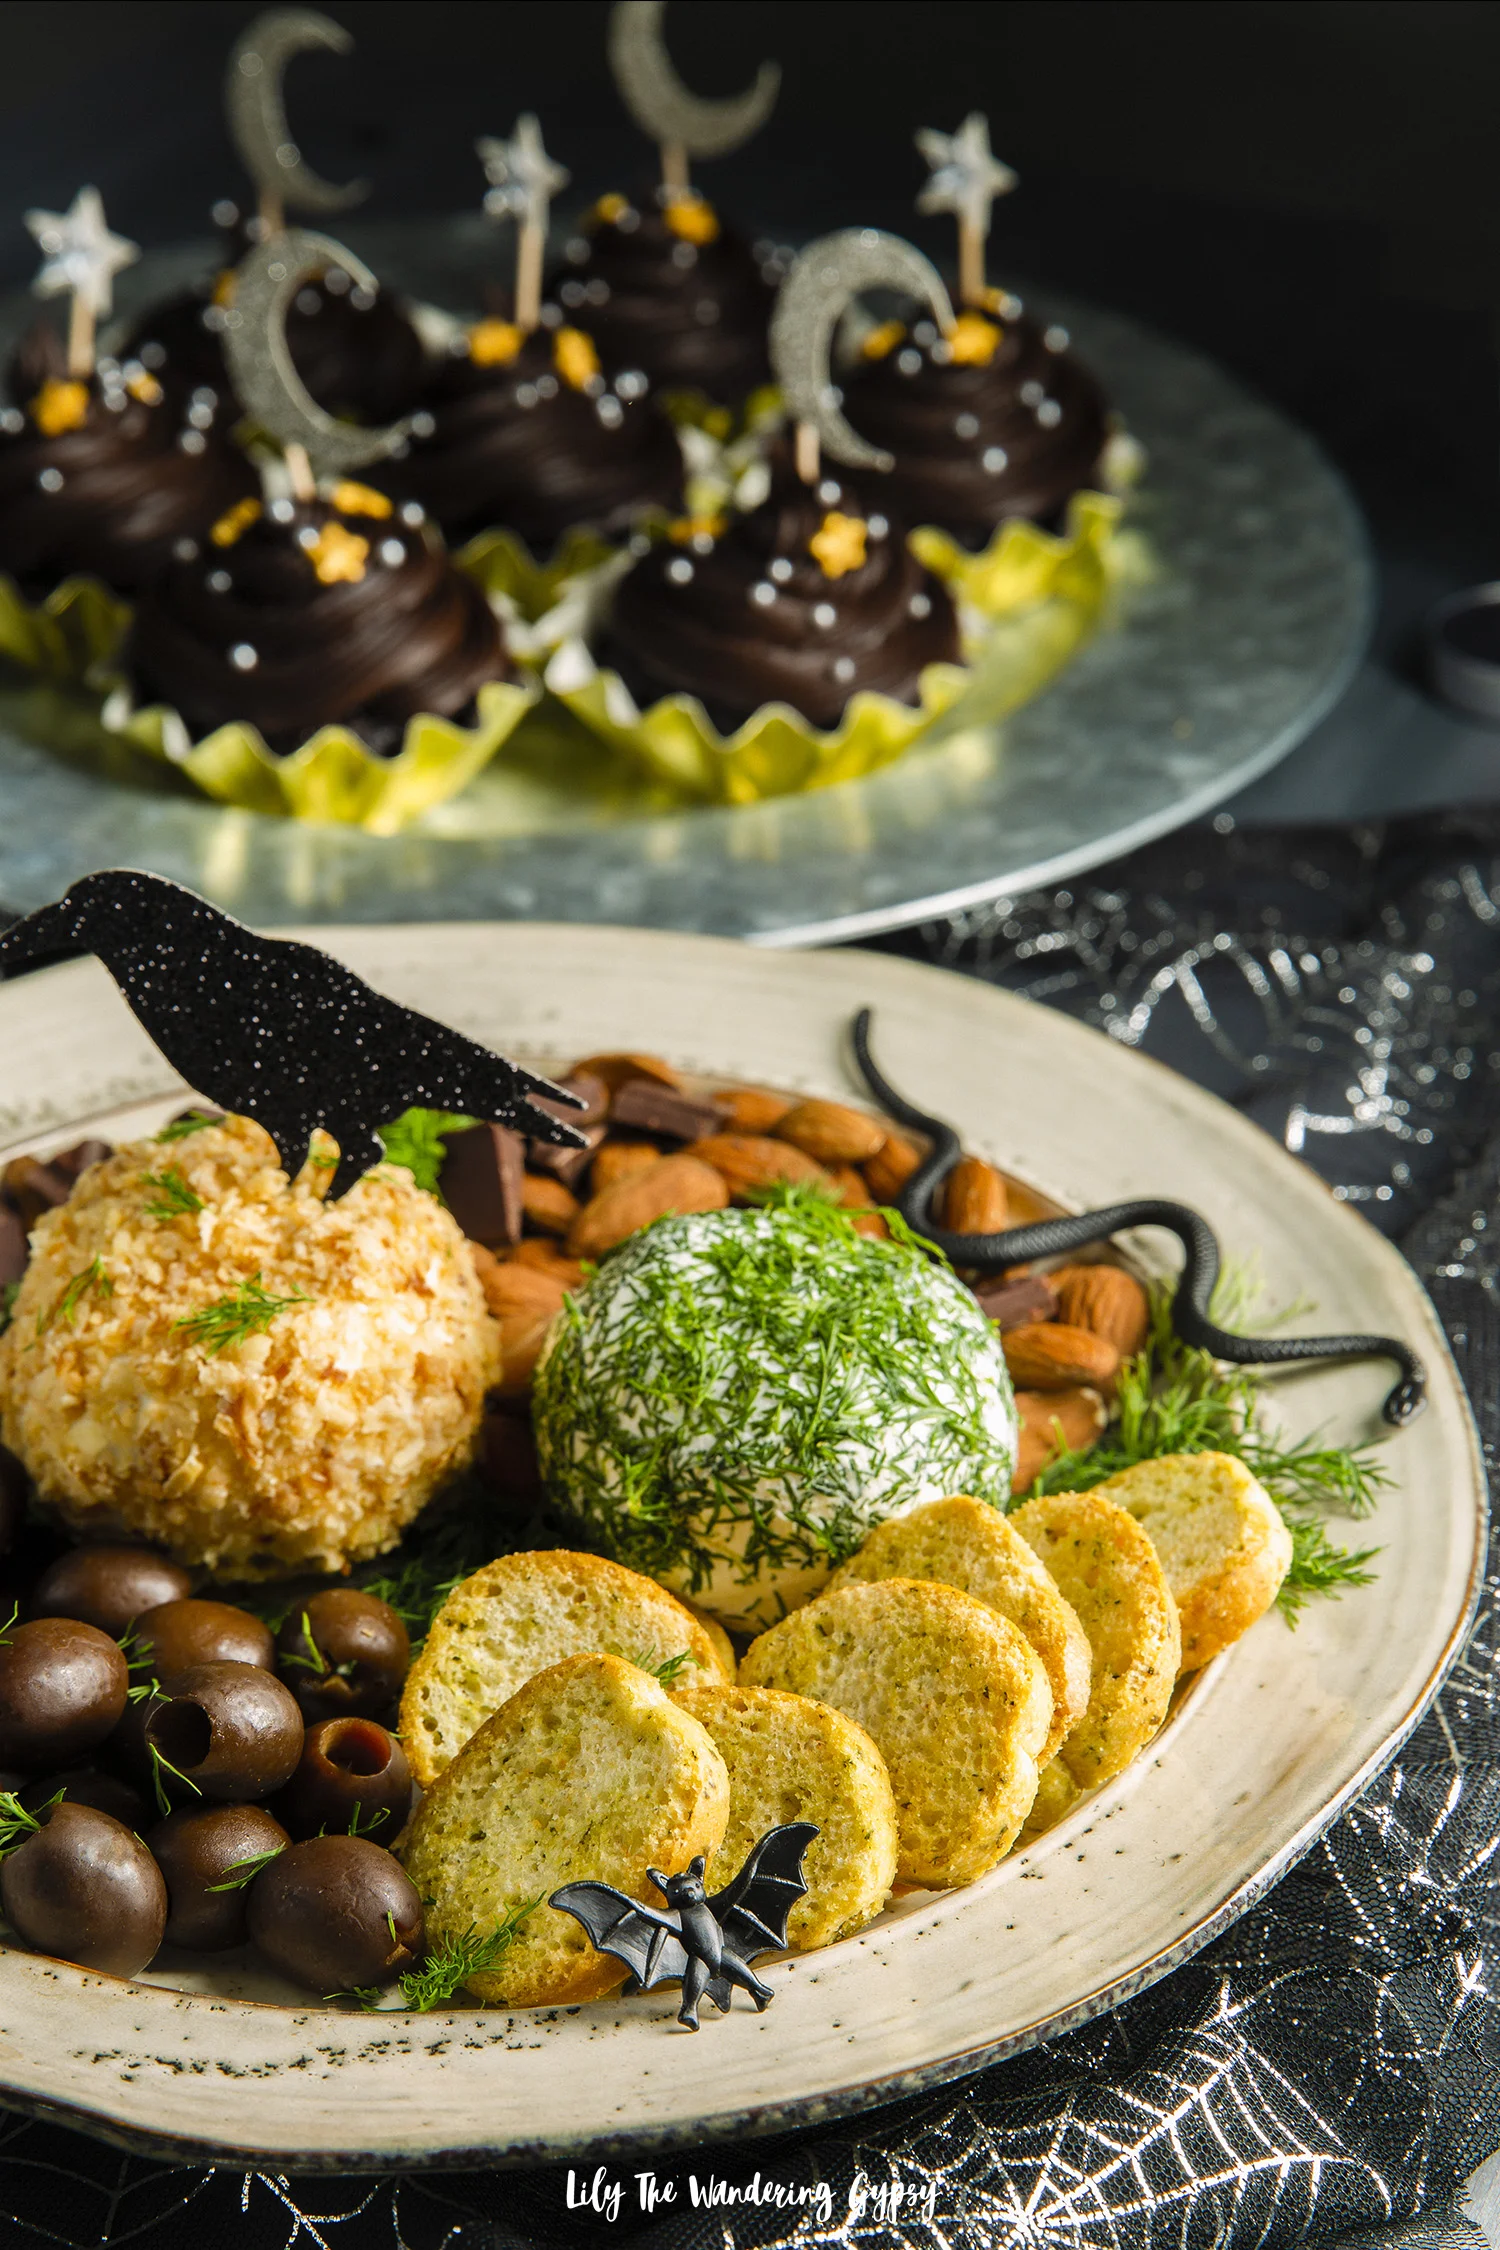
Throughout the research phase of this project, I also loved being able to dive deeper into learning about moon phases and astrology. I was inspired to create festive crescent moon cupcake toppers, which I think looked absolutely gorgeous! I used metallic, gold cupcake cups, dark chocolate cake mix, and dark chocolate frosting to make the darkest and most delicious Halloween cupcakes of the year!

TO MAKE THE CUPCAKE TOPPERS:

Supplies:

  • 1 sheet of silver glitter paper (found in the specialty scrapbooking paper aisle)

  • Toothpicks

  • 3D star stickers

  • Clear Tape

Instructions:

  1. Print out a crescent moon shape that is about 1.5” at the longest points.

  2. Cut out that shape and trace it onto the back of the glitter paper.

  3. Cut out crescent moon shapes, and glue or tape to a toothpick and insert into cupcakes!

  4. For the stars, I simply stuck the star stickers onto the toothpicks, and inserted them into the cupcakes. Such a simple and elegant way to dress up these dark cupcakes for Halloween!

Here are the 7 phases of the moon, according to 7 Moons Wine.


CRESCENT MOON PHASE


Open your eyes. It’s time to make your dream a reality.


QUARTER MOON PHASE


Trust your instincts. Make your move with confidence.


GIBBOUS MOON PHASE


Reflect on your journey. Learn from your winding path.


FULL MOON PHASE


Take stock of your accomplishments. Have pride in them too.


DISSEMINATING


Show gratitude. Don’t hold it back.


3RD QUARTER MOON PHASE


Let your worries go. Move forward without them.


BALSAMIC MOON PHASE


Pause. Rest. Close your eyes and find your next dream.

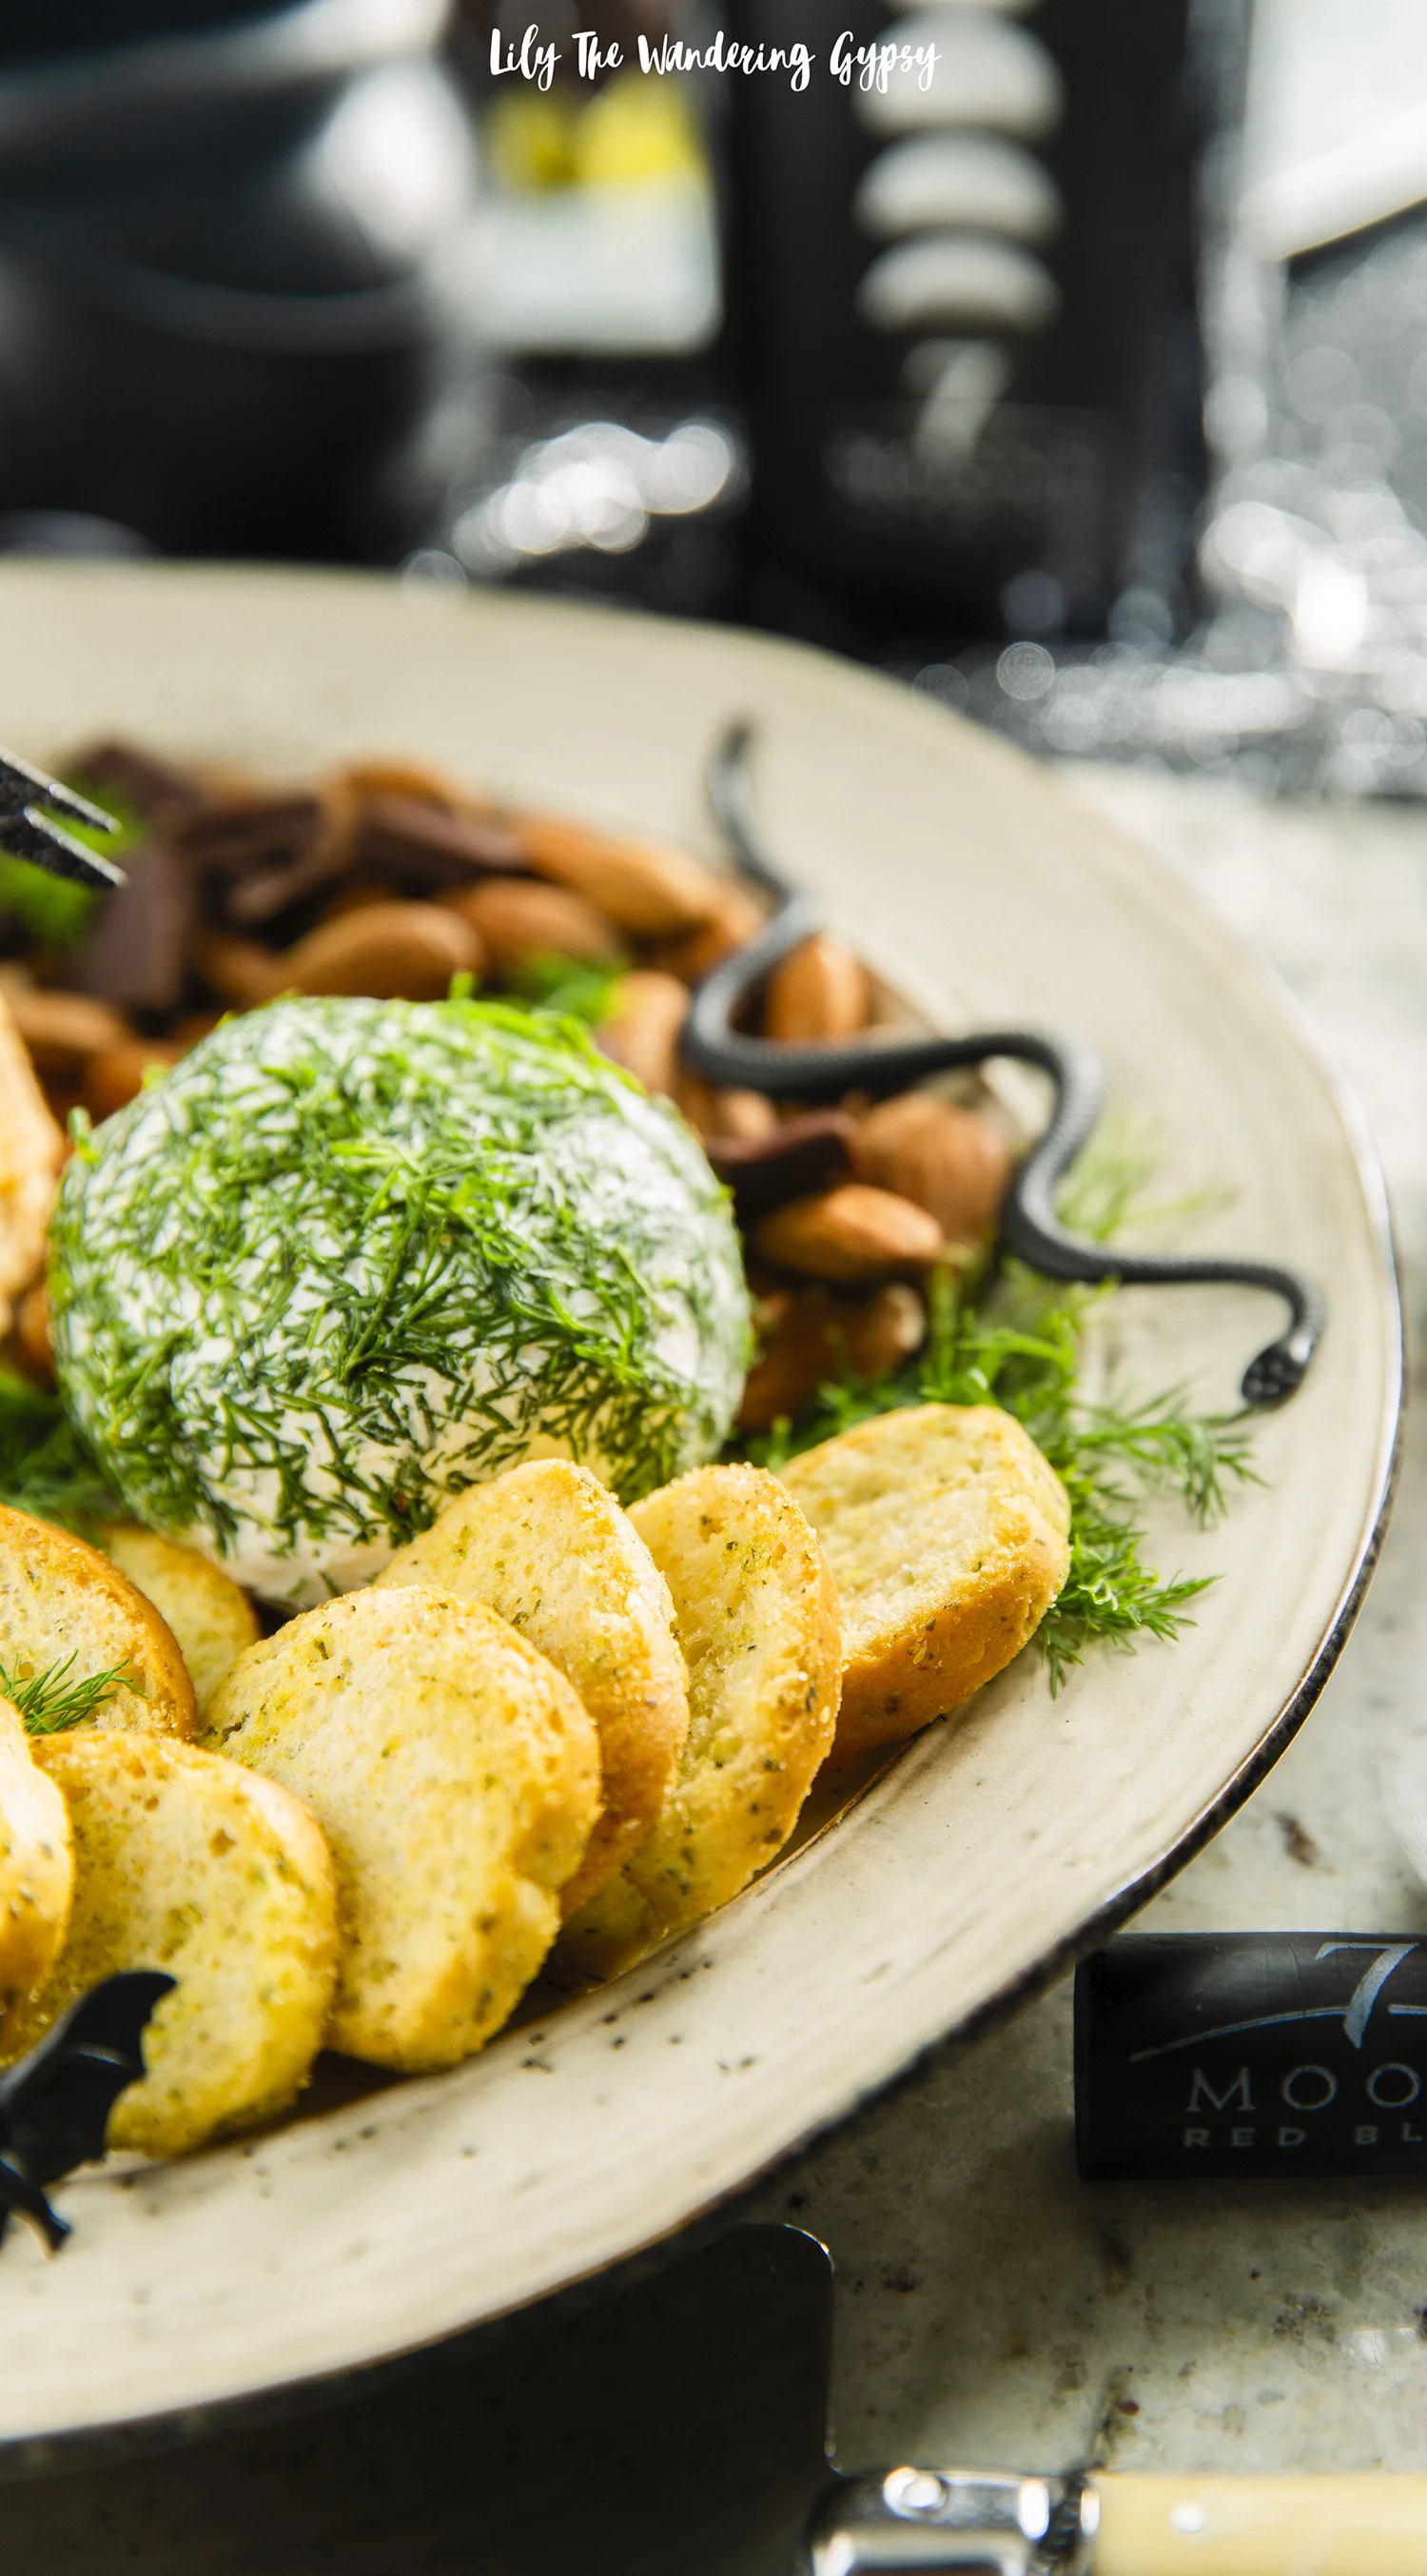
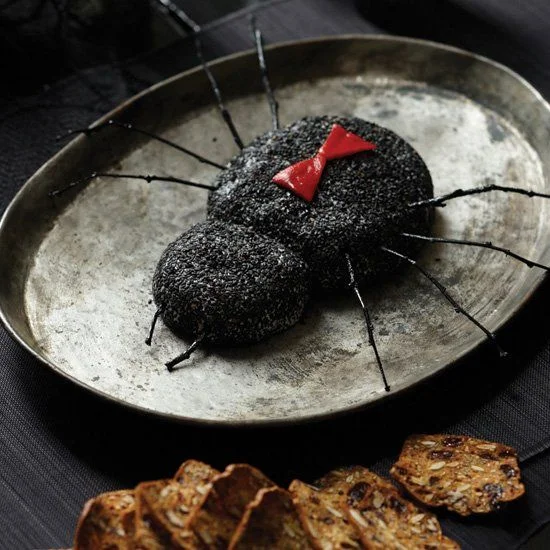
Since I love incorporating a bit of elegance into my Halloween décor, recipes, and celebrations, a Red Blend wine is actually perfect to pair with dark chocolate and a “creepy” Halloween cheese board with all natural ingredients. They all paired super well with the 7 Moons Red Blend wine. I looked up the best pairings when I was in my research phase, and both goat cheese and dark chocolate paired well, and that was my jumping off point. Above, the cheese board was created with a more rustic look - using fresh dill to look like moss! Some of the dill really resembled tufts of the green fuzzy plants you find on the forest floor. PLUS, I was extremely happy that the dill paired exceptionally well with the goat cheese.

The other goat cheese ball was rolled in crispy onions, which I just rough chopped. Three ingredients made for some really divine tasting cheese balls!

CREEPY CRAWLY CHEESE BALL

Ingredients:

8 oz. log of goat cheese or two 4 oz. pieces.

½ cup crispy onions

1 package of dill (.5 oz)

Almonds, dark chocolate pieces (60% cacao), black or green olives, and crackers or bruschettini style toasts to dip in goat cheese.

Creepy crawly plastic toys like snakes, bats, and spiders to add Halloween elements.  

Instructions:

  1. Cut goat cheese log in half, and roll both halves into balls. Set aside in fridge.

  2. Chop up a little over half of the dill (reserving prettiest pieces for mossy garnish). Place chopped dill into a small bowl.

  3. Chop up crispy onions, or place into a zip top bag and pour into a second small bowl.

  4. Roll one goat cheese ball in the dill and the other ball in the crispy onions, and place onto plate.

  5. To decorate plate, add bits of dill around cheese balls to resemble a natural setting.

  6. Place almonds, dark chocolate, and olives around plate, and then place/sprinkle tiny bits of dill “moss” tufts around plate for natural forest look.

  7. Embellish further with plastic snakes and other creepy crawly items. I also added a glittery black raven, which is a paper cutout I found at a craft store. Enjoy!

7 Moons Wine is an excellent choice for all of your holiday get togethers. I learned so much about the moon phases and explored making food look super elegant for Halloween. It’s been so much fun, and I hope you are also able to use this post as an inspiration for your next gatherings.

Relax and unwind this Halloween season and enjoy the finer things in life, perhaps under the moonlight!

Football Party Ideas + Updated Pigs In A Blanket Recipe

This shop has been compensated by Collective Bias, Inc. and its advertiser, Dr Pepper® and Eckrich®. All opinions are mine alone. #MyMeijerWin

Time to reinvent a classic, well-loved recipe that tastes better than ever! College football season it the perfect time to try out a few new recipes for guests, friends, and family alike! This grown up, more sophisticated version of Pigs In A Blanket will delight guests! Serve with ice cold Dr Pepper® for a pairing with Eckrich® Smoked Sausage, sure to be out of this world delicious! A true crowd-pleaser during your college football celebration - who will YOU be rooting for? 

Check out this mperks offer to save $1 on any TWO (2) Dr Pepper® 6pk 7.5oz cans or 8pk 12 oz bottles at Meijer (while supplies last).

I used one of my favorite ingredients, Eckrich® Smoked Sausage, to make this delicious creation, which would be AMAZING for your next game day or holiday celebration. People rave about these and always ask when I’ll be making more. Read on to learn more about my latest college football celebration, and get the details on how to make your next celebration a success. Our college's colors are maroon and white, so actually Dr Pepper is a fun choice to celebrate locally. PLUS, every single one of my friends is slightly obsessed with Dr Pepper, so offering this refreshment at any of my parties tends to go over well. The smoked sausage worked super well for this project too. 

I thought it was super clever to cut up the smoked sausages for this recipe, compared to using traditional small cocktail weenies. This made for a much better bite! ​

Whenever I begin to plan a design for a college football party, I immediately think of which vintage elements I want to incorporate. For some reason, I associate football with the nostalgia of times (and games) past, PLUS I believe that a vintage style theme and set of decorations will appeal to all age ranges, which I love. If someone who can have a sort of connection to my decor, whether they are actually attending my parties OR viewing the recaps on my blog, it means a lot to me.​

PRINT THE RECIPE:

RIGHT CLICK AND SAVE OR PRINT

GAME DAY PARTY DETAILS: 

To choose your colors, decide what color metallic you like best. I chose gold here, but silver or copper would be your other common choices. The gold accents really catch the light so well, and can make any party décor look more classy. These metallic gold, plastic utensils almost look real, and the gold shimmering tinsel (found in the gift wrap section at a craft store) really made things shimmer. I thought that the gold tinsel reminded me of pom poms!

Next, I used lots of rustic wooden surfaces, and one small vintage crate to get some of the items on the table up at eye level. I love setting up the food and drink table(s) with items being served at different heights. This adds SO much visual interest to the party offerings! This is such a better alternative than simply laying all the food on an uninviting table.Taking a few extra moments to consider the design of your food and refreshment table seems to at least make party setup more exciting on my side as well.

Let people serve themselves by offering Dr Pepper and other drinks in nice containers or a cooler, so you do not have to serve each guest individually. This gives you way more time to enjoy your company rather than stressing out by hosting so much. 

I incorporated football themed cups, plates, and napkins wherever I could! I loved this rather vintage look for the party, with rustic woods, plaid patterns, and even a vintage looking font for the Tailgates and Traditions can carrier, above. In addition to being a cute way to display Dr Pepper at your college football parties, this carrier (or some other fun 6 pack holder) would be perfect to tote your soft drinks to the game or to tailgate.

As soon as I begin to see football related party items in stores. I tend to pick them up. We celebrate all football season long, and so having a lot of different party items on hand makes life a little bit more fun, in my opinion! 

Do you tend to go all out when decorating for football parties / game days, or do you tend to scale things back a bit and just stick to the essentials? Either way, offering guests Dr Pepper and these updated Pigs In A Blanket will make your next get together a win!

I offered guests three different flavors of mustard to compliment the Pigs In A Blanket - I used a traditional yellow one, a creamy dijon, and a stone ground. But, whatever you have will likely work! Just serve the mustards in small glass bowls or anything that spruces up the presentation, and you're set. I definitely consider that a #MyMeijerWin

If I am having a party, I tend to offer lots of dips, making each meal a little bit more unique and delicious. Above, you will see three different mustards that I shared. Simply use whatever you already have in your home, or head to Meijer and take a few minutes to see just how many varieties of mustard there are. I chose a yellow, a stone ground, then a creamy stone ground variety. Whatever mustard(s) you choose, they will pair super well with these Pigs In A Blanket! YUM!!! This celebration and these recipes turned out SO well, and I cannot wait for you to try something this delicious. Enjoy!! 

PIN THIS POST FOR LATER:

Veggie Lovers’ Club Sandwich Recipe with Pepperidge Farm

This post has been sponsored by Pepperidge Farm®, all thoughts and opinions are my own.

If you’re wanting to find more ways to connect with family or friends, I often find that food brings people together better than nearly anything else. I recently created the most delicious Veggie Lovers’ Club Sandwich with Pepperidge Farm Farmhouse® Butter Bread, and it’s quickly becoming my go-to bread for sandwiches, breakfast recipes, and even making toast, which I love so dearly.

This sandwich contains ingredients in all sorts of colors; I just love to eat as many different colored veggies as possible each day. I hope you enjoy!

I find that sandwiches with fresh and delicious ingredients that can be made ahead of time really helps save time and brings families closer together. I absolutely love providing my friends and family with fresh, nourishing meals that in turn give them energy and encouragement to inspire wonderful days ahead. Whether you’re making this Club Sandwich for two or you’re making brunch for a whole house full of family and guests, I would definitely recommend the thick, rich, buttery taste of this awesome, slow baked Butter Bread – you’re going to love its fresh-from-the-oven taste!

When I visit the bread aisle at the grocery store, I see SO many choices for white bread. But even with all of those choices, few actually compare to this Butter Bread. I love how thick the slices are. Since I am already a huge fan of anything from Pepperidge Farm and I saw that this new flavor was available at a wide range of stores, I was instantly relieved to finally find a white bread with thicker slices and a bit of a buttery taste! YUM!

My boyfriend always jokes that any product that has butter in the name, I will love. Well, he is completely correct about that – I was seriously SO excited when I found out that one of my recipes contained butter bread, I nearly jumped for joy. That’s how much I love butter!

Find new Pepperidge Farm Farmhouse® Butter Bread at retailers like Target and Kroger here! This product may quickly become your FAVORITE new bread for every recipe you can imagine.

This Veggie Lovers’ Club Sandwich is such a fun way to spend more time together and also experience new and different ingredients and flavors – which is a super fun way to bond with those you love. Find joy in the simple flavors of these all-natural sandwich toppings!

INGREDIENTS (MAKES 2 SANDWICHES)

FOR THE SANDWICH:

6 slices of Pepperidge Farm Butter Bread

8 spinach leaves

10 slices of English cucumber

½ - 1 Cup sprouts (any flavor you like)

Toaster for bread

Food processor for beet spread

FOR THE BEET SPREAD:

1 package of pre-cooked beets or 1 can of beets (remove any liquid)

2-3 tsp olive oil

3 tsp balsamic vinaigrette

½ tsp salt

1 tsp Italian seasoning

(topped with chives – optional)

FOR THE GREEN GODDESS SANDWICH SPREAD:

¼ C. Greek yogurt (use non-dairy alternative for vegan)

1/8 C. mayo (use non-dairy alternative for vegan)

¼ C. finely chopped chives

2-3 Tbsp freshly chopped tarragon

1-2 tsp salt

1 tsp garlic powder

INSTRUCTIONS:

1.) Make Beet Sauce by putting all ingredients into food processor or blender, and pureeing until smooth. Add more salt if desired.

2.) Make Green Goddess Sandwich Spread by mixing all ingredients in a small bowl with a spoon until well combined. Feel free to add more salt, garlic powder, or any other seasonings you enjoy.

3.) Toast 6 slices of Butter Bread and get ready to make the Club Sandwich.

4.) To construct each sandwich – add Beet Spread on one slice of bread, then top with sprouts. On another slice of bread, add Green Goddess Spread and 5 slices of cucumbers (and a bit of salt on top of cucumbers if desired). One piece of bread will remain without any toppings.

5.) Lastly, layer the pieces like this – Beet Spread + Sprout slice, topped by the Green Goddess and Cucumber slice, then the final top slice of bread, and cut in half to serve! The beautiful layers of bread and ingredients are just so colorful and delicious. This toast also held up very well with all of these ingredients!

I hope you enjoy this vegetarian recipe with those you love! Good food brings people together, and that time with loved ones is what keeps me happy every day! Please let me know if you wind up making this recipe!

Elegant Halloween Party Inspirations

As the weather gets chilly and as we head into the last weekend in September, I am already in Halloween mode! I am doing some research for an upcoming project, and wanted to share my inspirations for an Upscale Halloween Party - decor and tablescapes. I have rounded up some of my FAVORITE and most inspiring Halloween Tablescapes! I generally do tons and tons of hours of research for every project, and realized that I should be sharing some of my inspirations!

First, I am featuring my favorite Halloween project of last year, this super easy to make Halloween Ghost Cake! I used a store-bought sour cream pound cake, iced it, and added Ghost Peeps! It turned out SO well and can be made in under an hour.

Below, this Halloween Mantle incorporates black and gold, and black creepy cloth to really add lots of great texture!

This Halloween Spider Cheese Ball would be amazing to serve with rustic crackers!

As always, Inspired By Charm brings the BEST Halloween decor to life!

Below, Coco Kelly put together this Sirens and Songs Halloween party that featured a bedazzled skull with nods to mermaids and those lost at sea…spooky!

Below, Williams Sanoma offers tips on styling this dark and elegant tablescape for Halloween.

Visit Tendir.com for TONS more inspirations!

Below, I am super inspired by crystals for party decor, and who knows, they might bring some good energy!

Below, in2food uses their famous mirror glaze and topped the cake with an edible gold skull, coconut pieces as geodes, and also a 3D spiderweb! How stunning!

Below, a gorgeous cake by CocoKelley, an all white Halloween Coconut Layer Cake.

And, below are a few more crystals for inspiration! Enjoy :)

Rustic Apple Pie Pizza Recipe + Why I love Fall Baking

This is a sponsored post written by me on behalf of Oregon Chai®. The opinions and text are all mine. #OregonChaiMeTime 

Wow! Have I got an incredible recipe for you today. It embodies the fall spirit, and includes a dessert “pizza!” This delicious and unique recipe is rustic, sweet, and crunchy; an amazing pairing with a nice, warm Oregon Chai® Tea Latte! Make this amazing dessert for your next gathering, dinner with friends and family, or even for a potluck. This dessert will vanish before you know it.

To me, baking is one of the best ways to spend “me time.” I tend to find myself baking the most once the weather cools down, when I have a bit of free time, or even when too many days have passed since I created something delicious.  Any day that includes chai tea and some me time is a GOOD DAY!

I wasn’t always able to bake freely though. Before we got our new furnace this summer, the house would get WAY too hot (83 degrees +) when I turned on the oven, and so it was nearly impossible to justify baking when the house would not cool down from it. I made so many no-bake meals, or even used our awesome toaster oven to try to make complete meals, small casseroles, and even side dishes – baking cookies, pies, or brownies really doesn’t go well in the toaster oven.

I didn’t even realize how strong of a connection I had to baking, until I had limited use of the oven, and realized how sad I was when I looked through Pinterest and saw all of those recipes that I could not even attempt. I now bake every few days (or more) and I am so happy about how cool our house stays finally. Thank goodness for good air conditioning, LOL!

I also tend to LOVE sweet desserts and dishes, so this one is just perfect for me. If you like desserts that are on the more savory or less sweet side of life, then you can majorly reduce the amount of sugar I have suggested. Either way, you’re going to love this apple pie pizza.

Pizza is such a familiar comfort food, and when I had a slice of this Apple Pie Pizza, it took me back to eating some of the best thin crust pizza ever, combined with one of my favorite fall desserts ever.

Since we are surrounded by apple orchards here in southern Illinois, using apples in my recipe came as a very natural solution to eating more local ingredients!

This rustic recipe is crunchy around the edges from this crispy crunchy dough, sweet, tart from the apples, buttery from the dough, and the egg wash and cinnamon sugar topping makes the most excellent crunch when you bite into it.

Perfect for enjoying on a chilly fall day or evening! I was extremely happy with how this recipe turned out, and I know you will be too. I used an organic pie crust from the store, and it held the shape of the lattice just perfectly.

By cutting the lattice into smaller, ½” strips, I was able to make a very intricate pattern on top of this Apple Pie Pizza. Feel free to also cut the strips into 1” pieces to make life much easier! The ½” strips were not incredibly hard to work with, just a little more time consuming. But, patience always pays off when you’re baking.

RECIPE

INGREDIENTS:

1 package refrigerated pie crust (2 per package)

2 apples, I used green apples

4-5 Tbsp.  sugar

1 tsp. cinnamon

1/8 tsp. nutmeg

1 egg, whisked for egg wash

4-6 Tbsp. water in a small bowl to use to attach pie dough together

Round or Rectangular baking sheet

Parchment paper

Oregon Chai Tea Latte Concentrate to enjoy while baking!


INSTRUCTIONS:

1.) Chop 2 apples into tiny pieces and coat with 1 ½ - 2 Tbsp. sugar, ½ tsp. cinnamon, and 1/8 tsp. nutmeg.

2.) Unroll both pie crusts onto a work surface covered in parchment paper. Optional: use a rolling pin to smooth out any creases.

3.) Use a ruler to mark every ½” or 1” on one pie crust. Also, use the ruler and a sharp knife to impress even lines and cut strips from the pie crust. Set aside.

4.) Spread an even layer of apples onto the other pie crust.

5.) Weave dough strips over apples, first laying half of the strips vertically, then weaving the horizontal pieces in next. Feel free to use a little bit of water in each place where the dough strips overlap. Brush top crust with egg wash.

6.) Once done weaving, sprinkle on a mixture of 2 Tbsp. sugar + ½ tsp cinnamon, and bake for 15-20 minutes at 375 degrees F. Slice like a pizza and enjoy! We cut the finished Apple Pie Pizza with a sharp knife, but you could also use a pizza cutter!

Make sure to also grab your Ibotta offer here for 75 cents off any 1 Oregon Chai product at Walmart (9/26/18 – 11/30/18, or until supplies last).

Stock up now! This tea is so delicious you will want to incorporate it into your every day routines and serve it to anyone who visits you.

I was able to easily order the Oregon Chai Tea Latte Concentrate (32 oz.) on Walmart.com using their super easy Online Grocery Pickup service!

Below, you will see how easy it was to search for all of the available Oregon Chai products at Walmart. I spent around $12 to create this entire recipe, and since the Chai Tea was under $4.00 I saved SO much compared to going to a coffee shop for an overpriced drink.

After I went to the checkout page, I simply chose “Pickup” for FREE (see below)! No shipping charges at all, which saved me around $6.00. YAY!! I love a good deal.

The taste of this Oregon Chai Tea was rich, smooth, and has those amazing chai spices that I can’t get enough of. I like to add macadamia milk to my chai tea, instead of traditional dairy milk, and my body loves me for it! What a delicious way to get a little pick-me-up during baking or during any other time of the day.

Once my order was ready, I was able to run by my local Walmart and easily grab the tea in the pickup area. Super easy since I had so many errands to run that day.

Has your local Walmart installed an Online Grocery Pickup station yet? Ours JUST remodeled, and I had an extremely easy experience, let me walk you through it/ 

1.) Visit the Walmart Online Grocery Pickup station and scan the barcode given in your email.

You can also just wait outside and call the phone number on the pickup area. They will bring everything right out to you!

Like I said, baking helps me de-stress and helps me continue to be creative, so after getting a ton of things checked off the to-do list, I relaxed for a bit, then got to baking.

I hope you have an absolutely splendid fall, and please comment below to let me know if you tried making this recipe! This would be so fun with kids, and would be a fun holiday baking activity. Enjoy!

Easy Caramel Brownie Layer Cake

If you are a fan of layers upon layers of chocolate brownies, homemade whipped cream, and caramel, then this is definitely the cake for you! Although it looks so elegant, it really is pretty easy. This dessert allows us to think beyond the traditional chocolate cake, and make your next dessert rich, decadent, and delicious! When I made this dessert for a potluck, people raved about it. It was so delicious once the whipped cream layers sat with the brownie layers, because the sides stay a bit crunchy, and the inside portion of the cake moisten up and form more of a fudgy and cake-like consistency all at the same time, that’s out of this world! Hope you enjoy.

INGREDIENTS:

*Note - Amazon Affiliate Links have been provided if available

For The Whipped Cream:

For The Brownies:

  • 2 boxes of brownie mix (I used Ghirardelli caramel turtle brownie mix, and instead of mixing the caramel into the brownies to bake, I decorated the top pf the cake with it!)

  • Brownie ingredients (eggs, oil, and water)

  • 3 round baking sheets - I found mine for about $1 each at Walmart!

  • Caramel Sauce if not included in Brownie boxes you use.

INSTRUCTIONS:

1.) Preheat oven to 375 degrees. On parchment paper, trace your circular baking dish three times. Cut those three paper circles out and set aside. Spray three circular baking pans with Pam, then place the circular paper pieces into the baking pans and spray a little bit more to coat paper.

2.) Mix up 2 boxes of your favorite brownie mix and pour into three prepared circular baking pans. Bake the three circle pans for 15-20 minutes, check to see if they are done by inserting a toothpick to see if they are done.

3.) To make your homemade whipped cream, in a stand mixer, add 1 pint of heavy whipping cream + 1/3-1/2 C. sugar + 1-2tsp vanilla. I also love using vanilla bean powder to add little black flecks and more vanilla flavor to my whipped cream. Whip for 2-4 minutes on high, until stiff peaks form. Just keep mixing, it may seem like an eternity, but is so worth it! Do not over beat the cream, or it will begin to resemble butter, and not be very fluffy.

4.) Now, it’s time to “layer up”! I have shown all of my layering steps below, so you basically layer up: brownies and whipped cream until you get to the top layer. Make sure to make the top layer of whipped cream as smooth as possible. But, no need to stress about being perfect - this cake is a naked cake and is pretty rustic anyway, so the more homemade it looks, the better!

5.) To decorate the top: I used caramel sauce in a squeeze tube that worked perfectly to decorate. I basically just made a continuous line of caramel vertically across the entire cake, then crossed that again with caramel lines horizontally. I rotated the cake as I worked, which was great. Add sprinkles and enjoy!

THIS CAKE ROCKS! HOPE YOU ENJOY!

If you wind up making this recipe or any other recipes, please tag me on Instagram with @happysolez! Thanks!!

2 Ingredient Fall Apple Dip Recipe

Yum! Fall is right around the corner and I have an amazing recipe for you! Everyone loves this amazing dessert, and I know you will too. My al time favorite Fall flavor would have to be caramel apple. The mix of those sweet tart green apples meld so perfectly with the salted caramel sauce and the tangy bite of the cream cheese adds an upscale flavor to this dish, which I hope you enjoy!

INGREDIENTS:

1 (8 oz.) Block of Cream Cheese

1/3 - 1/2 of a jar of salted caramel sauce (we love the Smucker's Simple Delight Salted Caramel)

2-3 apples, sliced (we used green and red, any flavor will do!)

INSTRUCTIONS:

1.) Open the block of cream cheese, and place it onto a plate, and pour LOTS of caramel over the top of the cream cheese.

2.) Chop apples and place beside dip. Enjoy!

Pull Apart Cupcake Cake Recipe

This recipe is PERFECT for parties and holidays, because it's easy to eat! Everyone has their own individual cupcake to share the joy, no need to cut THIS cake. 

We were ecstatic when we learned that we had the opportunity to collaborate with Martha Stewart to promote her baking items at Macy's. It's quite the honor, and several times throughout this process I exclaimed, "I am shooting recipes for Martha Stewart"!!! 

In order to creatively incorporate her Essentials collection into pins that would encourage people to want to learn more, I thought that a sweet treat would obviously be perfect, so I found a fun recipe on marthastewart.com and creates it! Below, you will find that very recipe, and I hope you are inspired by this fun post to make your very own cupcake cake!

MARTHA STEWART RECIPE (originally found here):

Pull-Apart Vanilla-Wafer Cupcake Cake with Berries

Talk about a fun dessert! It looks like a sheet cake on top, but there are actually vanilla-coconut cupcakes underneath the fresh berries and fluffy whipped-cream frosting. It's easy to make and even easier to serve -- no slicing required.

Source: Martha Stewart Living, May 2018

INGREDIENTS

  • 45 vanilla-wafer cookies, pulsed in a food processor until finely ground (1 1/2 cups)
  • 1/2 cup unbleached all-purpose flour
  • 1 teaspoon baking powder
  • 1/4 teaspoon kosher salt
  • 1 stick unsalted butter, softened
  • 3/4 cup granulated sugar
  • 2 large eggs, room temperature
  • 3/4 cup whole milk
  • 1 cup sweetened shredded coconut
  • 1 teaspoon unflavored gelatin
  • 1 cup cold heavy cream
  • 2 tablespoons confectioners' sugar
  • 1/4 teaspoon pure vanilla extract
  • 1 1/2 cups mixed fresh berries, such as blueberries, raspberries, and blackberries

DIRECTIONS

  1. 1. Preheat oven to 350 degrees. Line a standard muffin tin with paper liners. Whisk together cookie crumbs, flour, baking powder, and salt.

  2. 2. Beat butter with granulated sugar on medium speed until pale and fluffy, about 1 minute. Beat in eggs, one at a time. Reduce speed to low and add flour mixture in 3 batches, alternating with milk, beginning and ending with flour mixture and beating until combined after each addition. Fold in coconut.

  3. 3. Divide batter among cups. Bake until cupcakes are golden brown and centers bounce back when gently pressed, 22 to 24 minutes. Let cool completely in tin on a wire rack.

  4. 4. Add 2 tablespoons water to a small saucepan. Sprinkle with gelatin; let stand until thick, about 5 minutes. Gently heat over medium until gelatin has dissolved. Remove from heat; let cool 5 minutes (but don't let it set).

  5. 5. Beat together cream, confectioners' sugar, and vanilla on medium speed until very soft peaks form, 1 to 2 minutes. Add gelatin mixture; beat on medium until stiff peaks form, about 1 minute more.

  6. 6. Remove cupcakes from tin and arrange on a platter in a three-by-four rectangle. Spoon frosting over each row of cupcakes; using an offset spatula, smooth to cover tops, forming a rectangular shape. Refrigerate at least 1 hour and up to 3 hours. Sprinkle with berries before serving.

‘Make Every Cup Count’ with Laughing Man® Coffee from Target

This post is sponsored by Laughing Man® Coffee but the content and opinions expressed here are my own.This post is sponsored by Laughing Man® Coffee but the content and opinions expressed here are my own. #LaughingManCoffee #MakeEveryCupCount #Target

Sometimes I notice, that at the tail end of any season (the end of summer, for example), I sometimes get into a little slump. As a blogger, we are always having to think a month or more in advance for projects, and while it’s always fun to think about the new season ahead, I do sometimes need a little boost of caffeine in the mornings to get me through it and to stay motivated! A cute coffee cup never hurts, either! ‘Make Every Cup Count,’ friends – the motivating power of coffee is really amazing.

I recently tried delicious offerings from Laughing Man® Coffee, which I found at my local Target, and also on Target.com. I really, truly enjoyed this coffee! Bobby tends to prefer his coffee more black than I do, and wow, that fresh coffee aroma was absolutely intoxicating! We drink coffee almost every day, sometimes multiple times a day – who’s with me?! The flavors we loved most include the Columbia Huila and Hugh’s Blend. Have you ever tried this brand before?

Laughing Man® Coffee was actually co-founded by Hugh Jackman after an inspiring visit to Ethiopia, where he met a young farmer named Dukale. Inspired by Dukale’s optimism and determination, Hugh was committed to helping improve the lives of coffee farmers and share their Fair Trade Certified™ coffees with the world.

Since its inception, Laughing Man® Coffee has always strived to ‘Make Every Cup Count’ by donating a portion of proceeds from each purchase to the Laughing Man® Foundation, which supports coffee farming communities and programs that clear the way to health, growth and success for coffee farmers and their families. In addition to being available in recyclable K-Cup® pods, consumers can now purchase the brand in ground bagged coffee.

It’s important to have something to keep you fresh and alert, especially when a lot of my projects seem to be due all at the same time. That encourages me to try to burn the candle at both ends, and while I’d love to take a midafternoon (or admittedly a mid-morning nap), I know that’s just not always possible. If I have a warm cup of java nearby, then I can actually get through those rough work days.

LEARN MORE ABOUT THE COFFEE FEATURED HERE:

Colombia Huila – A dark roast coffee of uncommon complexity, Colombia Huila is produced from beans of great character, resulting in an intense, deep-roasted flavor with a black cherry sweetness, and a dark chocolate finish.

Hugh’s Blend™ – With contrasting, yet complementary notes of tart green apple and toasted graham cracker, this smooth and balanced blend represents the cheerful embodiment of the Laughing Man® coffee mission and a reminder that true fellowship knows no borders.

Both available in recyclable K-Cup® pods and bagged from Target.

I also like to enjoy a cup of coffee on the weekends – after all, a blogger’s job is never really done after Friday at 5pm, it’s a constant and very fulfilling job and I do love it!

What sorts of ways do you try to prep for the seasons ahead? I am finishing up lots of late summer and back to school projects, but soon enough, Fall and Winter projects will be in the works.

Whether you’re a blogger or not, I am sure we all feel the motivation to look ahead. It’s sometimes hard to create Fall projects when it’s still warm out, but I love having a delicious cup of coffee nearby, so I can get that extra boost of motivation!

Learn more about these amazing coffees here! Thanks for stopping by, friends!

Fresh Vegan Mushroom Tacos Recipe (Awesome in Cast Iron)

If you're looking for a new way to incorporate those fresh, local, Farmer's Market ingredients into a recipe, here's a good one! These Vegan Mushroom, Onion, and Pepper Tacos are super delicious and you definitely won't even miss the meat! 

Even more special, is the fact that we got to create this recipe for Martha Stewart Essentials available at Macy's. It's been SUCH an honor creating a set of four recipes for Martha! It's definitely a food blogger's dream :)

Keep reading to get the full details on this delicious, vegan recipe (but, feel free to add some cheese or sour cream if you like!!).

We found all of the fresh ingredients at our local Farmer's Market here in Carbondale, IL.

As soon as I learned about this amazing opportunity, I went searching through all of the items and decided upon four very delicious recipes, which I will link you to as soon as they are live! 

I was encouraged to use recipes right from MarthaStewart.com, so I used her basic recipes, then embellished and modernized them to make them extremely appealing for my Pinterest fans. Well, everyone has loved them so far, and now all of the cast iron skillets are SOLD OUT on the MAcy's website! Perhaps my recipes helped, but the fact that they were each around $15.00 might also be the reason these have all sold out. Nonetheless, find your favorite cast iron or other skillet, and let's get started!

Ingredients / Materials: 

- 1-2 lb. Fresh Mushrooms 

- 1 red onion

- 1 medium bell pepper (we used several small ones)

- 2 Tbsp. or more Mexican Seasoning

- 1/2 bunch of cilantro

- Small Flour Tortillas

- Martha Stewart Cast Iron Skillet 

Instructions:

1. Prepare and chop mushrooms, red onions, and bell peppers. 

2. Heat olive oil in a Cast Iron Skillet, add chopped onions, then belle peppers, then lastly, mushrooms.

3.) Season veggies generously with Mexican seasoning, a tiny bit of salt, and any other seasoning you would like. Also, add chopped cilantro at the end and stir everything one last time. 

4.) Warm tortillas, then add the veggie filling, and enjoy! They're so delicious, I hope you love them! 

FLYWAY FAMILY FARM MUSHROOMS (MAKANDA, IL)

As I mentioned, I got to use local ingredients from our Farmer's Market! We loved finally being able to utilize three different varieties of mushrooms from Flyway Family Farm. They have different mushrooms at the market almost every weekend!

Also, I used the red onions and colorful bell peppers from Country Sprout Organics, my other favorite booth at our local market! 

Hopefully, you have enjoyed this recipe! Stay tuned for several more recipes inspired by Martha Stewart! 

Our Montana Road Trip with Expedia Add-On Advantage

Thank you Expedia for sponsoring this post. Book your travel on Expedia.com to save with the Add-On Advantage!

We just got back home from an amazing adventure out west in Montana! We have a soft spot in our hearts for Montana and cannot seem to stay away! Travel fuels our creativity, inspires our work, and helps us bond in ways words cannot describe!

We love driving around the mountains and small towns of Montana, and renting a car from the new Expedia Advantage Add-On program is an excellent choice for a fun road trip like this, through southwestern Montana! 

When you book a flight, you can get awesome deals on add-ons like car rentals and hotels. Keep reading to learn more about their awesome deals AND see lots of photos from our recent vacation out west!

Downtown Virginia City, MT.

Montana is a magical place. "Keep Montana Majestic" is a fitting slogan I thought of as we were leaving this time, because it's such a gorgeous and majestic place that has only 1 million residents - one . We spent a lot of time in southwestern Montana this past month, visiting the areas around Yellowstone including Big Sky, Bozeman, Hebgen Lake, and Ennis, MT. We also spent time in the Missoula area for an awesome rafting trip on the Clark Fork River Gorge. Keep reading to learn more about some of our favorite places in Montana and get insights on these awesome travel deals.

BOOK A FLIGHT, CAR, OR PACKAGE AND UNLOCK UP TO 43% OFF SELECTED HOTELS!

So, if you already have a trip planned, and want to access a SUPER GREAT price on a hotel, this is a great opportunity! 

I checked on car rental prices around Missoula, which also unlocked deals on hotels! There were some awesome cars available, and all of the hotels in the screenshot below (with a yellow stripe above their name) offer additional discounts to those who use Expedia Add-On Advantage! I just love saving on travel, so I can use that part of the travel budget for something more fun. Like a rafting trip, which you will see below. We had SO much fun!!

Below, we spent one particularly fun Sunday on the water with a river guide. As a team, we worked together to get the inflatable raft through rapids. We had no clue how much fun we would have, since we generally never plan trips with any sort of guide or service - we love just driving and exploring places that way.

See the car rental deals I found, below, plus more suggestions of awesome places in and around Missoula to visit. 

If you ever have the chance to visit downtown Missoula, you will love it! I would even suggest 2-3 days to fully experience a couple of days of shopping plus being able to eat and drink at the MANY bars and restaurants is so much fun. The city is walking friendly but a little spread out, and luckily parking is super easy here in the summer, so feel free to use that rental car to get around town.

We have been so fortunate to visit Ennis, MT several times in the past couple of years. We love the gorgeous mountain vistas in the Madison Valley and I absolutely love how free you feel when you're in such a beautiful place. It's a very small town, but the Madison River runs right through town, as well as being one way people get to Yellowstone, the town's rather small population gets over a million visitors. It's very popular to fly fish in this area, and we love finding a place to let the dogs swim too. 

When you're in Ennis, you must check out the Gravel Bar (aka G Bar - see beers in the image below), which has lots of local MT beers and spirits, and their food is really pretty good. They are also opening a brewery next year, which should be really neat. Across the street from G Bar is Willie's Distillery. Deemo's Meats is a place to stop and grab groceries (they specialize in amazing meats and cheeses), and make sure to grab some of their frozen brats near the register - the green onion ones are AMAZING)! Perfect for roasting over a campfire too. 

Below, I thought this was so funny. Your typical Monday, with a Side By Side just leisurely driving through town! Some of our other favorite places to visit in Ennis include Plain Jane's (clothing, shoes, and the best Montana gifts ever), Nacho Mama, and Shedhorn, which sells outdoor gear, really nice quality women's shoes and clothing and also hunting and camping gear.

A historic gold mining town situated high above the Madison Valley. This is always a fun place to stop and shop or stroll through the wooden boardwalks that used to be hustling and bustling. 

Sure, since Big Sky, Montana sits at around 7200 feet in elevation, it's a great place to ski, snowboard, and snow mobile But, it's an amazingly vibrant and fun place to be in the summer as well. We spent several different days in Big Sky, and saw local music at their free Thursday Night Concert Series, drank a few local Montana beers at their bars, and visited the Big Sky Farmer's Market. The shopping in this area is really wonderful, if you like that sort of thing! There are also amazing restaurants in almost every style of food, so you can please everyone with something delicious!

These Thursday Night concerts are packed - especially this one weekend when the rodeo was also in town. If the line for the beer vendor is too long for your liking, just run into the Hungry Moose grocery store and grab something to drink - you can have open containers in the unincorporated town of Big Sky during these events. Grizzly Outfitters also has the most impressive selection of the latest women's clothing from the best outdoors brands. Yay! During the summer, people also love to mountain bike here, as well as fish the surrounding rivers. The Gallatin River runs through and all around town and is surrounded by huge pine trees.

The Big Sy Farmer's Market was really impressive. While around 90% of the vendors had art, I felt that the quality of most everything was nearly art gallery quality jewelry and decor, made with antlers, beads, and other local materials. This flower vendor was also incredible - I wanted to bring home a huge, rainbow colored array of Montana grown flowers, but that was a bit unrealistic :) There was live music which was also super great, and then you could walk to grab some food in a nearby restaurant or food vendor after walking around. This Montana Alpaca at the Farmer's Market was rather cute too! 

Montana Flathead Cherries are in season during the summer, so grab up as many of these as you can if you are in Montana! They're SO sweet and delicious and I would love to bake a cherry pie from them. Huckleberries are also in season, but way, way harder to find than these cherries.

Hebgen Lake was formed in 1959 when an earthquake occurred, causing part of the mountainside to fall into the water, creating a rather amazing lake that is unlike any other place we have ever been. Our friend has a boat slipped on this lake, so we drove out and spent time over several different days in the sunshine! The water is absolutely gorgeous and great for tubing and water skiing too.

This lake is situated along the drive from Ennis to Big Sky. You can also drive through Bozeman instead, but this drive avoids the traffic altogether and it absolutely stunning! You even drive partially through the western part of Yellowstone. making this one of the most scenic cruises you can do in this part of southwestern Montana.

There are so many rivers in Montana, and we loved fishing various places to pull over and get in the water. Below, the Ruby River.

We loved driving around Montana this summer, and if you want any more travel advice, please leave questions or comments in the section below!

I hope you enjoyed this recap of our recent vacation to Montana! Have you ever been to any of these towns pr places in Montana? Comment below to let me know!

I was selected for this opportunity as a member of CLEVER and the content and opinions expressed here are all my own.

Two Amazing Recipes for Summer Get-Togethers with Mission® Tortillas

This is a sponsored post written by me on behalf of Mission®. All opinions are entirely my own.

If summer get-togethers make you giddy with joy and excitement, then you’re not alone! I too love brainstorming recipes with friends, then planning, prepping, and preparing the food, then finally getting everyone together to enjoy the bounty. Food always brings people together, and is great shared with old friends and new ones! This summer, I am going to make it my mission to enjoy the company of others over great food as much as possible!

I love how these Mission® Super Soft Flour Tortillas really made my two recipes even better than I could have ever imagined. I have tried all sorts of tortillas, and these are the softest, tastiest ones yet. They were so versatile, and absolutely perfect for my Vegetarian Southwest-Inspired Pinwheels AND for my Grilled Steak Tacos. I always feel like the tortillas make or break a recipe, and I was so happy to find a new favorite. You can use the store locator on the Mission website to find Mission tortillas at stores near you, and find even more delicious recipes as well.

I’m not sure if you’ve ever experienced this, but I am always let down when tortillas kind of get dried out super quickly, then kind of crack when you roll anything out of them (like the pinwheels). Well, these were perfect. They held together super well, and worked amazingly well for this 4 ingredient appetizer!

And, since I wanted to offer lots of delicious toppings for these Grilled Steak Tacos, my first thought was fresh ingredients of course!

I thought it would be so fun to offer guests some handmade pickled jalapeños as party favors. Every time we serve these to guests or bring them to someone’s house, we always get lots of compliments on them.

PICKLED JALAPENOS

(Making 1 day in advance is recommended)

I think it’s time to start sharing them with people, so I filled mini jars with a mixture of fresh ingredients like jalapeño slices, garlic cloves, and mini red onions. Now, it’s time to pickle!

I heated a solution of 1.5 cups white vinegar plus 1 cup water, and 1-2 tbsp salt until the salt has dissolved. Let it cool a bit, then carefully pour the vinegar solution over the ingredients, leaving a little bit of room at the top of the jar so it does not spill out. Place lids back on, and gift as soon as the next day.  

These turned out SO cute, and you could even tie cute ribbons around the jars for an even more festive look.

In addition to the pickled jalapeños, I offered pickled red onions (get my recipe here), plus a guacamole tomatillo sauce and a traditional red salsa too.

The lettuce even came right out of my own garden! This was my first year to try growing lettuce, and while it may be almost at the end of its season, I love treating friends to things I grew!

GRILLED STEAK TACOS

INGREDIENTS:

1/3 cup olive oil

2-3 tbsp soy sauce

2-3 tbsp or more taco seasoning

Juice from 1 lime

1 tsp salt

1-2 lbs flank steak or similar

INSTRUCTIONS:

Simply marinate each pound of steak in 1/3 cup olive oil, 2-3 tbsp soy sauce, 2-3 tbsp or more taco seasoning + the juice from 1 lime + 1 tsp salt for at least 1-2 hours or overnight. Simply grill for 3 or so minutes per side if your steak is thin like mine was. Slice and serve with fresh sides and warmed Mission Super Soft Flour Tortillas (they taste best warmed).

Slice up the steak and set out the toppings, the tacos are ready to eat!!!

SOUTHWEST INSPIRED VEGETARIAN PINWHEELS

I searched for vegetarian pinwheel recipes and hardly found anything! These are so great tasting, and you will never miss the meat.

Ingredients:

1 package Mission® Super Soft Flour Tortillas

Plus 1-2 bunches of cilantro

1 head of green lettuce

To create the sauce:

1 (8 oz.) box of cream cheese, softened

½ cup (or more) taco sauce or red enchilada sauce

½ - 1 cup cream cheese

¼ - ½ tsp salt, optional

INSTRUCTIONS:

1.    Mix all sauce ingredients together, and stir until smooth. I used a hand mixer

2.    Lay one tortilla out onto your work surface, and spread 1.5 -2 tbsp sauce in an even layer on tortilla.

3.    Add a line of cilantro and a line of small pieces of lettuce towards one side of the tortilla, then roll up into an even roll.

4.    Cut in 2” sections, and display on a cute tray. I used cactus pieces from a local market.

Enjoy!


The bottom line - I would definitely recommend Mission Super Soft Flour Tortillas to anyone who loves superior taste and excellent ingredients!

Happy summer, friends!

Brunch Party - Vegan Avocado and Egg Toast Board

Brunching ain't always easy, but I found a way to make it so :) Try setting up a toast board, where everyone can choose their own toppings! It's such a fun and interactive way to have guests gather around a giant array of great food and drinks! 

If you're a fan of hard boiled eggs, then here is one way to enjoy these protein packed, brunch-worthy hard boiled eggs from Great Day Farms, available at Walmart!

To make this amazing spread, you head to the produce section and grab as many colorful fresh ingredients as you possibly can. Make sure you do stick to a budget, as fresh veggies can sometimes items can weigh a bit more than expected and then ring the bill up quite a bit. I found these amazing heirloom tomatoes for around $2.99 per pound - which made them incredibly reasonable. 

Embrace anything that is in season (via the farmer's market or local grocer), like jalapeños, basil, avocados, red onions, and other delicious vegetarian ingredients. 

This is a great idea for hosting friends who are in town for the weekend, and all have different tastes - this toast board embraces just about everyone!

Also, you could prep these ingredients for lunch at work, or even for a summer picnic. These ingredients are 100% natural, and actually offer energy and so much inspiration for the day ahead. 

By offering fresh, wholesome ingredients to those you love, you can truly help nourish them with a seriously fulfilling meal. Feel free to add sliced turkey or even lox to add a really elegant vibe to this rather upscale meal.

Back To School With Walgreens ~ Trail Mix Cookie Recipe

I was asked by Carusele to participate in the #SimplyNice campaign, sponsored by Walgreens. Although I have been compensated, all opinions are my own.

It’s suddenly that time of year again - the end of Summer and the beginning of Fall. Even though it’s the busiest time of year for some, Walgreens provides a lot of excellent snacking and baking options in their line of Nice!®

products, perfect for busy days and nights. I was actually able to use in a cookie recipe – perfect for packing in school lunches and also great for the office!

Also, please join us for a #SimplyNice Twitter party, where you can win prizes for answering questions on August 1!!!

Stocking up on snacks and ingredients is so easy and convenient during one quick stop into any Walgreens store! Keep reading to get the recipe for these irresistible Trail Mix Cookies and to learn more about the fine selection of snacks at Walgreens. They have TONS of options, to suit everyone’s taste and preference.

GIVING BACK:

Nice! is donating a portion of their sales to Me To We Foundation during the month of August on purchases made on select items. Every purchase gives school supplies to children in Kenya*. You can track your impact by entering code 658482 at: www.walgreens.com/metowe.

*Thru 8/23/18, for every specifically marked bag purchased, $.06 will be donated to the ME to WE Foundation, up to $175,000. For more info, visit www.we.org, purchases are not tax deductible, and this is not valid in Puerto Rico or the US Virgin Islands.

 TRAIL MIX COOKIES

Makes 25-30 Cookies

I am all about making life easier, and more delicious, so I wanted to share this scrumptious Trail Mix Cookie Recipe, which utilize the Hikers Trail Mix from Walgreens Nice! These make a great dessert or snack, and will be one of the most delicious lunchbox items around!

If you’re a fan of pepitas, sunflower seeds, and mixed nuts like cashews and peanuts, then you’ll LOVE these cookies. They also have a hint of cinnamon, lots of oats as well as a few other tasty ingredients. I am so excited to share this recipe with you! I hope you enjoy.

INGREDIENTS:

1 - 1 ½  C. Walgreens Nice! Hikers Trail Mix or Magic Trail Mix

½ C. softened butter

½ C. brown sugar – light and fluffy

¼ C. Honey

¼ C. Peanut Butter

1 tsp. vanilla

1 egg

¾ - 1 C. rolled oats

¾ C. whole wheat flour

½ tsp. baking powder

¼ tsp salt

½ tsp. cinnamon

INSTRUCTIONS:

1. Prep ingredients. Cream butter and sugar together until well combined (1-2 minutes). Add egg and mix until well combined.

2. Add all dry ingredients except for Walgreens Nice Hikers Trail Mix and oats and mix until fully incorporated.

3. Slowly add Hikers Trail Mix and Oats until you reach a nice, chunky dough consistency.

4. Freeze dough in mixing bowl for 5-10, then roll small 1½“ balls, and bake 6 dough balls per tray, lined with parchment paper for 10-15 minutes. Feel free to rotate baking pans half way through baking if desired.

Note – Dough balls MUST be frozen before baking for best results. I would also suggest baking no more than 6 cookies per baking sheet because they do spread out a bit. These cookies taste amazing!!!

Nice! believes in celebrating the good in every day, every food, offering a range of healthier products that nourish the body, and delicious treats that elevate the spirit!

I love this mindset because I love creating recipes that also inspire my readers and fans every day.    

These cookies are absolutely perfect for making ahead of time, then packing for lunch at school or the office! These cookies are also unique and so delicious for the office, for bake sales, for parties, and a batch of these cookies makes an amazing gift too!

I love the fact that the various trail mixes from Walgreens are all so different from one another, yet all taste so scrumptious! My other favorite mixes include the Fruit & Nut Trail Mix, which contains dried pineapple and mango, as well as dried bananas, cashews, and more. Additionally, the Magic Trail /mix, which has been a solid choice for me for the past year or so, appeals to my sweet tooth because it more of traditional mix with M&M’s, dark chocolate chips, peanut butter drops, peanuts, and raisins – YUM!

In addition to packing these cookies for an easy meal, and I’d love to suggest a few of the brand’s lunch-sized snacks, all available at Walgreens. I am already a huge fan of the Organic Cheddar Puffs, their Organic Teriyaki Beef Jerky, Fruit Medley Trail Mix, and more. A large variety of their products are organic, which I absolutely love. It’s hard to find a line of such delicious organic foods.

I am constantly so impressed with each snack I taste from Walgreens Nice. I have had several of their snacks before, but I also recently learned about these delicious individual-serving sized snack packs.

I am actually fortunate enough to be able to say that I have such great memories about my school lunches. As funny as that sounds, both my Dad and my Mom would pack me school lunches up until I was beginning high school. When there were homemade cookies in my lunch box or lunch bag, no one would ever be able to trade me for anything, LOL! I have always loved homemade cookies.

What do you pack for your children’s school lunches or for your own lunch at work? Alternately, what did your parents pack for your school lunches?

Wishing everyone a happy and prosperous Fall!

Connect with Walgreens Nice on Pinterest, Facebook, Instagram, and Twitter!

Elegant Yet Easy Dinner Ideas with New Tyson Dinner Kits

This post is sponsored by Tyson Foods, Inc. All comments and opinions are my own.

One of my very favorite things in life is having dinner with friends. It’s an amazing excuse to get together a few times a week and it also ensures that we all have at least a few good meals each week. We are all so busy that sometimes we need to treat ourselves!

If my friends are hosting, I love bringing dinner over. I often stop by the store on the way to their house and Target is right on the way, so I grab everything we need, then head to their house for a relaxing and delicious night!

Weeknight meals can be both easy and delicious with Tyson® Dinner and Entrée Kits from Target. The flavors are all so delicious. Keep reading to see how we incorporated these meal kits into a night with friends.

I found that two of the Tyson Dinner and Entrée Kits, plus a few snacks to munch on while we cook, completely filled all four of us! I always grab fresh fruits and veggies as snacks, since we really make cooking the meal a major part of our night. Tyson Dinner and Entrée Kits are made with proteins and vegetables that are prepped and portioned, then frozen at the peak of freshness

At Target, I chose the Tyson Dinner Kit - Lemon Parmesan Chicken, which I found in the freezer aisle near all the other Tyson chicken products. I also included a nice loaf of sourdough bread, and a large variety of veggies and fruits like grapes, apricots, and a few other items that were in season. Whatever we didn’t finish, we left for our friends to enjoy for lunches throughout the week.

Curious about the difference between the Dinner Kits and the Entrée Kits? The Dinner Kits include a vegetable for a complete meal, while the Entrée Kits include a protein, sauce and topping and is intended to be paired with a side dish to make a complete meal! These meals are so versatile and so delicious!

For the price of these meals, you get way more food than you would in a restaurant, which is awesome. And, compared to ordering takeout or pizza at our friend’s house, our bellies were much more full and satisfied, and we bonded over the prep and cooking experiences! We even got to eat outside, which made the night feel like we were dining in a five star restaurant.

These process of making these meals was super easy and WOW, they were delicious - seriously, the meals got rave reviews from everyone.

COMPARED TO MEAL ORDER KITS:

While they did remind me of the mail order meal kit services (since they contain all pre-portioned ingredients), I found them MUCH easier to prepare. For instance, the chicken is already seasoned and cut to size, plus, the veggies were already chopped as well. The meal kits would have shipped me a whole head of broccoli that I had to chop myself.

Overall, I was extremely happy with these Tyson Dinner Kits! They are going to be a staple in my home, as I am sure they will in yours! Check out the other Dinner and Entrée Kit varieties available in the freezer aisle at Target:

Dinner Kit - Crispy Chicken Pomodoro

Dinner Kit - Lemon Parmesan Chicken

Dinner Kit - Seasoned Steak Fillet & Mushrooms

Entrée Kit - Crispy Adobo Chicken

Entrée Kit - Roasted Ginger Chicken

Entrée Kit - Citrus Roasted Chicken

WHAT WE BROUGHT TO DINNER:

We brought everything over in a vintage picnic basket, and then added a couple of cute towels below all of the food to create a safe surface to cushion the food. Like a gift basket, I created a beautiful array of colors and fresh items that really makes for a gorgeous presentation.

1 Tyson Dinner Kit - Lemon Parmesan Chicken

½ lb. red grapes

½ lb. green grapes

1 package of Crackers (plus optional cheese for crackers)

1 package of Cookies in any flavor

2 bottles sparkling water (this could also be wine)

Lettuce for salad

Other seasonal fruits and veggies that added color and texture to the basket.

Be sure to grab this Target Cartwheel digital offer for $2 off any ONE Tyson® Dinner or Entrée Kit from 8/1/18-8/30/18.

Have you tried these new Tyson Dinner and Entrée Kits yet? They’re new, so if your local Target doesn’t have them yet, you won’t have to wait long to try them!

Have a wonderful summer!!

Pin It For Later:

FREE Summer Fun + A Cute DIY Gift Idea!

This post is sponsored by Zynga, but the content and opinions expressed here are my own.

Looking for fun and entertaining ways to enjoy the summer? Well I have teamed up with Zynga Words With Friends 2 to help share some fun and easy ways to have fun for FREE. Hey, we can all use a break, right?!

With this fun gift idea + a brand-new version of the Words With Friends app will help entertain everyone this summer. Help create more winning experiences this year, enjoy the thrill of the game.

Learn more about Words with Friends 2 here.

Download the game here (Apple store) or here (Google Play). Brush up on rules here!

You may be familiar with their first WWF game, but this one is a bit more updated and runs SUPER fast on my phone.

I love how you actually stretch your brain capacity and also learn new words. It’s fun for the whole entire family, and even fun with groups of friends too. I feel smarter during and after playing Words With Friends – I always pull out new words in conversations later that day! The game helps me connect with friends (new and old)!

I have met all sorts of new friends through the WWF app! There are always tons of players ready to start or complete a game with us, every time we login. We play ALL the time, and since we are always on the go, it’s something familiar in each place too.

With all of the Double Letter (DL), Triple Letter (TL), Double Word (DW), and Triple Word (TW) spots on the board, you can really gain a lot of points in just a turn or two.

Some of our highest scoring words are: CLOTS, TAXED, and HANDLED!!

DIY SUMMER GIFT IDEA

I know that rock painting has been around for decades, but I thought that a fun way to commemorate our friendship and share the beauty of the river would be to paint our friends’ names on rocks, then spell out their names in a gift. I had so much fun, and the best part of this crafty activity, is that you may already have everything you need – deeming this a FREE project!

MATERIALS:

Smooth River Rocks

Acrylic Craft Paint in White, Coral, Mint, and Raspberry

2-3 Small Craft Paintbrushes

Paper To Cover Work Surface

INSTRUCTIONS:

1.) Head to your local river to collect rocks, find them at a craft or hardware store, or find them anywhere else you like!

2.) Wipe off excess dirt from rocks with damp washcloth.

3.) Paint thick, white letters onto each rock. I used two coats of white paint for each letter. Below, you will see some rocks with two coats of white paint and some rocks in-process with only one coat of white paint.

4.) Paint colorful designs on top of white paint, on each rock.

5.) Give rocks as gift and let recipient spell out their names or secret message once they receive your gift! That’s it, and this project was so fun and easy. What a thoughtful gift.

THE FINISHED PRODUCT:

Luckily, The Words With Friends app is free as well, and while I was painting the rocks, my boyfriend Bobby entertained himself with the Words With Friends app on my new phone.

A SENSE OF CONNECTION:

With the weather being so warm and beautiful right now, it was a lot of fun to gather rocks for this project, then gift such a special and thoughtful memento to my friends. I feel like we are even more connected, just like how we will be able to play WWF from afar and know that we are still connecting and interacting.

Do you play Words With Friends yet? If so, what are some of your best words? Do you play with old friends or new ones?

Have a wonderful rest of the summer! Tag me on Instagram with @happysolez if you make this project, and tag the brand, @wordswithfriends on Instagram and as @wordswfriends on Facebook to show them how you spend time playing!!

Dr Pepper Pick Your Pepper Summer ~ Indoor Picnic Ideas

While summer is all about enjoying the outdoors, here in southern Illinois / most of the Midwest, the heat and humidity sometimes keep us indoors. I am not incredibly sensitive to the heat, but if you’re having guests over, not everyone is going to enjoy it or even be able to tolerate temps in the 90s, so you could always consider hosting an indoor picnic!

The theme/inspiration for this picnic was a bountiful French picnic that features ice cold Dr Pepper Pick Your Pepper theme bottles (a personal fave), and lots of delicious snacks. Nothing super heavy as far as food, just smaller bites that you and your guests can feast on throughout the evening.

Keep reading to learn more about how you can win fun and festive prizes for Summer.

Each 20 oz. Dr Pepper bottle features over 40 artistic and inspiring labels that contain a Snapchat code on them. To unlock this fun filter, simply open Snapchat, take a photo of the Snapchat logo / code on the side of the bottle, then a little notification will appear, giving you access to the filter. Below, two of my favorite Snapchat filters were outdoors themed.

YOU CAN WIN!

Callout that the fun, unique Pick Your Pepper packaging and how it’s fun, individualized, and designed by millennials, for millennials. Available in stores starting 6/15/18.

Call out the prize reward and drive to  http://bit.ly/2pts8Qo

When you buy Dr Pepper 6/15-8/15 this summer, you can upload your reciept at http://bit.ly/2pts8Qo  to get the prize featured in my blog here and/or other prizes like:

Spend $5 get 5 bottles = Dr Pepper Retro Specs

Spend $10 get 10 bottles = Dr Pepper Copper Lined Mug

Spend $20 get 20 bottles = Dr Pepper Bluetooth Speakers

Spend $30 get 30 bottles = Dr Pepper Pool Float

CHECK OUT THE RETRO SPECS, BELOW…

Scan the Snapchat code on any Dr Pepper Pick Your Pepper to reveal a unique filter you can use! I then save the image and share it wherever you want! Below, two of my favorites!

My boyfriend Bobby and I love being outdoors, so these filters are super cute. He adores fishing, so the Snapchat filter, shown above that says, “Keepin’ It Reel” is perfect for him!

While this particular picnic I hosted for this post was indoors, I loved bringing traditional outdoor picnic elements into the evening with galvanized metal trays to hold food, easy to eat bites of a huge assortment of foods, and even cozy floor pillows, rugs and lightweight picnic blankets. I still love incorporating rustic elements into my events no matter where I host!

There are so many benefits to hosting this picnic indoors - Think of it, no bugs, no heat, and all the food and drinks one can possibly snack on throughout the evening without having to leave the elevated comforts of home. It’s such a fun way to enjoy time with friends or have a date night!

TO SET A COZY SCENE:

I love the idea of reminiscing about days past, where we would put pillows and blankets onto the floor and have a sleepover. Now that I’m older, we don’t really do that anymore, so it’s fun and nostalgic to reminisce and more or less make a soft place on the floor to settle in for the evening! It could be super fun to set this up in the living room, where everything is centrally located. Or, even on a porch!

I also added upscale touches like French-inspired textiles in stripes and plaids of white and blue. I packed some of the 20 oz. bottles of Dr Pepper into a metal “picnic basket”, which was a great way to carry the bottles plus lots of other necessities.

FOR THE FOOD:

I am always drawn to bountiful plates of fruits and other bite sized foods, so this was the perfect opportunity to try my hand at not one but three snack trays!

For one platter, I used a large, round galvanized tray with handles to hold everything. I then placed a white charger plate in there, plus a marble cutting board to hold the meats and cheeses (this was the least messy way to display them), then placed items like croissants, red and green grapes, strawberries, and more.

For another tray, I placed mini chocolate chips, blueberries, and blackberries. For the last tray, I placed a bit of herbed goat cheese dip, sliced baguettes, and crackers to dip into the goat cheese.

I was so happy with how upscale everything looked!

TO SERVE YOUR GUESTS:

I used lightweight linens, gold plates, and gold plastic utensils (that almost looked real!!), which added a bit of shimmer and glitz to the picnic. The gold and white looked really lovely.

It would definitely be fun to host a similar picnic outdoors if you live somewhere the weather is nice all the time! I love this particular color scheme, and I know those party platters would really look great at so many of your summer events.

Connect with Dr Pepper across social media!

Facebook / Twitter / Pinterest /Instagram

PIN IT FOR LATER...

Camping With Dogs – Tips and Tricks with #WalgreensPetshoppe

I was asked by Carusele to participate in the #WalgreensPetshoppe campaign, sponsored by Walgreens. Although I have been compensated, all opinions are my own.

I was asked by Carusele to participate in the #WalgreensPethoppe campaign, sponsored by Walgreens. All content and opinions are my own.

We recently had the opportunity to take the dogs on a fun camping trip in Montana. There were almost more dogs than people, but that’s how the majority of our gatherings wind up anyway! Here are a few tips to help you through your next camping experience with dogs. We stocked up on TONS and TONS of amazing Petshoppe items from Walgreens before heading out, and since we had a pack of dogs, they all behaved very well because of the Petshoppe treats from Walgreens. What a fun addition to an already amazing weekend.

We have been taking our pups hiking and camping for over ten years now, and we always learn something new each time. It’s such a fun learning experience, and moreover, camping trips are the absolute best way to help our pets get lots of fresh air, exercise, and even social time with other dogs. The campground becomes such a fun experience for everyone. We could hardly imagine a camping trip without our dogs around. Below, our pupper friends Craig and De De came for a visit as well!!! Porter LOVES playing with these two brothers.

TOP CAMPING TIPS FOR PET OWNERS:

1. If there is no water spigot in the campground, or fresh water available, please make sure to pack 2-3 extra gallons of water for your pets per day. They drink a ton of water every time we are camping, especially if it’s super hot out, or if we are in an arid place like the mountains or desert.

2. Bring food and water dishes. Each dog needs their own food dish, and they generally all share their water bowl.

3. We love using our electronic collars to keep our dogs close by. While most camp grounds are going to require dogs on leashes, these e-collars add a bit of extra protection to make sure your dogs are listening to you and behaving around the campground.

4. Stock up on treats because the dogs will need a bit of extra incentive to listen J They also burn so many extra calories while camping, hiking, and swimming, that we always treat them to a few extra treats while camping.

5. Bring soft, supportive, and warm bedding for night time. We bring an air pad for the dogs to use in the tent at night, and we also either cover them with our coats, or bring extra blankets for them. Cabbie loves cuddling in, and Porter loves the chilly air and would never want to be under the covers.

6. Watch your dog(s) around the fire pit. Sometimes dogs will try to play around the fire, or play with extra fire wood, just keep an eye on them!

7. Make sure to keep an eye on your dog(s) at ALL times! They could wander off and disturb wildlife or eat something they find in the woods that could upset their tummies.

Some of our favorite treats from Walgreen’s Petshoppe collections include the Chicken Bites with Pumpkin and Cranberry, Sweet Potatoes with Cranberries, and Chicken Bites with Pumpkin and Cranberry – all of which contain NO corn, wheat, or soy! The dogs all shared very well – we definitely had more than enough to go around.

WALGREENS PETSHOPPE IN-STORE PROMOTIONS

2 for $10 mix and match Petshoppe toys and bones every day

Week of 8/5/18 – BOGO 50% off on Petshoppe Pet Treats

Week of 8/19/18 – Petshoppe Pet Treats and Petshoppe 50 count puppy pads on sale for $7.99!

Porter was extremely interested in every flavor variety, and the Chicken Strips were definitely a crowd favorite :)

Porter had a blast – she stayed up all night looking around the tent, listening for animals and noises that peaked her interest.

Select varieties of Petshoppe treats are Made in the USA – Look for the label on the front of the packaging! They take the utmost care in delivering high quality pet treat, which have no corn, wheat, or soy – perfect for almost every dog!

Their toys have held up super well! Above, the Plush Turtle which comes in two colors. Below, the two Boston Terriers were playing with this Squeaker Pig ALL morning together, it was adorable!

Above, you will see a few more varieties of their treats. We are definitely stocked up for a while. Walgreens Petshoppe offers quality products for your best friends!!

Connect With Walgreens On Social:

Facebook / Pinterest / Instagram / Twitter

Use hashtag #WalgreensPetshoppe to show us how you and your pets enjoy these products too.

IF YOU LOVED THIS POST, PIN IT FOR LATER...

Antipasta Flatbread / Breadsticks with Nudo Olive Oil

Did you know that you can actually adopt an olive tree? I am so honored to share such an intriguing company with you, especially because my grandfather raised me to love Italian food and Italian culture! Today, I am excited to share this very easy yet very delicious recipe with you for this Antipasta flatbread. It only took a few minutes to create and a few minutes to bake, and I wound up with a quick meal that tastes better than something from a restaurant! 

Adopt an olive tree from a traditional Italian grove, and receive some fo the best Italian Cold Pressed Olive Oil, straight from your own little piece of Italy!

Nudo is a collaboration of provincial Italian groves which use traditional, sustainable practices. They produce some of the best olive oil in Italy: premium, authentic, and on a small scale. Our adoption program supports these groves and farmers by connecting them with food lovers around the world, and by providing this economic security it helps protect the land from the increasing intensive farming practices.

The base flavor for this recipe is definitely the high quality Nudo olive oil. The flavor was mild but wow so smooth and delicious.

ANTIPASTA FLATBREAD / BREADSTICKS RECIPE:

Ingredients:

2 Tbsp Nudo Olive Oil

1 Package of Garlic Naan Flatbread

1/2-1 lb. Antipasta from salad bar at grocery store or elsewhere (I chose artichoke hearts, an assortment of different olives, and pepperoni)

1/4-1/2 C. Shredded Parmesan Cheese

Salt, Italian Seasoning

Instructions:

1. Brush Naan flatbread with a generous amount of Nudo Olive Oil.

2. Slice olives into thin slices, and cut artichoke hearts into small pieces. Also chop or prep any other toppings. Arrange toppings onto flatbread.

3. Sprinkle with salt, parmesan cheese, and optional Italian seasoning, and bake for 5-8 minutes at 350 degrees F.

4. Cut into slices and enjoy!

FOR THE HOLIDAYS...

For Thanksgiving, Nudo Adopt has created a selection of thoughtful giftsets to thank the food loving host in your life. Choose from a choice of three gitfsets; Aperitivo set, Olio set & A Tavola set.

Aperitivo set with handcrafted olive ramekin and Taggiasche olives from the glamourous Ligurian coast.

Olio set with a handmade, stoneware cruet paired with premium artisan Extra Virgin Olive Oil from Le Marche; one of the oldest regions in Italy to produce olives

Can’t choose? Pair up both, A Tavola set, for an extra special Thanksgiving treat.

For Christmas, Nudo Adopt have collaborated with Yorkshire based artist Michelle Freemantle , to create limited edition, handmade oil cruets especially for the festive season.

Exclusive gift with our Olive Tree Gift Adoptions; a beautiful and long-lasting gift.

Michelle’s visionary ceramic bottles take inspiration from her environment; the colours for the cruet are a reflection of Nudo’s brand & Italy; yellow sunshine, green countryside and blue midnight sea.

A wonderful sentiment that lasts longer, looks after the environment, supports provincial farmers and is good for you.

Side by Side – A Great Dog Food for Picky Eaters!

This post was sponsored by Side By Side as part of a Two-Post Influencer Activation for Influence Central and all opinions expressed in my post are my own.

This summer has been absolutely wonderful so far! It’s hotter than ever outside, but that’s not stopping us from getting out as much as possible with the dogs and letting them enjoy summer too!

We began feeding the dogs a new diet recently and they are LOVING it! If you saw my previous post, here, we were just beginning to introduce our dogs to the new food. Side by Side believes that the best way to cherish our pets is through making better food choices for them. Whole food nutrition is a great option! Side by Side only uses whole food, with minimal processing, allowing the nutrients to actually be preserved within the food better, delivering it to your pets so they stay full and happy. A pet’s diet is as important as a human’s diet, so consider making the switch to something like a whole food diet, raw or lightly cooked, frozen or freeze-dried diet.

The dehydrated Side By Side treats, such as their Duck L’Orange, Beef Lungs, and Chicken Hearts are some of the nicest treats we have ever seen. They’re not at all greasy or stinky, like lots of other treats. We aim to give our dogs treats with minimal ingredients, so one ingredient treats are spectacular! The dogs behave SO well for these treats – they’re such good girls!!

Our dogs mean everything to us, so we love being able to treat them to something they really deserve. Since we both work from home, we are able to spend most of our days with Cabbie and Porter. We invest so much time and money into our beautiful babes, and we want the very best for them, which I am sure they notice.

Our Chocolate Labradoodle, Porter, who turns 2 years old on July 5, is a rather picky eater. She has been devouring the Side by Side dog food and then actually sitting by her bowl waiting for her next portion. While we try not to super encourage this behavior, it does mean she loves the food.

With our previous dog food, which was a higher end kibble, we would generally feed the dogs 1.5 cups each, twice a day. Porter, the doodle would leave lots of food in her bowl all day. I am not sure if it was just that she didn’t really love the flavor, or if it’s because we were just giving her the wrong thing.

We still treat the dogs to a bit of low fat yogurt, plus other fruits and veggies throughout the day, but we are SO happy with the food and treats from Side By Side. Just look at the girls’ smiles to see what I mean :)

The dogs actually received the food in the mail, and it was all still frozen. The company uses a recycled material to insulate the products, and they arrived in great shape too.

Now that they received this, they think every single package is for them. Porter nearly knocks boxes out of our hands when they arrive, so she can see if there is more Side by Side inside!

Yes, the dogs have their very own ottoman by the window, if you were wondering :)

We noticed a few improvements in the dogs. Cabbie, the lab seemed to slim down around her mid section, and her coat has been extra shiny. Cabbie seems a bit more energetic, and since we feed them three times a day now, because of the Side By Side portion cups, the dogs love having another fun and “exciting” activity each day (lunch time, LOL!).

The dogs always have a few red bumps on their bellies, and when I chatted with one of the founders of Side By Side, she actually mentioned that they would clear up, and they pretty much completely went away. Marney explained that sometimes the red bumps can be related to food and environmental allergies. Well, perhaps the food made a bigger impact than I could’ve imagined! I believe the food did help clear up their bellies, which is so great.

Side by Side products were developed from the pet’s perspective and puts pets first to give them the best life. This allows us so many more years of opportunities to better share love with our pets.

For part of this post, we visited a local fishing pond that is about a 1-mile hike each way from where we park. We walk through cow pastures, rolling hills, tall beautiful grasses and there are even a few places to stop and fish along the way. We love bringing the dogs out to explore the area, and a couple of our friends even brought their pups too.

When Porter gets to see her little friend, Wilma, shown below, they play until they practically “fall over” from how much fun they’ve had. It’s such a great way for higher energy dogs to get their crazies out, and I love watching them have so much fun together.

We are SO thankful to have had this opportunity to introduce our wonderful pups to a raw dog food diet thanks to Side by Side! We have a new way to show our dogs we love and appreciate them, with whole food nutrition, and we cannot wait to see how the dogs keep improving in every way! 

Look for all of Side by Side’s integrated products including Food Diets, Supplements, Toppers, and soon to be released Broths. Each and every product is thoughtfully formulated to provide a complete and balanced nutrition plan for your pet!

ADDITIONAL RESOURCES

Side By Site Website: https://shop.sidebysidepet.com

Side By Side Facebook Page: https://www.facebook.com/sidebysidepet/

Side By Side Twitter Page: https://twitter.com/SidebySidePet

Side By Side Instagram Page: https://www.instagram.com/sidebysidepet/